Showing posts with label tea. Show all posts

Saturday, February 17, 2018

How to Make Your Own Coffee Bar

How To Make a Coffee Bar of Your Very Own

How to Make Your Own Coffee Bar
Coffee. We all need it. But those bulky brewers take up so much counter space! Not to mention all the accessories: cups, coffee, sugar, creamer, munchables... and don't get me started on tea, coffee's weaker-yet-just-as-necessary cousin. So, how do you get that junk off your counter and still have a cute, delicious place to store it all? A coffee bar, of course! They are all the rage these days, and why not? If you're not into coffee, try a tea station, snack station or cocoa bar! It's all good!
Here's a peek at my coffee station and some ideas for building one of your own.

My coffee station was born out of necessity. Our kitchen is teensy weensy and counter space is like prime seaside real estate. It doesn't come cheap. There was no way our coffee pot was going to fit on the counter with things like a microwave and dish drainer fighting for space. The solution was to make a coffee bar.

How To Make a Coffee Bar of Your Very Own

Start With Furniture That Fits Your Space
First, you'll need a space for your coffee bar. Some place with an outlet and a nearby water source. Mine is in an odd little nook just off our kitchen, probably meant as a small dining area. I already had the table (a Craigslist find). And I even had the bonus drop-leaf table from a thrift store. Your needs may be different. Either way, any piece of used furniture will probably do the trick. Think antique dressers, vanities, desks. Start with a substantial piece of furniture and build your bar around it!


Next? Accessorize!
What kinds of things would make your coffee bar work better? I use a wooden crate as a kind of shelf. Inside is a space for coffee storage, including a penny candy jar. Above is a three-tiered tray for holding k-kups,  jars for tea with cute little chalk labels, and Hubby's favorite sweet sesame snacks. But you could just as easily add a plate rack or cup rack depending on your needs. Beneath the coffee maker is a tray to catch spills.

How To Make a Coffee Bar of Your Very Own

Beneath, an old crate and apple basket complete the look.


How To Make a Coffee Bar of Your Very Own


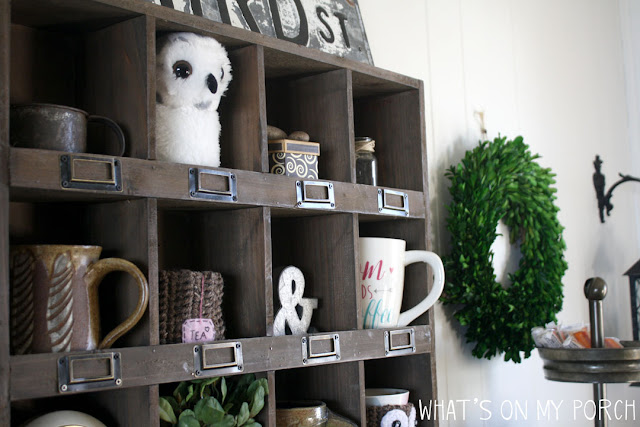
I also have a wood cubby shelf for holding coffee cups and other decorative knick-knacks. I got mine at Hobby Lobby. You can also find a similar one on Amazon here. A baby snowy owl, small ampersand and owl mug cozy peek out from their cubbies. A lantern and boxwood wreath add a decorative touch.  You could also add a chalkboard or sign. Get creative.

How To Make a Coffee Bar of Your Very Own


What are your favorite accessories for a coffee, tea or cocoa bar?

How To Make a Coffee Bar of Your Very Own

Sunday, August 7, 2016

Fall Farmhouse Tea Towel Pillows


It's almost fall, ya'all! What better way to celebrate the season of cool breezes, crisp apples, colorful leaves and plump pumpkins than with some cozy farmhouse style pillows?

Step 1: Tea Towels
I bought some awesome white towels from Walmart in the kitchen towel section. They are Mainstays
brand Flour Sack Towels in white. The fabric has an awesome farmhouse look and feel. The first step is to IRON your towel. They are very wrinkly, which isn't a bad thing since the look I was going for was casual, but I wanted my image transfer to be crisp.

Step 2: CitraSolv
There is a handy, delicious smelling orange cleaner out there called CitraSolv. It is heavenly! And it's awesome for transferring inkjet printed images onto fabric! **This transfer method does not work with laser printers. Only inkjet. Grab a little glass jar and a small housepaint brush for this.

Step 3: Print your picture... backwards!
I always mess up this step. I printed the entire image on four different sheets of paper before I realized I had forgotten to flip it. I use Photoshop to create a document the same size as my pillow. (In this case, around 22x22 inches). Then I crop each section to fit an 8.5 x 11 sheet of paper and print them, line them up and tape them. I'm sorry if this is confusing. You may want to start with an image that can fit a standard sheet of paper... just don't forget to flip it backwards! If you don't have Photoshop, you can do this in MS Word by inserting Word Art, choosing Rotate and Flip Horizontal. You can do it with pictures, too.

Step 4: Transfer the image.
Once you have your (backwards) image place it on the tea towel so the ink is touching the fabric. Make sure it's centered. Tape the corners in place. Then lightly brush the CitraSolv onto the back of the image. Use a tablespoon to rub the image and transfer it to the fabric. After rubbing the entire image, gently lift it to be sure it transferred. It's very difficult to line it up again. I've never been successful doing it.


Step 5: Sew & stuff your pillow! And then repeat and make a few more! :)


The files for these designs are available on my Etsy shop:
 
https://www.etsy.com/shop/MyPorchPrints

Resize as needed and remember to FLIP them so they are backwards before you print! :)


Tuesday, January 26, 2016

Tea-rific Valentines for Seniors & Widows

Today on the Porch, we have SNOW. And snow means working indoors. Since Valentine's Day is fast approaching, I thought it would be fun to make some valentine cards for the seniors and widows at our church.

Of course, all valentines need treats! My first thoughts (naturally) went to chocolate. But chocolate is so very difficult to send through the mail. My next thought was flat candy like laffy taffy or gum. Then I realized it didn't really work with my target audience's diets/dentures. Finally, my thought went to that sugar-free, non-sticky, super flat staple of life... tea!

And I got to work. With help from kiddo #2, a few art supplies and Twinings Tea, I was able to whip up these beauties just in time for Valentine's Day!

To make these tea-rific valentines for seniors, you'll need a few supplies:
All these can usually be found in any craft store or even Walmart's craft section.


I cut pieces of craft paper to fit half the card and combined different patterns to make it interesting. Then I glued the pieces to the blank cards.


Next, I covered the seam where the two pieces of craft paper meet with a strip of washi tape. I wrapped it around the back and inside just a bit.


Kiddo helped me make cute little tea tags out of craft paper and string.


Next, I attached the heart tea tags to the back of the tea bag and looped a couple pieces of tape to the back as well. Then I stuck the bag to the front of the card. Easy peasy!


I added the printable valentine to the inside of the card with a written message.


Finally, I cut a piece of cardstock the same size as the card to cover the tea bag before slipping it into the envelope. I'm hoping this will help it go smoothly through the mail. (One year I used 3-D stickers and they got caught in the mail and sent back to me.)


Beautiful tea-rific valentines for seniors!

Thursday, March 13, 2014

Make This Hotel Key Sign


Make This Hotel Key Sign
I get a little stir crazy in the wintertime. I miss working on my porch: scraping, sanding, painting. But while Old Man Winter hangs on in these last few days, I can still do a few smaller, indoor projects. Here is one I've been working on.

I freely admit I totally stole this idea from one I saw on Etsy/Pinterest. I just fell in love with the vintage look and the many, many hooks for hanging necklaces, bracelets, keys, scarves.


Of course, I had to give it my own unique touch. In this case, I added a hotel sign to the top of the board and a few tags for the little metal tag-plates.

The board itself was made from reclaimed pallet wood (thanks to the amazing HUBBY!). He cut the pallet wood and assembled it. Next, I lightly painted it a creamy latex white, leaving the wood grain to show through. Then I went over it with some watered down black acrylic paint for an old, gray tint.

I added the hooks and labels, pretty much eye-balling it (I'm not great with measuring/numbers/simple math.) But I did attempt to space it out evenly using my handy-dandy fabric tape measure. Hey, if I'm a little off... it just adds to the charm, right? :) I painted lightly over the hardware, letting some of the black show through for a chippy look.

The black tag plates/label/card holders were from Amazon. The hooks were from Walmart hardware section.

The brown tags were made from gluing brown mailing paper to cardstock. Then I wrote out some French words (Google
translator) and numbers, as in room numbers.

Tim Holtz idea-ology makes these cute little ceramic style number plaquettes, which would also work great on this sign. I used one on a key.

The "Hotel Paris" at the top was inspired by a design I saw on Pinterest. I painted a very thin board black, then colored on it with a wax Easter egg crayon. Any wax will do, though, I think, even a white crayon. Next, I painted over that with white and then used a scraper to scrape the edges. The wax keeps the top coat of white from sticking, so it can be scraped away, revealing the black paint beneath, giving the sign a cool, vintage look. I printed out the words, colored the back of the paper with willow charcoal (Walmart art section) and then traced the words onto the sign and filled them in with paint. When they were dry, I hand-sanded just a bit for a worn look.

Put it all together and ta-da! I have a pretty little French-ish hotel key sign! Lovely!


Next up, see how I transformed an old wooden bench!

 
https://whatsonmyporch.blogspot.com/2017/12/farmers-market-bench-makeover.html


Friday, January 3, 2014

Beautiful Junk

Well, the holidays are over, and it's back to work! I found a few tiny treasures over the break, not to mention a couple larger items. (Don't ask me how I will make them over with negative temperatures and a Porch full of snow. I have no idea.)

Here are some of the items I found! They are listed on my Etsy Shop. Enjoy!

I collect oversized paintbrushes, and I was VERY tempted to keep this one for myself. Unfortunately, the red/yellow color scheme clashes with my dining room, but I know SOMEONE out there is looking for this.

What little girl doesn't want a pair of soft, white gloves for her teddy bear tea?

Another find I was tempted to keep for myself: metal cups! Aren't they adorable?

I can see this trowel repurposed as a coat hanger or something even more amazing.
With this much beautiful rusty patina and charm, it can't possibly just be a trowel.


Okay, I've said it before. I want this for myself. The trouble with being a junker is learning to
LET GO. Otherwise, one's house becomes VERY crowded. Still, this adorable basket is hard to part with.

There are no words to describe the awesomeness of this spool.


Originally I was calling this a "pastry squirter." I have since learned the proper term is "pastry press."
Whatever you call it, I just call it awesome. It is functional and also artistic!
I have one of my own that I use as a steampunk accessory (think ray gun).