Showing posts with label tags. Show all posts

Tuesday, April 14, 2020

Toilet Paper Roll Tags for a Junk Journal

Toilet Paper Roll Pocket Tags for a Junk Journal from My Porch Prints

Toilet Paper Roll Tags for a Junk Journal
Hello and welcome to the Porch! So, right now (spring 2020) we are in the midst of the COVID-19 epidemic, and for a few weeks it was almost impossible to find toilet paper. Anywhere. Suddenly all anyone was talking about was toilet paper, toilet paper, toilet paper. It got a little scary.

So, I decided to issue a crafting challenge on my Facebook Group (Not a member? Join the fun here!). The challenge was to turn all this toilet paper negativity into something positive by creating a craft project from toilet paper rolls. This is my own answer to the challenge. I hope you love it!

I began with two toilet paper rolls, one of which I cut up into little pieces and stared at for about half an hour. Then I cut it up some more and threw the the pieces away. LOL! Attempt 2 meant I was down to just one TP roll, so I had to break into an almost-empty paper towel roll and cut it to size. This gave me 3 toilet paper-sized rolls which I proceeded to smash flat.

Flattening My TP Rolls
Getting them flat was a challenge all on its own. I used my bone folder which helped a tad, but those suckers still wanted to pop back up into their roly poly roundness. So, I used the old dollar bill method. You remember? When your dollar bill wouldn't fit in the pop machine so you'd drag it along the edge of a table or some other flat, hard surface until it straightened out? Yep. That's what I did.


Next, I used Tim Holtz Distress Ink in Vintage Photo Color and inked the edges of my TP rolls.


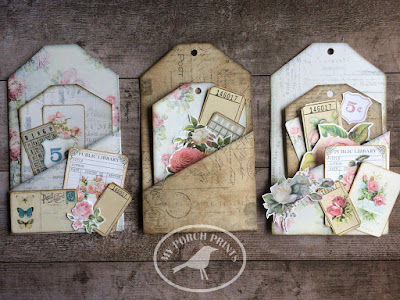
And I decided I would attach them to a journal page. This one is from my Faded Roses Journal Kit in my Etsy shop.

Toilet Paper Roll Pocket Tags for a Junk Journal from My Porch Prints

Making the Pockets for the Tags
Using that same printable kit and my Rose Ledger Cards, I found some pretty ephemera pieces and cut them to fit on top of my TP rolls. I rounded the corners using my corner rounding punch and inked the edges as well.

Toilet Paper Roll Pocket Tags for a Junk Journal from My Porch Prints

Then I sewed the ephemera pieces onto my TP rolls. I had planned to leave one end open to slide the tag into but quickly realized I would need some very skinny tags to fit inside the TP rolls or behind the ephemera pieces, so I came up with a new plan....

Toilet Paper Roll Pocket Tags for a Junk Journal from My Porch Prints

Toilet Paper Roll Pocket Tags for a Junk Journal from My Porch Prints


My new plan was to sew zig-zag style up the left edge to attach the TP rolls to my junk journal page. Then I also sewed zig-zags to attach in between the TP rolls, securing them to the journal page and also creating the "pocket" that the tag would slide into. I know. It's confusing. So, the tags don't actually fit INSIDE the TP rolls, they fit BEHIND them.

Toilet Paper Roll Pocket Tags for a Junk Journal from My Porch Prints

Making the Tags
I used more ephemera to create some horizontal tags. I just cut them to size and cut off the corners to make a tag shape.

Toilet Paper Roll Pocket Tags for a Junk Journal from My Porch Prints


Then I used my eyelet punch to add some holes and finished the tags off with some distress ink and a little sari silk ribbon.

Toilet Paper Roll Pocket Tags for a Junk Journal from My Porch Prints

Toilet Paper Roll Pocket Tags for a Junk Journal from My Porch Prints

All Finished!
For a final finishing touch, I added a bit of pearl bead trim. And that was it. After all that work, I was pooped. :)


Toilet Paper Roll Pocket Tags for a Junk Journal from My Porch Prints

Toilet Paper Roll Pocket Tags for a Junk Journal from My Porch Prints


Friday, April 19, 2019

Freebie Friday: Free Printable Easter Bible Verse Tags

Free Easter Gift Basket Bible Verse Scripture Tags My Porch Prints

Freebie Friday: Easter Basket Gift Tags
Hello crafters! So, I was putting the final touches on Easter baskets for my grown daughters, and I really wanted to add some decorative tags & Bible verses. A quick search of the Internet revealed that there just aren't that many free, printable Easter tags out there with Bible verses on them. At least, not any that were my style. So, like any good designer, I decided to create some myself!

And what kind of a friend would I be if I didn't share? :)

So, please enjoy these free printable Easter scripture tags (at bottom of this post). They have images of flowers, crosses, feathers, etc. I included a couple that would work for boys, too. Also, some are blank for you to write names on or other sentiments.

They also go nicely with my Printable Pocket Tags from My Porch Prints on Etsy.
These pocket tags are available in my Etsy shop.

Have a blessed Easter, everyone! He is risen!


To Download
Click the image(s) below, then right click and save it to your computer.
Visit my Etsy shop to see more printables.

PERMISSIONS & COPYRIGHT
PLEASE NOTE:
 This image(s) is NOT to be re-used in digital form (as in do not re-post it on your website or anywhere else or try to sell it in digital form).

For PERSONAL use ONLY.
Free Printable Bible Verse Easter Tags from My Porch Prints
Here are some more Bible verses for Easter: 
The angel said to the women, “Do not be afraid, for I know that you are looking for Jesus, who was crucified. He is not here; he has risen, just as he said. Come and see the place where he lay.”
Matthew 28:5-6

He is not here; he has risen! Remember how he told you, while he was still with you in Galilee: ‘The Son of Man must be delivered over to the hands of sinners, be crucified and on the third day be raised again.’
Luke 24:6-7

“Don’t be alarmed,” he said. “You are looking for Jesus the Nazarene, who was crucified. He has risen! He is not here. See the place where they laid him.”
Mark 16:6

They stripped him and put a scarlet robe on him, and then twisted together a crown of thorns and set it on his head. They put a staff in his right hand. Then they knelt in front of him and mocked him. “Hail, king of the Jews!” they said.
Matthew 27:28-29

When he had received the drink, Jesus said, “It is finished.” With that, he bowed his head and gave up his spirit.
John 19:30

The crowds that went ahead of him and those that followed shouted,
“Hosanna to the Son of David!”
“Blessed is he who comes in the name of the Lord!”
“Hosanna in the highest heaven!”
Matthew 21:9

“We are going up to Jerusalem, and the Son of Man will be delivered over to the chief priests and the teachers of the law. They will condemn him to death and will hand him over to the Gentiles to be mocked and flogged and crucified. On the third day he will be raised to life!”
Matthew 20:18-19

Jesus called out with a loud voice, “Father, into your hands I commit my spirit.” When he had said this, he breathed his last.
Luke 23:46

“Abba, Father,” he said, “everything is possible for you. Take this cup from me. Yet not what I will, but what you will.”
Mark 14:36

Above his head they placed the written charge against him: this is jesus, the king of the jews.
Matthew 27:37

Rejoice greatly, Daughter Zion!
Shout, Daughter Jerusalem!
See, your king comes to you,
righteous and victorious,
lowly and riding on a donkey,
on a colt, the foal of a donkey.
Zechariah 9:9

Finally the other disciple, who had reached the tomb first, also went inside. He saw and believed. (They still did not understand from Scripture that Jesus had to rise from the dead.)
John 20:8-9

Lord, save us!
Lord, grant us success!
Blessed is he who comes in the name of the Lord.
From the house of the Lord we bless you.
Psalm 118:25-26

Source: https://dailyverses.net/easter


Sunday, December 16, 2018

Christmas Loaded Envelope Tutorial

Vintage Christmas Loaded Envelope Tutorial

Vintage Christmas Loaded Envelope Tutorial*May contain affiliate links.
Okay, confession time. This is my very first loaded envelope. You're probably wondering why you should take advice from me on how to make one of these. I have no answer, except to say that I've done a bit of crafting in my time, and this is the kind of project I love! And I did do a little research. I don't think there is a right and wrong way to make a loaded envelope. But there are some things I learned in the process, and that's really what I want to share with you.
Vintage Christmas Loaded Envelope Tutorial
What You'll Need
You can use almost anything to make a loaded envelope. But for this particular one, I used Christmas-themed printables from my Etsy shop. I will list the items you'll need along with shop links for the printables.

#10 Envelope (4.13 x 9.5 inches)
Craft supplies: glue stick, glue, scissors

From My Porch Prints on Etsy:
Christmas Sheet Music
Christmas Phrases Papers
Christmas Recipe Cards
Christmas Mini Folders
Red Christmas Truck Tags
Christmas Countdown Flip Cards

Choose A Theme
First, you'll need to choose a theme for your loaded envelope. I chose Vintage Christmas. But you could do anything. Some ideas: roses, holidays, colors. I even saw a rainbow one that had a package of Skittles candy in it! Decide who will be your recipient and build a theme around that person. Gift them with tags, crafts, stickers, candies, etc. Or use as part of a junk journal, December Daily or flowish journal (a journal where the pieces can be taken out and used for crafting).

Cut Papers
Using your envelope as a guide, trace & cut papers to fit. Cover the inside of the envelope, the flap and also the back as shown. Leave the flap open. It will become a pocket.

Vintage Christmas Loaded Envelope Tutorial

Ink Edges
After your front, back & flap are covered with paper, you can choose to ink the edges. You can use Distress Ink or a marker & make-up sponge as shown. Color on the sponge with your marker, then dab the sponge along the edges of your envelope to create an aging effect.

Vintage Christmas Loaded Envelope Tutorial

Next, fold the bottom of the envelope up over the flap to form a pocket as shown. Only glue the sides, leaving an opening to create your pocket.

Vintage Christmas Loaded Envelope Tutorial

Add Small Pocket
Next, cut a piece to use as an extra pocket on the front. I used this Christmas sheet music piece printed on cardstock. ONLY glue the sides & bottom. Leave the top open to create the pocket.

Vintage Christmas Loaded Envelope Tutorial

Cut Top Of Envelope
Cut the top off your envelope to create a pocket as shown. Ink the edge if desired.

Vintage Christmas Loaded Envelope Tutorial

Fill Your Pockets
Next add your "goodies". These can be tags, small cards, mini folders, etc. You can also add lace, ribbons, buttons, tea bags, gifts, stickers, embellishments... whatever you want to fill up your pockets and "load" your envelope. All of my goodies came from My Porch Prints on Etsy.

Vintage Christmas Loaded Envelope Tutorial

Vintage Christmas Loaded Envelope Tutorial

I added a Christmas Recipe Card to my largest top pocket. I filled the smaller pockets with tags & folders. And the littlest pocket holds a tiny Santa and a layered flower. I glued "Sleigh Rides" to my tiny pocket as well and added another layered flower as an embellishment.

Vintage Christmas Loaded Envelope Tutorial

Vintage Christmas Loaded Envelope Tutorial

That's it! Now who's going to make a loaded envelope? Visit my Crafting Ideas Facebook Page and share your creations.


Tuesday, October 2, 2018

Black & White Halloween Craft Pumpkin Tutorial


When witches go riding, and black cats are seen, the moon laughs and whispers... tis time to make this awesome black & white craft pumpkin, yo.

Okay, that's not quite how it goes. But it doesn't matter. We're going to take the moon's advice and make this pretty pumpkin... yo. ;)

Make This Black & White Halloween Craft Pumpkin

You Will Need...
First, we need to gather supplies. Even Cinderella had to start with a pumpkin. If it was good enough for her, it's good enough for us! I got mine at Hobby Lobby. You can also find similar pumpkins here. You could potentially use a thrift store plastic or foam pumpkin, too... as long as you can stick images to the surface. Just keep in mind if it is a bright orange, you might want to paint it first.

You will also need:
- Romance Writer Scrap Pack from My Porch Prints (for the papers)
- Black & White Halloween Scrap Pack from My Porch Prints (for the images)
- Mod Podge (I used glossy)
- Foam Brushes
- Black Lace (optional)
- Fabric Flowers (optional)

Make This Black & White Halloween Craft Pumpkin


Decoupage
To begin, cut or tear your papers into small pieces, about 1-2 inches in size. I tore some of mine. Others I cut. I didn't want them identical, but rather of various sizes and shapes. Pour your Mod Podge into a paper bowl and use your foam sponge brush to apply the Mod Podge to a small area of your pumpkin. Then place one piece of paper over it. Using the brush, apply another layer of Mod Podge on TOP of the piece of paper.
Tip: If parts of the paper won't lay flat, I used a craft stick to smooth it down.

Make This Black & White Halloween Craft Pumpkin

Make This Black & White Halloween Craft Pumpkin


Layer Papers
Repeat the process, layering the papers over each other. You can use a few different papers, or just one, whatever you like. I layered a few different kinds of paper.
Tip: I left the bottom uncovered because no one would see it.

Add Halloween Images
To add the black & white Halloween images, carefully tear around the images you want and use the Mod Podge in the same way you applied your paper.


Make This Black & White Halloween Craft Pumpkin

Finishing Touches
When finished, allow to dry for a few hours. Then use the black lace to tie a tag to the top of the pumpkin. Embellish with black & white fabric flowers. All done!

Make This Black & White Halloween Craft Pumpkin


Make This Black & White Halloween Craft Pumpkin

Thursday, March 13, 2014

Make This Hotel Key Sign


Make This Hotel Key Sign
I get a little stir crazy in the wintertime. I miss working on my porch: scraping, sanding, painting. But while Old Man Winter hangs on in these last few days, I can still do a few smaller, indoor projects. Here is one I've been working on.

I freely admit I totally stole this idea from one I saw on Etsy/Pinterest. I just fell in love with the vintage look and the many, many hooks for hanging necklaces, bracelets, keys, scarves.


Of course, I had to give it my own unique touch. In this case, I added a hotel sign to the top of the board and a few tags for the little metal tag-plates.

The board itself was made from reclaimed pallet wood (thanks to the amazing HUBBY!). He cut the pallet wood and assembled it. Next, I lightly painted it a creamy latex white, leaving the wood grain to show through. Then I went over it with some watered down black acrylic paint for an old, gray tint.

I added the hooks and labels, pretty much eye-balling it (I'm not great with measuring/numbers/simple math.) But I did attempt to space it out evenly using my handy-dandy fabric tape measure. Hey, if I'm a little off... it just adds to the charm, right? :) I painted lightly over the hardware, letting some of the black show through for a chippy look.

The black tag plates/label/card holders were from Amazon. The hooks were from Walmart hardware section.

The brown tags were made from gluing brown mailing paper to cardstock. Then I wrote out some French words (Google
translator) and numbers, as in room numbers.

Tim Holtz idea-ology makes these cute little ceramic style number plaquettes, which would also work great on this sign. I used one on a key.

The "Hotel Paris" at the top was inspired by a design I saw on Pinterest. I painted a very thin board black, then colored on it with a wax Easter egg crayon. Any wax will do, though, I think, even a white crayon. Next, I painted over that with white and then used a scraper to scrape the edges. The wax keeps the top coat of white from sticking, so it can be scraped away, revealing the black paint beneath, giving the sign a cool, vintage look. I printed out the words, colored the back of the paper with willow charcoal (Walmart art section) and then traced the words onto the sign and filled them in with paint. When they were dry, I hand-sanded just a bit for a worn look.

Put it all together and ta-da! I have a pretty little French-ish hotel key sign! Lovely!


Next up, see how I transformed an old wooden bench!

 
https://whatsonmyporch.blogspot.com/2017/12/farmers-market-bench-makeover.html