Tuesday, November 10, 2015

Red Radio Cabinet


You may have seen a similar cabinet on Pinterest. Like me, you may have even pinned it. Twice. And you might have also thought, "I NEED that." Of course, radio cabinets aren't all that easy to come by, but when you do find one on Craigslist. In your town. You BUY it! And then you paint it RED.

Okay, so that's what happened. One dark and stormy night, the ever-beleaguered Hubby went out and brought home this bad boy: an antique wood radio cabinet.

I seriously thought about painting it white. "White goes with everyone's décor," I said. But my daughter convinced me to go for the red. "Not too many people can fit red into their house," I said. "Yes," she answered, "but that means the ones who can will be REALLY excited to find something in red."

Okay!

Here's a quick rundown of the process. First, Hubby removed the fabric "speaker" in the front. Then I sanded a few of the rough spots. Not enough, though. After I painted, some of the dents showed through, but we'll call that "character."

Then I primed it with Zinsser primer. This step may or may not have been necessary. I was going for a bit heavier distressing than usual, so I could have probably gone without the primer.

Then I painted the whole piece red. (Acrylic craft paint, Walmart craft section.) After that, I sanded it with a sanding block.The red was a tad on the orangey side, but I didn't mind because I knew I'd be going over it with a dark stain, which is the last process: to brush on stain and wipe it off. The stain helps bring out the sanded wood, essentially staining it again. It also adds depth and a little shine to the piece while giving it a layer of protection.


I really love how she turned out! Once again, I wish I had a bigger house, because I'd keep this one! Alas, it is moving on to greener pastures.


Wednesday, September 30, 2015

Signs, Signs, EVERYWHERE Signs!

So, a while back, during our town's "junk" day... you know, the day where everyone throws their junk on the curb? And then the rest of us go dumpster diving for three days looking for hidden treasure? Yes, that day. Anyhoo, I was going through my neighbor's junk heap delicately searching when I found some old fencing that had been thrown out. With Hubby's help, I turned that old fence into a series of hand-painted signs... and my love for wood signs was born!

Soon, I got my hands on some pallet wood, and poor Hubby was overwhelmed with sawing and assembling more wooden "doors" for me. I added hinges and other hardware, sanding, staining, painting and lettering these delightful little doors!

Here are the latest products of my obsession. And you can learn more about how to make your OWN sign here.


Tuesday, September 15, 2015

How to Paint Shabby Chic Florals on Furniture


Hello Porch Fans! Today's post is about how to paint pretty little shabby chic roses onto wood furniture. First of all: Disclaimer! I really had no idea how to do this, so I turned to my trusty how-to guide (AKA Google) and tried to find a "how-to" guide to painting shabby chic flowers on furniture. There's a lot of pretty stuff out there, but not a whole lot of "how-to's". That's when I decided to wing it myself and see what happened.


So, don't consider this a one-and-only-way kind of tutorial. It's more of a guide on how you could, maybe, sort of go about painting shabby chic florals.

Step 1: You need a shabby piece of furniture. This table started life as my computer desk. (Actually, it started as a bad Craigslist purchase that fell apart before we even got it into our van. Like, literally FELL APART in the guy's driveway. Hubby was NOT happy. But he fixed it. I love that man.) It was that golden color of wood that some people like, but personally is not my favorite. I shabbied it up with paint and sanding and love.

Step 1 1/2: So, as I dragged my furniture out onto my Porch (a process I am VERY familiar with). I looked around for floral inspiration and found it in full-bloom. Punny!


Step 2: Once your furniture is prepped, you can begin to paint your flowers. Ha ha! No, not really. Not even close.

You need to gather supplies:

  • Tape Measure
  • Pencil
  • Acrylic Paints in the colors you want
  • Jar of water
  • Paper Towel
  • Brushes (small and large)
  • Sanding Block
I also chose a pic from the Internet as a kind of basic idea of what I wanted. I'm not good on the fly. I need some kind of reference, even a basic one will do.
 
Step 3: You need a shape to serve as the background for your floral. I chose a circle, because it's what I had on hand, and by on hand, I mean it was a pizza pan on top of my fridge. I measured to find the center of my table, plopped my pizza pan down and traced it out.


Step 4: Next, I lightly brushed cream-colored paint in my circle and tried to fade it toward the edge to hide the pencil mark and make a kind of blurry line between the cream and the blue of the table.


After that, I penciled what I call Smilies and Frownies all around the edge of the circle. You can see them in the pic.


Step 5: I chose an earthy brown to paint over the smilies and frownies. Then I added little "leaf" shapes on the tips of my smilies and frownies. I filled in more leaves and added some curlie Qs or whatever looked right. This was a trial and error kind of process till I got the look I wanted. After I was finished with the Smiley Frownies I realized they were awfully dark, so I went over them with some watered-down cream paint, just to mute the color a little.

Step 6: This is the step where I make a big fail. I decide to try to pencil in my flowers before painting them. Not only are my freehand drawing skills spectacularly awful, but I realized after painting a few leaves that the pencil shows right through the paint. I tried to erase the pencil marks, another massive fail. They just smeared, and I scratched up my table a little. No big, I like scratched up tables, but I had to hide those pencil marks, so I painted over them with the cream paint, which brings us to...

FAIL.


Step 7: Painting your flowers!
So, since I had no pencil marks to guide me, I really had to wing this part. I wish I could give you a Happy Trees guide to painting roses, but I can't. I just started with dark pink blobs that were the centers of my roses. Then I added some light pink blobs as petals. I used water and cream paint to blend these until they started to look rose-ish. Again, I know that's not very helpful, but it's the best I got for ya. I did the same thing with leaves, making vague "fern" shapes, starting with the tip and zig-zagging once side of the leaf, then the other, adding a "stem" with a quick swipe of the brush down the center of each leaf. I added little curlie-Qs here, too, to fill in the blank spaces and round out the design.


Step 8: When I was done, it was kind of pretty, but obviously not pro. I remedied this by using watered-down cream paint to dull the extra-bright green and pink parts of the painting. When it was dry, I used a "dry brush" technique over it, which means I dipped a large paint brush (like for painting wall trim) in cream paint and dried it off on a paper towel. Then I lightly swept it across the painting, letting the texture of the table grab it.

 For the final touch, I went back and sanded here and there when all was dry. For my first attempt at floral painting, I don't think it's too shabby. ;)


Sunday, September 13, 2015

Secretary Makeover With Damask "Tattoo"

I have been so busy.
Also lazy.
Well, lazy about posting to my blog, anyway.
But that just means I've gone into overdrive on my Porch!
Check out this cute little wood secretary makeover that I  am too tired to properly write about:

Before: this secretary had seen better days. It was pretty scratched up, and the drawers had major opening issues.
After! The secretary got a lovely paint job and a little sanding to give it a chippy look.

I painted the inside gray with a cute little damask "tattoo". :)

I printed it out in sections and lined the pieces up, then I colored on the back with willow charcoal (at Walmart, craft section). When I lined it up where I wanted it, I traced the design with a regular pencil. Okay, not just a regular one, a HARRY POTTER pencil!
 
The willow charcoal left a decent design behind, which I filled in with paint. Careful not to smudge it away!

I used a dry brush technique to make it look worn and faded. Just dip a paintbrush in your gray paint, wipe it on a paper towel and lightly brush over the white design.
 

Wednesday, August 12, 2015

Lamest Post Ever

Okay, I've been working kind of sporadically this summer. For a long time we thought we were moving to Michigan, so I didn't want to start a bunch of projects and make my house all cluttered and messy. However, we just decided last month that we would NOT be moving. In all the confusion and switching-gears I decided to start doing projects again. Because nothing takes my mind off life-changes like painting an armoire!

Here are a couple of projects I've done in the last week or two. I didn't bother with a lot of before/during photos, so sorry for that. But, if you're like me, you can still enjoy a good makeover.

Hoping to bring LOTS more projects as fall creeps in.


Updated an old wood computer cabinet with a little paint and distressing.


A little punkin painted on reclaimed wood.


This design was from a cute pin I saw on Pinterest! Love it!

Thursday, May 21, 2015

Steampunk Teddy Bear

Yes, I'm one of THOSE people. The weirdies. The geeks. I get INTO things. And one of those things is steampunk! If you haven't heard of steampunk, I don't even know what to say. In fact, I can't even define it. It's a kind of subculture. It involves books, gadgets, cosplay and all manner of steampunkiness. It's like Victorian meets dystopian. Think airships, convoluted weaponry and lots of leather and brass, and you're getting there.
Just Google it.

One of the best things about steampunk (aside from the costumes) is the idea of "steampunking" one's stuff. I did it to my Maverick Nerf gun with fantastic results. And now I bring you...

ACE: The Steampunk Teddy Bear


Ace began life as a Christmas bear. He had a hideous green and red plaid jacket and a bow tie. No. Just no. I found him all lonely and abandoned at Goodwill and decided to give him a makeover. No longer would he be a nerdy bear in a Christmas vest. Now he would be an airship pilot!


This took quite a bit of imagination and work. Let's begin at the beginning, shall we?

First I chopped off Ace's red vest and bowtie and flung them into the aether! Then I spiffed up his features with a brown Sharpie (classy, I know). He got enhanced paws and a nice, big smirk that only a dashing airship captain could pull off.


Next, Ace needed some clothes because nudity is frowned upon, even in steampunk. I found a lovely purse at Goodwill that I knew would make the perfect bomber jacket! I chopped it up and put it back together by hand-sewing and also using Super Glue (again, classy). I'm a numpty when it comes to sewing, so the jacket doesn't quite fit.


I also made Ace an aviator hat from some leather scraps I got from a lady behind a shop at a Renaissance faire. (Yes, you read right. Steampunk isn't the only weird thing I like.)


A couple leather belts helped finish off Ace's outfit, along with some various and sundries I had laying around like a tiny key and a chain, a brass button and a scrap of fabric for a scarf.


I purchased a set of charms from Michael's craft store, from which I got the silver wings for Ace's pilot "pin" on his hat. The "compass" is just printed on cardstock and "laminated" with packing tape. (Have I mentioned how classy I am?)

The cooliest part of Ace's ensemble is his steampunk goggles. They're made from more leather belt parts and two rather expensive (almost ten bucks a-piece, for cryin' out loud!) locket pendants. I got these at Michael's, too. They are meant to hold cute little keepsakes on a chain around your neck, but these hinged beauties are simply PERFECT as aviator specs. Moving parts are a MUST in steampunk. :)

The weird thing? Not a gear to be found. Gears are usually steampunk essentials, but I figure I get points for his goggles, so I can totally pass Ace off as a steampunkified teddy bear airship pilot. Don't you think?  ;)


Monday, May 11, 2015

Monogram Pallet Family Name Sign


Monogram Pallet Family Name Sign
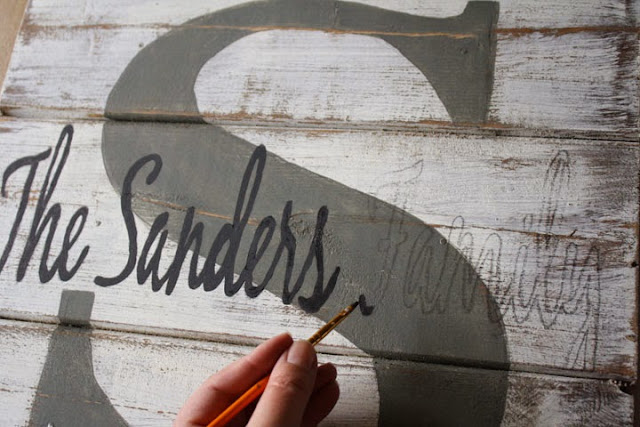
You've probably seen these wood pallet family name signs on Pinterest. They've got rustic charm, an adorable little monogrammed letter and make a home look cute as a button. You might have even thought about making one yourself. Here's a step-by-step guide to how I made mine.

1. Find a pallet, tear it apart and put it back together. Only prettier. This is where a hubby who is handy with a saw comes in. Or, if you're a warrior chick, you can try it on your own. All I know is that I say, "Three boards long, about 16 x 16 inches square honey" and it happens! I LOVE that man!

2. Stain your sign. I used a Walnut Minwax stain. Any dark stain would probably do the trick. Let it dry completely. I let mine dry overnight, with a fan blowing on it for part of the time. Just to be safe.


From Amazon

3. Paint one coat of white (or other color) over the stained sign. I go heavier in the middle and leave about an inch border around the edges. Then I wipe some of the paint off my brush for a "dry" brush technique, and I come in from the edges. This gives it a kind of worn look. Let dry. (Again, a fan is handy for this.) It doesn't take very long. Maybe twenty minutes. Have some coffee.

4. Lightly sand the dry paint to let some of the wood show through. This gives your sign even more of that "vintage" look.

5. FUN STUFF. Not really. Okay, I happen to be a graphic design minor, so we have Photoshop on our computer. This is what I used to make my BIG letter "S" and the smaller "The Sanders Family." I created a file that was 16x16 inches (the size of my sign) and used Timmons for my letter "S" and Black Jack for my family name font. I stretched my family name vertically to make it bigger. You can choose whatever fonts work for you. If you don't have Photoshop... which most people probably don't, you can Google how to print a big picture on multiple pages. I found one solution that gets good reviews here.

Find Saral Transfer Paper Here

6. Print the big letter first. To transfer it to the sign, I used Saral transfer paper. I got it on Amazon. It comes in different colors and works like carbon paper. Easy peasy. (If you don't want to use transfer paper, you can color the back of your paper with willow charcoal-Walmart craft section.) I also outlined it in pencil after I transferred it so I wouldn't accidentally wipe it away with my sleeve.

7. Fill in the big letter with paint. I used an acrylic craft paint from Walmart in Pewter Gray. Once it was dry, I sanded it a little to let the wood show through.

8. Finally, it's time for the name. I transferred our family name to the sign and painted it, too, this time in a darker gray color called Pavement. If you have a shaky hand, try using a paint pen (also in Walmart's craft section) to fill in the finer lines. All done!


Want to see more wood signs?

Check out these cute Garden Gates made from reclaimed wood!


http://whatsonmyporch.blogspot.com/2013/08/it-was-our-town-junk-day-lot-of-my.html