Showing posts with label sign. Show all posts

Friday, February 1, 2019

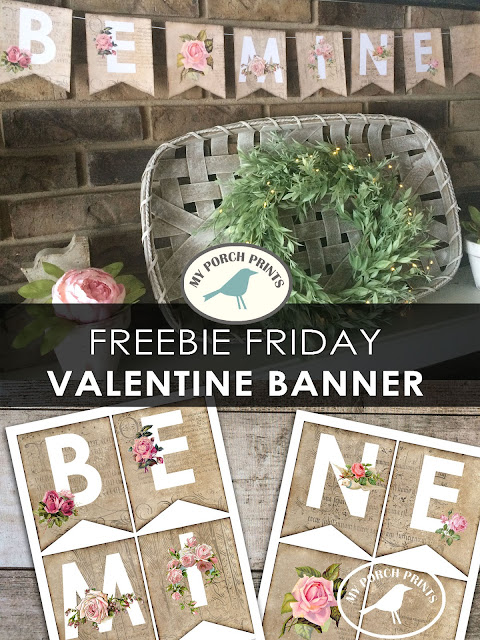
Freebie Friday: Valentine Banner

Free-Download-Be-Mine-Valentine-Banner

Freebie Friday: "Be Mine" Valentine Banner
It's the first Friday of the month which is Freebie Friday here on the Porch! That means another great free download for you. Today's freebie is this vintage style printable "Be Mine" Valentine's Day banner. 
Enjoy!

Free Printable Valentine's Day Banner from My Porch Prints

To Download
Click the image(s) below, then right click and save it to your computer.
Visit my Etsy shop to see more printables.

PERMISSIONS & COPYRIGHT
PLEASE NOTE:
 This image(s) is NOT to be re-used in digital form (as in do not re-post it on your website or anywhere else or try to sell it in digital form).

For PERSONAL use ONLY.

Free Printable Valentine's Day Banner from My Porch Prints

Follow Crafting Ideas by My Porch Prints on Facebook for lots of fun & beautiful paper crafting inspiration.


Saturday, February 17, 2018

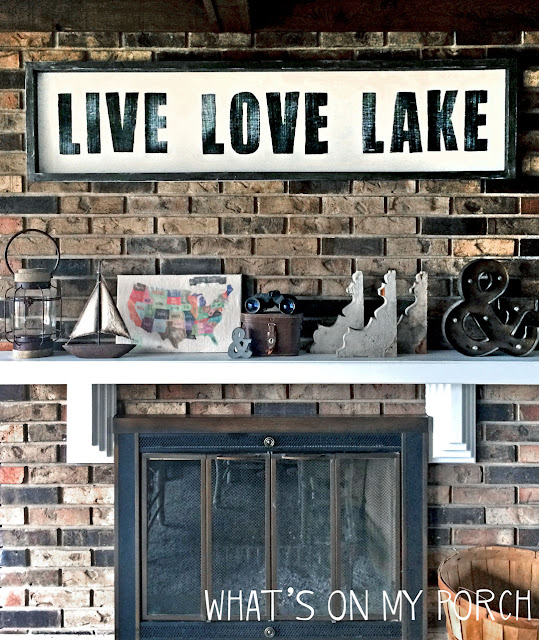
How To Make A Lake House Sign

How To Make A Lake House Sign

How To Make A Lake House Sign
Recently, Hubby and I moved to a house on a lake. It really was a dream come true. We'd always talked about what it would be like to wake up and see the sun on the water, to watch the storms roll in and whip up the waves. Of course, we never believed we could actually afford it. So, when an opportunity came up, we jumped at the chance!

Waking up to lake views is pretty amazing, but there's another element to lake life that I hadn't really thought about until we moved in... decorating! There are so many fun elements to lake house décor. It's like a blend of cabin-y woods and boats and anchors. Of course I don't want to go overboard (pardon the pun). Too much theme-y décor can start to feel cheesy. But a little sailboat here or anchor there can add just the right touch of lakehouse to my usual farmhouse style.

And that is where this sign comes in. I wanted to acknowledge our lake home without painting everything blue and putting up lake themed décor everywhere. I think it's a nice nod to lake life.


To Make This Sign You Will Need:
  • 1x1 wood boards for the frame
  • Flat wood (There are lots of options here. I used old wall paneling that we just flipped over.)
  • Screws, nails or nail gun
  • Picture hanging hardware (such as these)
  • Paint or stain for the frame (I used Rust-Oleum Carbon Gray stain)
  • Acrylic craft paint for the words
  • White latex paint or craft paint for the background
  • Paintbrushes and craft paintbrushes
  • Willow charcoal or pencil

Step 1: Assemble The Frame
Hubby assembled the wood frame. Ours is 4 ft. long to fit our fireplace, but you can make it any size you want. Cut equal top and bottom pieces. Then cut equal side pieces. Screw the side pieces onto the top and bottom pieces of the frame. Cut the flat wood panel to fit behind the frame. Make it just a bit smaller so the frame hides the edges, but so you can still attach it.
DO NOT attach the frame to the paneling yet.


Step 2: Stain the Frame
Using a workspace, stain the frame. I get the weathered wood look by lightly brushing the stain across the wood, leaving some of the wood unstained. It's extremely easy. You  might want gloves for this part. You could also use craft paint. I don't bother staining the back as no one will see it.


Step 3: Paint the Flat Wood Panel Piece
I painted the panel white with latex interior white satin paint. White craft paint would work, too. It took a few coats to completely cover the wood.

How To Make A Lake House Sign

Step 4: The Words
To add the words "Live Love Lake" to the sign, I used Photoshop. But you could probably use Microsoft Word. Just choose a font. I used "You Are Loved" font. And choose a size that makes sense for your sign and the space where it will hang. I printed off the letters a page at a time and then assembled them with tape, laying them out on my sign for a good fit.

Flip the assembled words over and use willow charcoal or a pencil to color on the back. TIP: I hold the sign up to a window so I can see the letters through the paper. Then I only color where the letter is. Once the back of each letter has been colored, flip the words back over and lay them gently on your flat white wood piece.

Tape them into place and trace each letter with a pen or pencil to transfer it to the wood sign. I re-trace the letters with pencil after they've been transferred, then use a cloth to wipe away the charcoal.

Finally, paint the letters with black acrylic paint and a small, flat artist paintbrush. When the letters are dry, I use the white background paint on a large paintbrush. Dip it lightly in the paint and then wipe it almost dry on a paper towel. Lightly pull the brush across the words. This is a "dry brush" technique that makes the words look weathered.


How To Make A Lake House Sign


Step 5: Assemble
Once it is dry, use a nail gun to attach the flat piece to the frame. Attach hanging hardware to the back of the frame, too, one on each side. And you're done!

How To Make A Ginormous Lake House Sign


Thursday, December 28, 2017

Galvanized Farmhouse from Hobby Lobby


I am gaga for galvanized home décor! I just love that faded silver look! Here are a few galvanized farmhouse finds from Hobby Lobby. I already have the three-tiered tray and the metal tray with the handle... and I think I might pick up that lantern soon, too!

https://www.hobbylobby.com/Home-Decor-Frames/Lanterns/Round-Galvanized-Metal-Lantern/p/80771727

This little lantern might have to come to my house, soon!

https://www.hobbylobby.com/Home-Decor-Frames/Metal-Decor/Country-Farm-Flour-Galvanized-Metal-Canister/p/80854995


https://www.hobbylobby.com/Home-Decor-Frames/Metal-Decor/Galvanized-Metal-3-Tier-Tray-Stand/p/80791934
 
I have this awesome tray near our coffee bar.
It's perfect for holding tea and jars, and it also works great for seasonal decorating!

https://www.hobbylobby.com/Home-Decor-Frames/Glass-Decor/Galvanized-Metal-Bottle-Caddy/p/80828839


https://www.hobbylobby.com/Home-Decor-Frames/Mirrors-Wall-Decor/Wall-Clocks/Galvanized-Metal-Windmill-Clock/p/80780423
 
https://www.hobbylobby.com/Home-Decor-Frames/Trays-Coasters-Place-Mats/Galvanized-Metal-Tray-with-Handle/p/80646074
 I loved this little tray so much for holding all our odds and ends (think tape, string, glue, keys, etc.) that I bought one for my mama-in-law for Christmas.


https://www.hobbylobby.com/Home-Decor-Frames/Farmhouse-Industrial/Rustic-Galvanized-Metal-Pitcher/p/80826320


https://www.hobbylobby.com/Home-Decor-Frames/Wood-Decor/Wood-&-Galvanized-Metal-Letter---&/p/80766616


**Images source: Hobby Lobby


Get ready for spring by making this monogram wreath!
Read about it in my blog post here.


https://whatsonmyporch.blogspot.com/2016/02/spring-flowers-monogram.html


Wednesday, August 12, 2015

Lamest Post Ever

Okay, I've been working kind of sporadically this summer. For a long time we thought we were moving to Michigan, so I didn't want to start a bunch of projects and make my house all cluttered and messy. However, we just decided last month that we would NOT be moving. In all the confusion and switching-gears I decided to start doing projects again. Because nothing takes my mind off life-changes like painting an armoire!

Here are a couple of projects I've done in the last week or two. I didn't bother with a lot of before/during photos, so sorry for that. But, if you're like me, you can still enjoy a good makeover.

Hoping to bring LOTS more projects as fall creeps in.


Updated an old wood computer cabinet with a little paint and distressing.


A little punkin painted on reclaimed wood.


This design was from a cute pin I saw on Pinterest! Love it!