Showing posts with label DIY. Show all posts

Monday, April 29, 2019

Layered Junk Journal Cover Tutorial

Layered Junk Journal Cover Tutorial from My Porch Prints

Do you ever look at journal covers on Pinterest and think, "How do they do that?" I often find myself perusing beautiful, layered journals, wondering how people are so creative?! I imagine some crafty lady in a beautiful studio with shelves of pretty, decorative boxes labeled "papers" and "embellishments" and "lace". She carefully chooses each item: vintage, tea-stained papers and little metal charms. And somehow, magically, a junk journal cover is born.

Okay, I know it's not quite as fantastic as that. How do I know? Because my craft studio is my dining table. And my shelves of boxes are sprawled across numerous cabinets & closets in my home. And labels? Ha ha. They would all have to say, "junk" on them because I'm not the most organized person.

So, how do we mere mortals create beautiful layered journal covers? With tutorials and kits! Ha ha! Seriously, though, I created a pretty little printable kit which you can find in my Etsy shop (My Porch Prints). And I also made this tutorial. So, follow along, and together we'll make some lovely layers worthy of Pinterest!

List of Supplies/Printables:


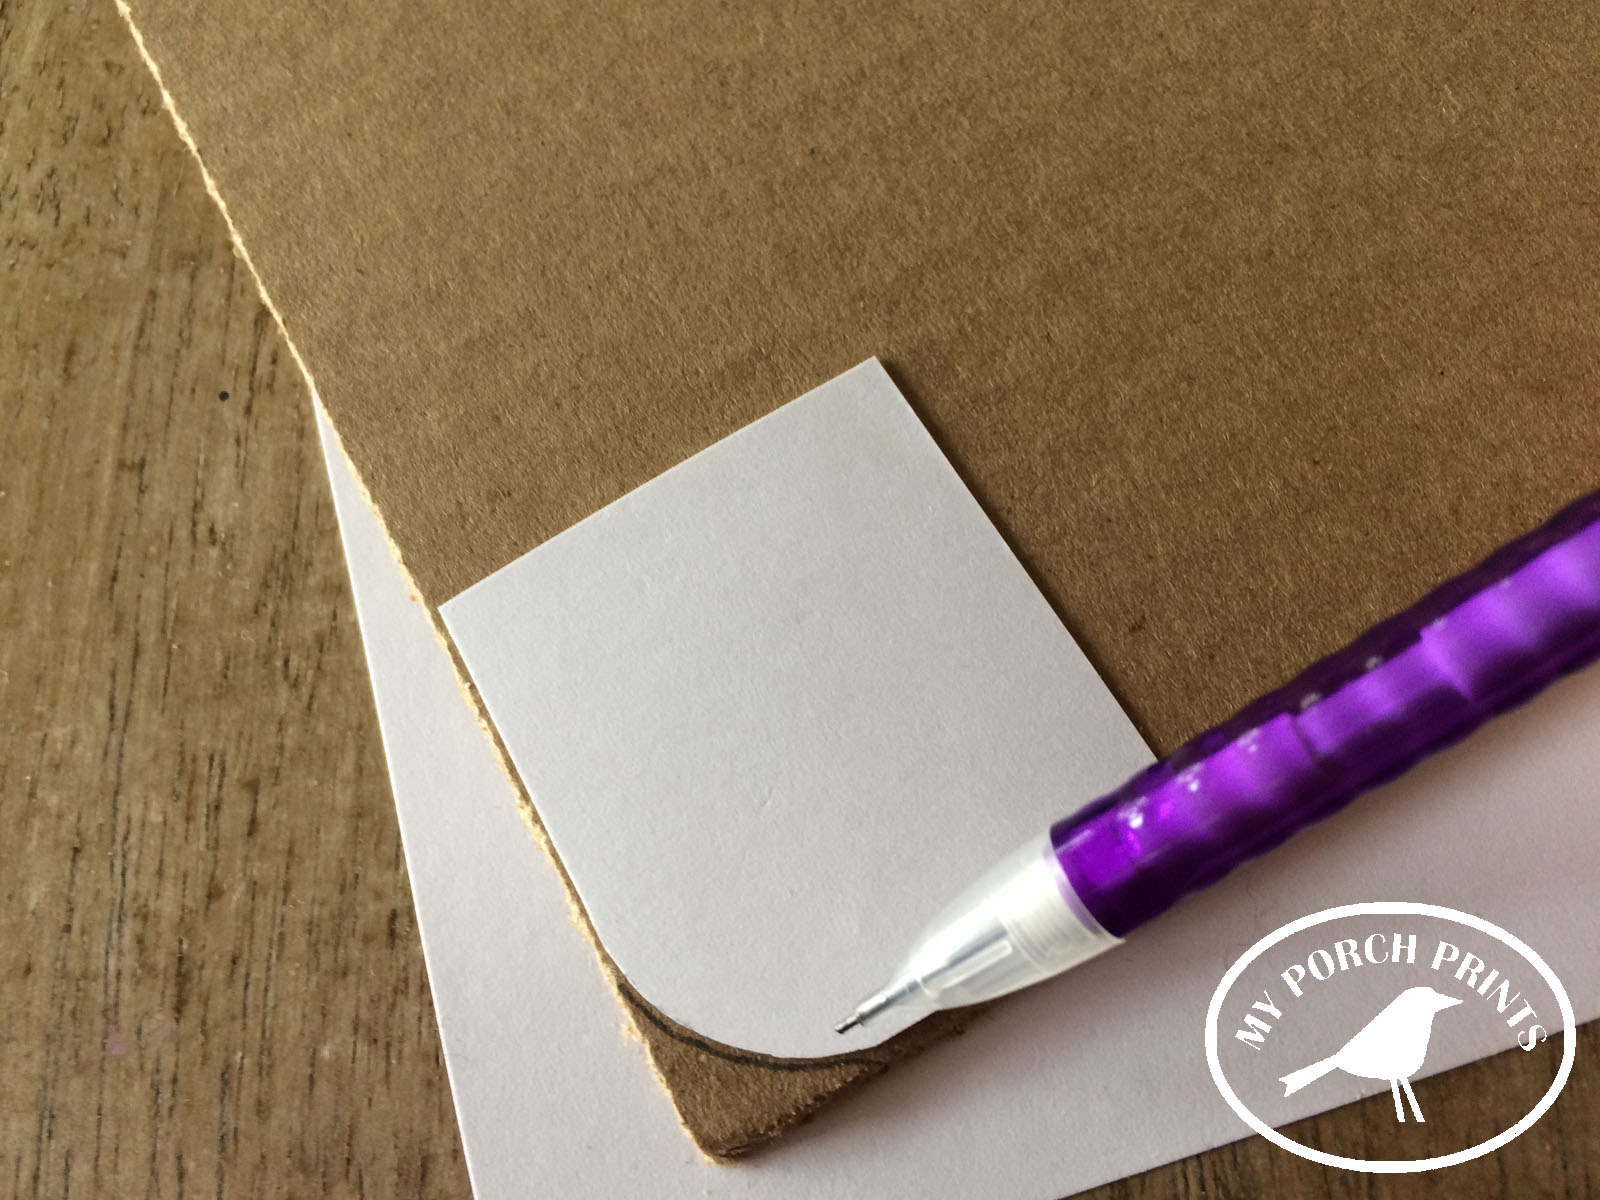
So, first I cut out a cardboard piece that will serve as my journal cover.* I'm not actually creating an entire journal today, just the cover. If you want a junk journal tutorial, click here. I also cut out all my printables.*You can also create a journal first, and then attach these printables to the cover. 


I rounded the corners of my cardboard cover by creating a template cut from a corner of scrap cardstock. This ensures all my rounded corners are even. Then, I used a makeup sponge to apply Distress Ink around the edges.


I chose the words I wanted to use from my printable kit and carefully tore them out, then inked the edges.


Next, I rounded the corners of my background paper and inked it as well. Then I applied glue, spreading it with a brush and glued my paper to my cardboard. This serves as my background, kind of like a canvas for my layers.


I wanted a lace element, so I added this to the edge of my journal with glue.

Now it was time to start layering. I inked all the edges of my printable elements and then began placing them on my journal cover background to get an idea of how it would look when it was all finished.


I think the key to layering is not to worry about covering up the layer underneath. I always think, "But I can't cover up this pretty thing! It will ruin it!" Nope! It really is okay to cover up one layer with another. Trust me.

Begin with tall or large items first.


It's okay if items hang off the edges a little.


I inked bits of cheesecloth and used them behind small pieces to add interest, texture & dimension.


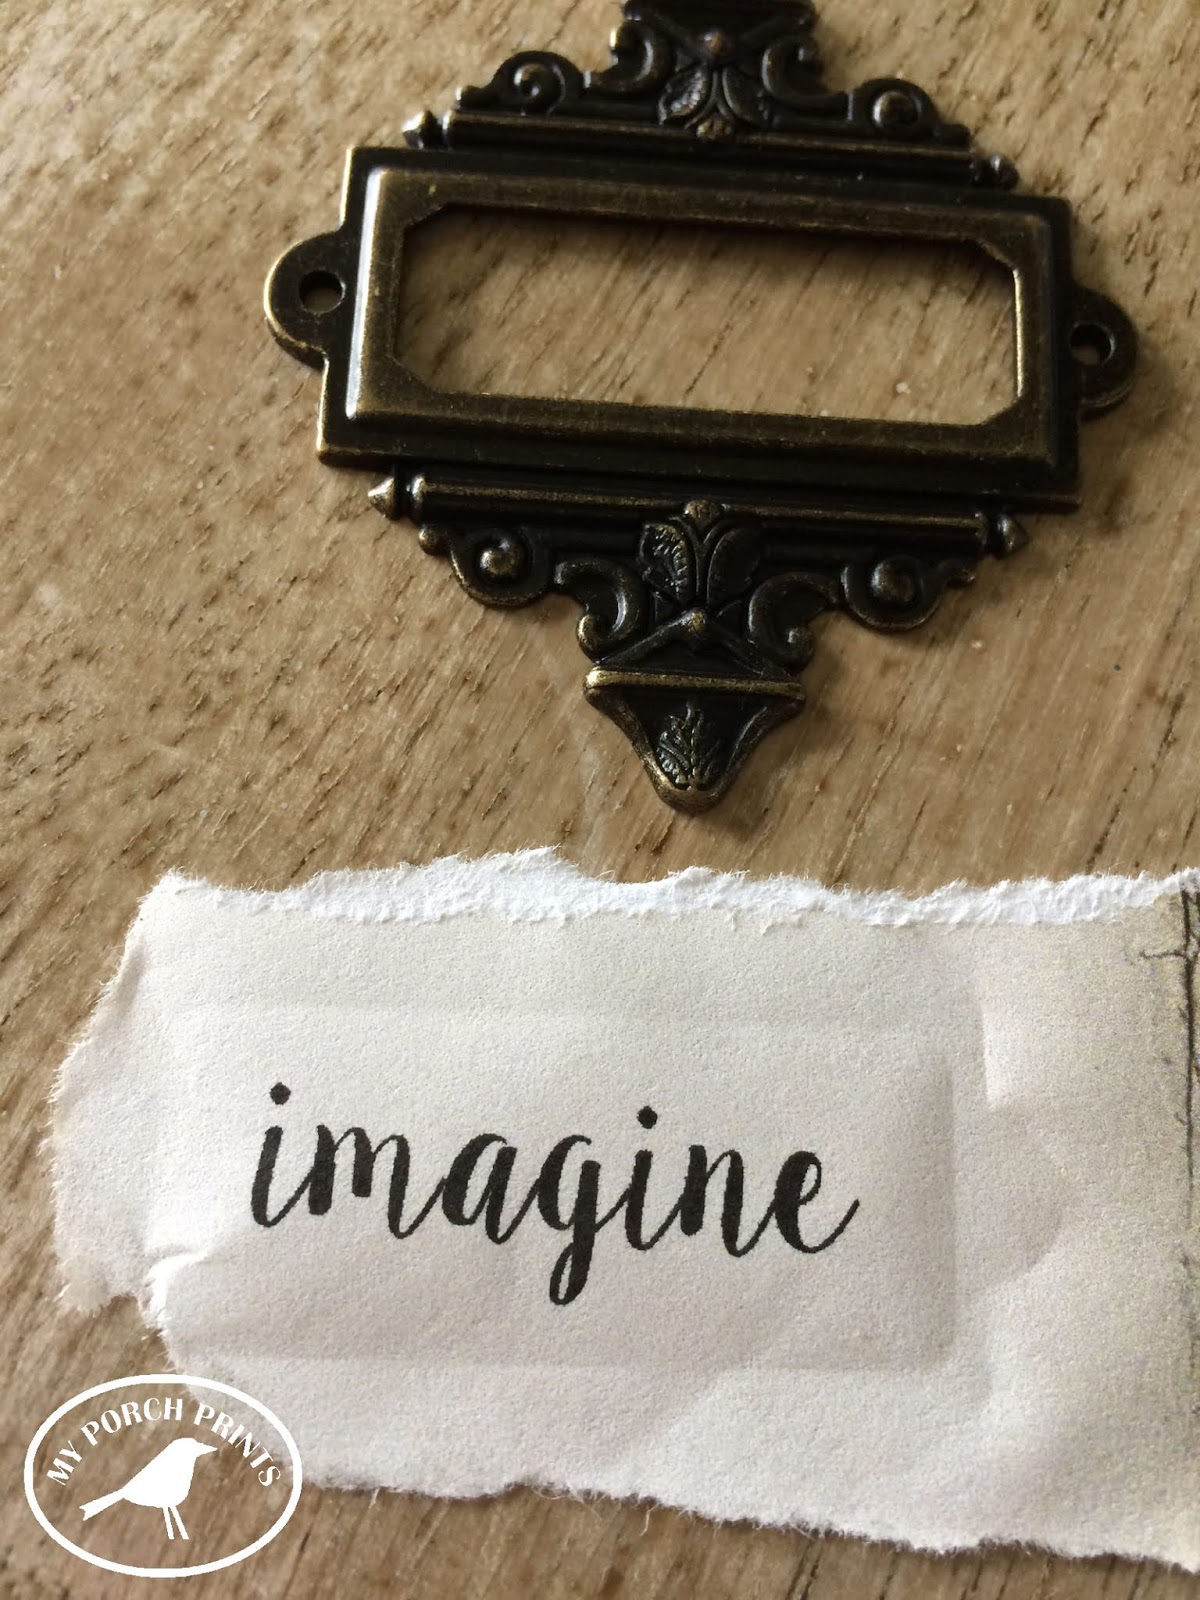
To add my journal title, I chose the word "imagine" and cut it out. Then, I placed it behind my book plate and pressed gently. This created indentations in the paper, which I used as a guide when cutting out my title word. I glued the title word to my journal and attached my bookplate. You can use the fasteners provided or glue.


Last, I added a small key charm, attaching it to my lace as shown. I also threaded some pink ribbon through the lace holes.

Layered Junk Journal Cover Tutorial from My Porch Prints


And that was it! The printable kit is designed so the colors and pieces go together for easy layering. Enjoy!

Layered Junk Journal Cover Tutorial from My Porch Prints


Thursday, January 17, 2019

"Mysterious Woman" Junk Journal from My Porch Prints

Mysterious Woman Journal from My Porch Prints
*Contains Affiliate Links

Mysterious Woman Journal 
She walks in beauty like the night...
This stunning journal was made using the "Mysterious Woman" Journal Kit from My Porch Prints on Etsy. It's pages are filled with dark beauty and images that evoke feminine mystery: a key, a mirror, a tea set, a dress form, scissors, clocks & more!
Be intrigued...

Some items used in this journal:

MYSTERIOUS WOMAN JOURNAL KIT

TIM HOLTZ KEYHOLES

CHARMS

BULB SAFETY PINS

CHEESECLOTH

CHIFFON FLOWERS

SARI SILK RIBBON

Mysterious Woman Journal from My Porch Prints

I used cheesecloth inside the front cover and a black chiffon flower. For the tags, I used cheesecloth, twine, lace & sari silk ribbon.

Mysterious Woman Journal from My Porch Prints

Some of the pages are coffee-dyed copy paper. I cut them to 5x7, dipped them in a tray of coffee and then set them individually on cookie sheets and baked them at 300 for a few minutes.

Mysterious Woman Journal from My Porch Prints

Mysterious Woman Journal from My Porch Prints

Mysterious Woman Journal from My Porch Prints


Mysterious Woman Journal from My Porch Prints

Mysterious Woman Journal from My Porch Prints

Mysterious Woman Journal from My Porch Prints

The binding is a simple twine binding. I added charms using a chain & bulb safety pins (see links at the top).

Mysterious Woman Journal from My Porch Prints

Mysterious Woman Journal from My Porch Prints

See a video flip-thru on YouTube

Want to make your OWN junk journal?
JUNK JOURNAL TUTORIAL


Tuesday, January 1, 2019

French Rose Junk Journal Tutorial - Part 2: Adding Pages


French Rose Junk Journal Tutorial : My Porch Prints

French Rose Journal Tutorial *Contains affiliate links
Part 2: Adding Pages

In Part 1 of this tutorial, I showed you how to create a journal cover using a cardboard box and the French Roses Journal Pages from My Porch Prints on Etsy.

In Part 2, I will show you a quick & easy way to add the pages to your journal.

Making Pages
First, you'll need pages. These can be anything really: old scraps of papers, receipts, envelopes. These are part of the "junk" for your journal. But to make it simple, I'm using the French Roses Journal Pages and coffee-dyed paper cut to 7x10 inches (which makes 5x7 when folded). To coffee dye the pages, I filled a cookie pan with coffee, dipped regular copy paper and then put them on cookie sheets to bake for a few minutes at 275 F degrees.

TIP: After they're baked, splash a little coffee randomly on the pages and put them back in to bake for a few more minutes. This will give give them more interesting stains.

How many pages you want depends entirely on you and how big your journal spine is.

French Rose Junk Journal Tutorial : My Porch Prints

Create Signatures
Once you have all your pages ready, you can fold them to create signatures (a collection of folded pages). My journal has 4 signatures made up of about 6 folded pages each.

French Rose Junk Journal Tutorial : My Porch Prints

Easy Twine Binding
Now it's time to bind the signatures into your journal. There are lots of ways to bind a junk journal. Some are complex or require special tools. This method, sometimes called "Easy Twine Binding", is simple and also works in a way that leaves the pages loose & removable if desired.

Begin by using a piece of twine or other sturdy string.

French Rose Junk Journal Tutorial : My Porch Prints

Wrap your twine around your journal spine. Begin on the outside as shown. Then wrap as many times as you have signatures. I have 4 signatures, so I wrapped four times. End with both ends of your string on the outside of your journal spine and tie them off as shown in the photos. Space out the strings. You can also look up video tutorials for "easy twine binding".

French Rose Junk Journal Tutorial : My Porch Prints

Once you have tied off your twine binding, leave the loose ends (don't cut them). We will use them later to attach embellishments to the spine.

Adding Your Pages
Open your journal. Starting with your first signature of pages, slide one corner under the first string, then ease the rest of the pages under it. This takes some care so as not to rip your pages.


French Rose Junk Journal Tutorial : My Porch Prints

After your first pages are in, flip them over and add the next signature to the next string. Continue until all your signatures are inside your journal.

French Rose Junk Journal Tutorial : My Porch Prints

French Rose Junk Journal Tutorial : My Porch Prints

French Rose Junk Journal Tutorial : My Porch Prints

French Rose Junk Journal Tutorial : My Porch Prints

French Rose Junk Journal Tutorial : My Porch Prints

French Rose Junk Journal Tutorial : My Porch Prints

French Rose Junk Journal Tutorial : My Porch Prints

And there you go! You've added pages to your junk journal!
In Part 3, I will show you how to create a tassel and embellish your journal.

Friday, December 28, 2018

"French Rose" Junk Journal Tutorial : Part 1

French Rose Junk Journal Tutorial : My Porch Prints

*Contains Affiliate Links
French Rose Junk Journal Tutorial
Part 1: Making A Cover
Hello Crafters! Today we're making a journal from a cardboard box and the French Roses Journal Pages from My Porch Prints on Etsy. In this first part, I'll show you how to make the cover. The pages & assembly will come in Part 2.

Find A Box
Start by finding a box. A really easy solution is to use a cereal or cracker box. They tend to already have a journal shape. I used a leftover Christmas box. It was already close the size I wanted and was just begging to be transformed into a junk journal. I opened my box and cut it to the dimensions that would work best with my journal pages: 5x7 inches. I actually cut the box just a smidge larger so that my cover would extend over my pages a bit.

French Rose Junk Journal Tutorial : My Porch Prints
Cut Your Box
Next, I opened up my box and cut it to the size I wanted using a craft knife.

French Rose Junk Journal Tutorial : My Porch Prints

French Rose Junk Journal Tutorial : My Porch Prints

French Rose Junk Journal Tutorial : My Porch Prints
Paint Box 
I decided to paint my box white. This is not necessary. There are LOTS of options here. You could cover your box with paper or fabric. Or leave it plain brown if it has no printing or stickers on it. But I opted to paint mine white.

French Rose Junk Journal Tutorial : My Porch Prints

French Rose Junk Journal Tutorial : My Porch Prints

Round The Corners
Another optional choice is to cut your corners and round them off. I like the way this looks, but again totally optional. If you want consistent corners, make a template from a piece of paper or cardstock and trace.
French Rose Junk Journal Tutorial : My Porch Prints

Front Cover
I decided to use one of my printable journal pages as a cover: plain with some coffee stain markings and script around the edges. I liked the simple look and it leaves me lots of room for decorating options. I cut the corner in a curve to match my cover.

French Rose Junk Journal Tutorial : My Porch Prints
Spine & Back Cover
I also cut pieces of journal pages to fit my spine & back cover, leaving a bit of border around the edges. This left the spine with an unfinished look, so I inked the edges with Distress Ink and a make-up sponge to give the paper a more finished look.

French Rose Junk Journal Tutorial : My Porch Prints

French Rose Junk Journal Tutorial : My Porch Prints

Glue The Cover
To attach the paper to my cover, I applied glue on the journal cover and spread it using a paint brush. This helps keep the paper from bubbling too much.

French Rose Junk Journal Tutorial : My Porch Prints

French Rose Junk Journal Tutorial : My Porch Prints

TIP: If your craft glue is running low, use a cup to hold it upside down. This will keep the glue ready at the tip!

French Rose Junk Journal Tutorial : My Porch Prints

French Rose Junk Journal Tutorial : My Porch Prints

Ink Journal Edges 
Once my papers were applied to the outside cover, I opted to ink the white edges. I thought it gave it more of an antique feel. I also applied ink to the edges of the INSIDE cover.

French Rose Junk Journal Tutorial : My Porch Prints

Inside Cover Pocket
Now it was time to do the inside cover. I wasn't sure exactly what to do for this. Finally, I decided just to use more journal pages and create pockets for holding tags, etc. I rounded the corners to match. After gluing a page inside the cover, I cut a second piece to cut and form a pocket.

French Rose Junk Journal Tutorial : My Porch Prints

French Rose Junk Journal Tutorial : My Porch Prints


Gluing Pockets
I only applied glue to three sides of my pocket, leaving the top open. Then I spread it with a brush.

French Rose Junk Journal Tutorial : My Porch Prints

French Rose Junk Journal Tutorial : My Porch Prints

French Rose Junk Journal Tutorial : My Porch Prints

French Rose Junk Journal Tutorial : My Porch Prints

Cover & Bookplate
For the cover, I decided to use a Tim Holtz Ornate Plate and the word "Create". The words come from a free printable. I started by cutting out my word & gluing it with a craft glue stick to my journal.
French Rose Junk Journal Tutorial : My Porch Prints

Next, I placed the book plate over the word and marked the holes with an awl from a bookbinding kit. This requires a light hand. Be careful not to damage your pages on the other side.

French Rose Junk Journal Tutorial : My Porch Prints

French Rose Junk Journal Tutorial : My Porch Prints

Finally, I added the fasteners. They show on the opposite side, but I'm planning to use some embellishments to cover them later.

French Rose Junk Journal Tutorial : My Porch Prints


In Part 2, I will talk about adding pages & binding to your journal.