Friday, October 12, 2012

Rescue Hutch

Hutches are my new obsession. In the last two months, I've bought three of them and worked on a fourth one for a friend (see it here). They are oh-so-fun to makeover! They go from looking like something your grandma kept porcelain figurines on when you were eight to something BEAUTIFUL... not to mention the awesome storage they provide.

In fact, right now the hutch in my dining room (a Salvation Army find for $75, total bargain) hides a jumble of board games and seasonal decor underneath and displays books and photographs above! Maybe I'll post pics of it later, but back to the rescue hutch.

So, when I found this baby on Craigslist, I jumped at the chance to make it over. The sad thing was a victim of basement flooding and had some damage to the finish  on the bottom portion, but glass doors, an interior light and those fabulous engravings more than redeemed it!I knew I could refinish it and make it shine like new. So, I got to work.

This hutch was a mixture of solid wood, most likely pine, and composite wood. Sanding was a bit of a challenge. But I managed it. Then, I put it through the usual routine: prime, paint, distress, glaze and seal. The end result is stunning! (And sold.) :)


Tuesday, September 25, 2012

French Country Table & Chairs Makeover


Chairs BEFORE.
French Country Table & Chairs Makeover
I picked up this table and chairs set a few months ago with high hopes of refinishing them into something be-you-ti-ful! They did not disappoint!

Table BEFORE.
The pretty fluted legs and molding details are really what make this set special. I knew with a little love (and a lot of sweat), I could bring out those details, so I got to work. First, as always, is the sanding. Lots and lots and lots of sanding. The trouble with pretty little details is they don't like to be sanded. But I did my best.

Next was painting. I used an ivory latex color to coat the whole thing except, of course, for the top of the table. That got a dark walnut stain. Gorgeous!

After painting, I distressed with some sandpaper, glazed with a mix of acrylic paint and water, and sealed it all with spray-sealer. After staining the table, I sealed it, too with a matte finish Mod Podge. Three coats. They were brushed on with a sponge brush (you can find these cheap in Walmart's paint section).


Pretty details.
Ugly cushions
Finally, I had to cover those hideous chair cushions. While in great condition, the fabric just screamed ugly. Loudly and annoyingly. So I covered up that nasty jungle print with faux grain sack that I made myself. I bought a darker muslin fabric and also a striped fabric. Then I printed images from The Graphics Fairy and used Citra Solv to transfer the images onto the fabric. This is like magic. The kind you only dreamed of as a child. You can find out more about Citra Solv image transfer here. FYI, I washed the fabric directly after transferring the images, and yes! They do stay!

Despite a few imperfections, I think the table & chairs are beautiful! I'm only sad that my Porch will most likely be closing down soon for winter. :(

AFTER! So pretty!


"Grain Sack" Cushions.

Love the details!


Thursday, September 20, 2012

Shabby-Chic Nightstand

So, my daughter sent me a frantic text saying her friend's neighbor had just put some furniture out on the curb and would I be interested? I texted back saying, "Send pics!" THIS is the result of that fateful text.

I decided to ask my teen daughter if she'd like to take on this little nightstand and keep the profits. Like any American kid, she perked up when she saw the dollar signs and agreed to make-over the nightstand. It was a pretty little thing with good bones. I knew it would turn out great!

So, my darling daughter began sanding and scraping off veneer. It was a lot of hard work, and I honestly expected her to give up and lose interest, but she didn't! She persevered and by the end of the day had scraped and sanded that little nightstand so much that we actually had to get out some wood filler to repair the little dents.

She painted a couple coats and then got very busy with school. So, I decided to put the finishing touches on it myself, wondering if I was stealing her thunder. I knew it was a mistake. She was disappointed she didn't get to, "Put the little knobs back on" herself. I should've let her finish the work she'd begun, and I promised next time to let her do it all herself. But when she'd heard that it had sold for $55 on Craigslist, she forgave me. ;)


Saturday, September 8, 2012

Hutch Makeover

All sanded.


What I Did
Something I realized over the past two weeks is that refinishing furniture for a client is SCARY. I don't know if I want to do it ever again. See, when I buy something from Goodwill and decide to fix it up, the worst thing that can happen is it looks bad, or I dent it, or I just can't sell it and get my thirteen bucks back. Really, the consequences aren't all that dire. But when I'm working on someone else's furniture, I have to worry a little more about if I'm doing everything right and if it will stand the test of time.

Left unglazed. Right glazed.
That being said, I really did LOVE working on this hutch, despite my fears. And in my opinion, I think it turned out BEAUTIFUL. The client seemed happy, too, which was my biggest fear.


How I Did It
First, all the hardware was removed. Yes. All of it. Next, I sanded the whole thing. Yes. All of it. My fears here were if I didn't sand it, the paint would slide right off. It's a lot of work, but in the end, sanding really pays off.  Next step was priming, then painting with a creamy satin latex paint. It took a few coats to cover it all up. After that, I sanded all the
I also painted the hinges to match the
new hardware.
edges to bring out the details of the molding. Next, I glazed it with a mixture of burnt umber acrylic and water, brushing it onto the surface, then wiping it away, leaving just a hint behind for that aged/worn look. And finally, I coated it with a clear acrylic sealer. I used spray matte finish Mod Podge and then also brushed on few coats of matte finish furniture-quality Mod Podge.

Tuesday, August 21, 2012

Bruno and the Pile of Projects

Today I have a LOT of work to do! On My Porch right now I have a desk, a table, four chairs, a china cabinet, a side table and an old window that all need makeovers. Plus, I have a friend who needs her hutch sanded and painted by yours truly.

Let's forget the overwhelming pile On My Porch for just a moment and focus on one item in particular: a desk. This little guy--let's name him Bruno--was rescued from Salvation Army a few weeks ago. He's been hanging out On My Porch ever since, waiting patiently for a makeover while other, more glamorous items have had their turn.

My plan for Bruno is to turn him into a beautiful buffet table. I want to sand his veneer, paint him a creamy white, distress and glaze him and finish him with a shelf and some baskets.

Unfortunately, Bruno is going to have to wait a little while longer. I'm itching to makeover a table and chairs I got last night, plus my friend's hutch will take a lot of time and attention for a week or two. After that, I might work on my own china cabinet and well, poor Bruno is just sitting on the back burner. At least he's not lonely out there.

Don't you love his old hardware and cute little drawers? Plus the top drawer is divided so neatly. I can't wait to see how Bruno turns out, but I suppose I'll just have to.


Thursday, August 16, 2012

French Wine Label Coffee Table


So, it's time to post again. I have a few new projects on my porch but, alas, technology has defeated me. The drive for my SD photo card is hateful and vindictive and will not allow me to access any of my photos. So, instead of showing you What's On My Porch this week, I'm going to show you what was on my porch earlier this summer.

Of course, I have no "before" photos. Sometimes I forget to take them. It happens. Suffice to say this coffee table was a light stain and scratched up a bit... like a lot of my projects. I began by sanding it. Then I applied creamy white paint (the usual three coats).

I hand-painted a design on the top from what appears to be a French wine label. I honestly cannot recall where I found it. I should probably keep better track of those things.

Then I changed my mind. I'd thought about distressing it by sanding away at the corners. However, the light stain underneath wasn't the look I had in mind. I wanted something darker, warmer, richer. So, instead of sanding, I did a dry-brush technique with a dark-brown acrylic paint, highlighting the edges and also lightly brushing across the white surface to give it an old... wait for it... VINTAGE feel.Yuk yuk.


The finishing touch was to lightly sand the painted words and then spray with a light coat of matte acrylic sealer. And voila! A beautiful coffee table that I sold for $65. Not too shabby.


Saturday, August 11, 2012

Random Porch Projects


So, I finished up the chairs to go with my French country table. They started life as purplish-red with nasty green cushions. With a little sanding, painting, distressing, aging and re-covering, they have transformed into something charming and lovely. And clean.


 A few of my other projects/finds:


Some great hardware from my a box my hubby has been hiding from
me in the basement. Steampunk-a-rific!


Excellent find at Salvation Army! I LOVE this piece!
My daughter said it looked like Sara's from Labyrinth... where she keeps
her stuffed animals, including Lancelot, the teddy bear!

This was an old project I did a while back.

Finally, a great use for an old drawer. The wood was pretty. The handle
adds a charming touch. This drawer has dividers for sorting all my art supplies!

Thursday, August 9, 2012

Lesson from a Pedestal Table

I am what the world would call a dreamer. Impossibly big ideas + impossibly big ego = dreamer. I see a project and think, "I can do that!" Sometimes it's true, and other times it isn't. Let me explain this using the project On My Porch this week: Free Pedestal Table.

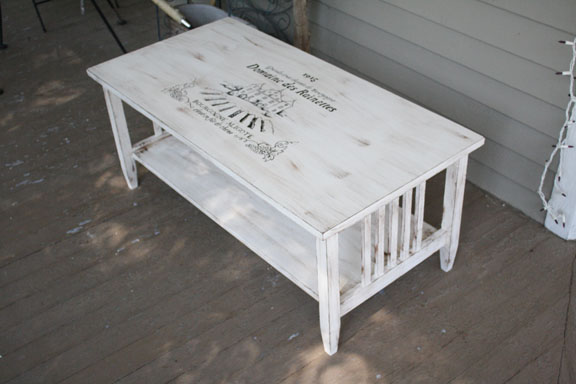
If you recall, my hubby found this baby FREE on a curb! I was so excited for this project and had Really Big Ideas for it. So, I got to work.

First, I sanded the table using an orbital sander and also a sanding block. I started with the top, but since that's where my Impossibly Big Idea and Impossibly Big Ego were both shattered, let's talk about the base instead.
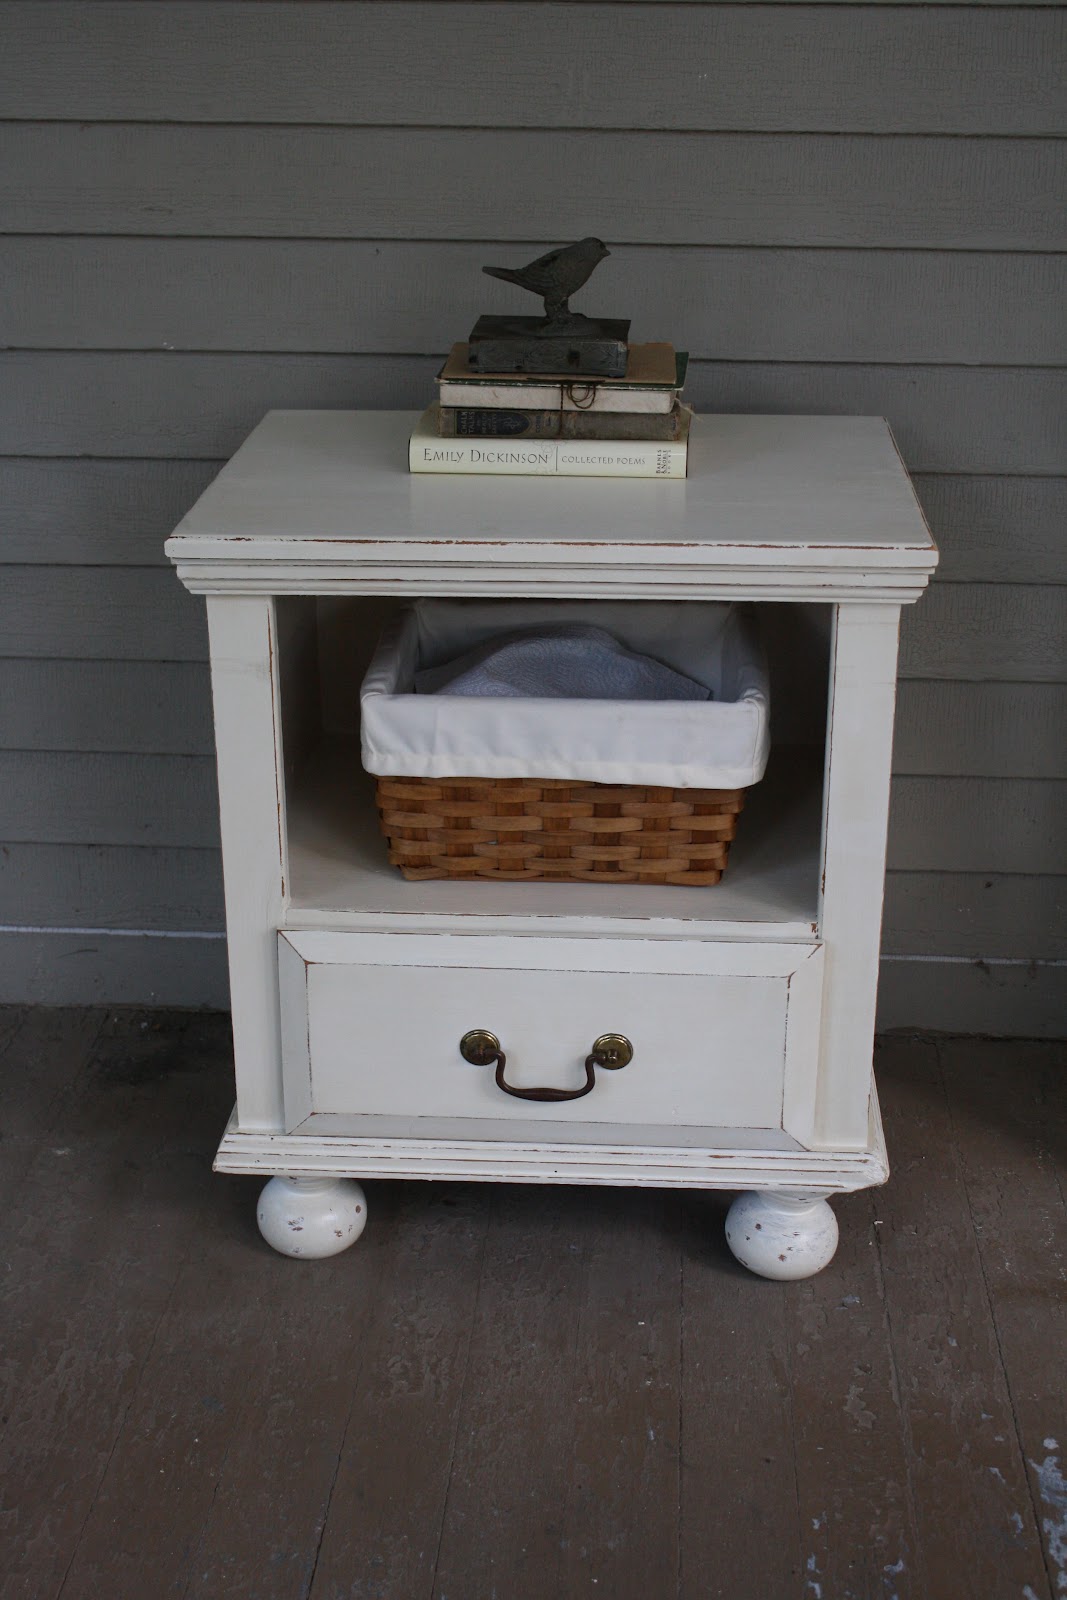
The Base
The lovely angles of the base would not permit orbital sanding, so it was all done by hand. I just roughed up the surface, not bothering to remove ALL the old finish. I mean, it's only the bottom, so why bother? I also covered the brass plates with card stock, cut to size, to keep the paint off. Then I painted the base with a creamy interior latex, sanded the edges by hand for a "worn" look, and finished with my own homemade version of an antique glaze, which is basically dark-brown acrylic paint and water. I brushed this mixture over the white paint, then wiped it away, leaving a slight hint of the brownness behind for an aging effect. Beautiful.

And now, we come to the table top. The sanding went... (wait for it)... SMOOTHLY! The old finish practically melted off like butter on a hot corn cob. It was perfection! Then I did something really, really stupid. I did a stain/varnish combo in walnut. This, in itself, was not stupid. It actually turned out very pretty, especially after two coats (4-6 hours of drying time each) and a final clear coat over all.

Soap-paint was the only thing
that even slightly transferred.
Here's where the stupid comes in.
You see, I was planning to put a very elaborate French graphic (from the always-amazing Graphics Fairy) onto this table. I planned and measured it PERFECTLY. It took me hours of Photoshop work and looking up the French word for shoes on Google translator (chaussures), and then using the existing words in the same font to actually write the French word for shoes into the design. I thought I was very wise in planning for the extra table leaf, too, since the leaf could be removed, and the graphic would still look AWESOME, and the seams would match up to perfection! Clever me! Except for one fatal flaw: I cannot transfer this graphic onto the shiny slick surface of the table top.

SPLAT!
I tried. A lot. I tried black crayon, black paint, black paint mixed with soap, which almost kinda, sorta worked. But didn't. And to top it off, I splattered it all over my shirt. In the end, I realized I was defeated by the amazingly shiny, slick surface that I, myself, had created. I realize now I should have put the graphic on BEFORE finishing the table. And there is no way that I can possibly freehand this design without it looking like a four year-old did it. (No offense to four year-olds.) If only I had a projector! Alas, I do not.

French graphic I
was not able to use.
(This time.)

And so, my French graphic, French country table is just a regular old French country table. Which really isn't so bad. Hubby fixed the slidy mechanism for the leaf, which works like a dream! I can put in and remove the leaf myself without any help thanks to his skills and a little WD-40.

So, sans-graphic, this baby is ready to sell except for the fact that it has no chairs. Don't get me started about my quest to find reasonably-priced chairs, though. That is a blog for another day!


Friday, August 3, 2012

Hello world! And a table.

By Stephanie S. Sanders
I realized my old blog was getting clogged up with DIY projects, so I decided to make a brand-spanking-new blog devoted to....... you guessed it: DIY projects. These could be anything from furniture makeovers to party invitations. They will usually involve my cheapskate tudy-tude and my anything-you-can-do-I-can-do-better-or-at-least-cheaper spirit. So, to kick-off this new blog, I will post the latest project On My Porch: a French graphic table.


I bought this little beauty at Salvation Army thrift store for six bucks. Actually, I think it was $5.98. It was a little wobbly and the drawer was a bit off the alignment, but I didn't care. I figured if I couldn't fix it... my hubby could! So, I got to work.

Paint or Stain?
My original idea was to sand and stain the top, then add a graphic in black paint. I broke out the good old orbital sander which did a fine job removing the old stain. However, this table was made of some kind of soft, textured wood that did not at all like being sanded smooth. The lovely, hateful ripples kept showing through, even after I stained it. It was charming and annoying. So, I decided to paint the top instead.

I mixed up some joint compound with acrylic paint (in flat, not glossy) and slathered it on. It looked great. I was going for the chalk-paint effect and it did not disappoint. However, it was EASILY scratched off. I decided to address this... later.

Adding the Ooh La La!
So, I printed out a nice French graphic and realized a dilemma. See, usually I color on the back of my graphic with a black crayon, then trace over it to "transfer" it to the table. But black crayon on black table wasn't exactly working. What did work? Pressing really hard with my tracing pencil and basically imprinting the graphic into the black "chalk" paint. Then I went over it with a pencil just to be sure I could see it when it came time to paint it white.

So, up to this point I've been doing a lot of detail painting on my various projects with acrylic paint and a teensy weensy brush. It works and looks good, but my poor wrist and eyes can only take so much. So, I decided to spring for a fine paint-pen from Walmart's craft section. It worked great for tracing out the lettering of this graphic. White on black: classy!

Hob-Knobbery
I hated the brass knob that came with the table, so I dug around in my hardware junk drawer to find a suitable replacement. After several failed attempts, I decided on a nice little round antique brass pull. Now, if you recall, I said I'd address the fact that the "chalk" paint scratched off the surface if I so much as sneezed at it. The fix? A layer of Modge Podge, painted on with a sponge brush. And then a final spray of clear acrylic sealer, just to be safe. I love the look of this little table and can't wait to make a hefty profit on Craigslist!