Showing posts with label French country. Show all posts

Wednesday, August 21, 2013

Dining Room Makeover

We saw this place on the way to the
Renaissance faire. I promise I don't always
dress my kids like that.
It's funny how we neglect ourselves. As a mom, I usually make sure my kiddos have clean clothes, haircuts, transportation, etc., while I myself run out the door without brushing my hair (or sometimes teeth). The same thing happens with my house. I find myself making over furniture pieces for everyone under the sun, while my own home suffers.

I finally decided to do something about it! I was sighing over Pinterest boards when I realized I could do that! Or something like that, anyway. I didn't have to live with fifteen shades of wood and mystery piles in the corner anymore! And so began my DINING ROOM MAKEOVER! Yay!
Attempt #3 or #4 at painting the dining room.
To really tell this story, I have to go back, waaaay back to square wheels and dinosaurs and this house in 2006, the year we bought it. It was a fixer-upper, and by fixer-upper, I mean that it looked like it should be condemned. I still remember the first time we drove by. My husband had had a dream when he was a teenager about a woman with dark curly hair and a little girl in front of a house with a corner door. So, when we saw this house had a corner door, we had to stop, even though it really did look like it was about to fall down. Hubby got out to look while I stayed in the car. Then I saw him waving frantically from the saggy porch.


"Oh brother," I said as I dragged myself out to see what had him so excited. Then I looked in the picture window and saw this:


It was a beautiful wooden staircase. We bought it soon thereafter and began the WORK. The work never finished. We are, at this moment, still working. But that's another story. On to the dining room!

The dining room started out with pink painted walls (over wallpaper) and green carpet, or at least it had once been green. I'm pretty sure. Since then, it has been painted, I believe, FIVE times. Yes. I painted it yellow, then added stripes, then green, then white, then the current color which is a kind of off-white. With all those layers, I think the room has actually shrunk by a quarter inch.

First attempt: yellow!

Yellow=bad. Very bad.
Yikes! Second attempt: Stripes!


Uh, nope. Things get fuzzy here. Maybe it's all the paint fumes... I'm pretty sure third attempt was army-green, then white. But I don't have a picture of the "white" phase.

My "green" phase. Did not work. Made the room very dark.


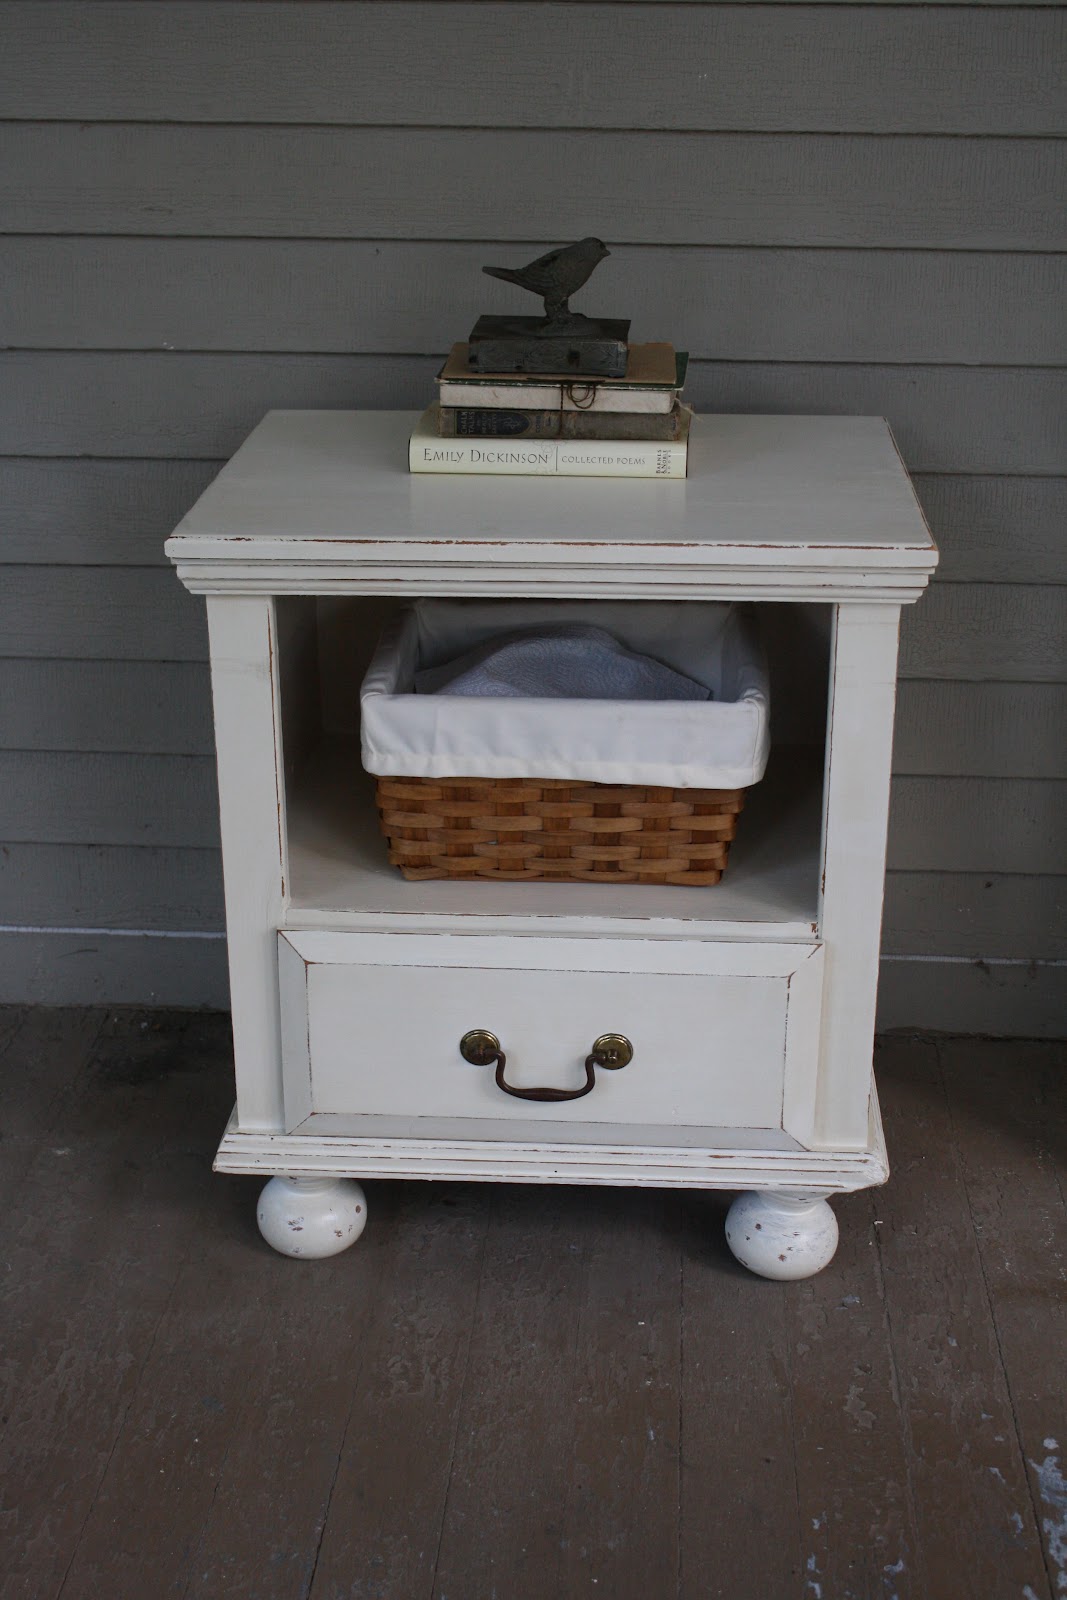
So, I finally found a color I can live with, but then I realized I really didn't like my dining room. It had eight thousand clashing shades of wood furniture/trim/flooring. I've changed the table twice. Computer desks have come and gone and come again (our dining room doubles as an office). And I've also gone through various storage units, finally settling on a Salvation Army hutch, a gutted radio cabinet, and a Walmart cabinet that I made over after Hubby put it together upside down. :)

I won't go through the details of before and after. Instead I will show you how things have progressed. The end result isn't really the end. I still have plans and will likely paint two or three more times. But I'm happy.
For now.
Pretty light curtains give an airy feeling to this boxy room.

My favorite! I LOVE how the dining table turned out!

Lead paint didn't stop me from loving this little door.
I simply gave it a few clear coats to seal in those naughty paint chips.

I <3 old windows!

Found these corbels at a thrift store. They are a perfect fit for my new shabby/French country dining room!

As an author, I LOVE old books.

Finally painted this mirror my mom gave me. So shabby-chic!


Old radio cabinet now stores art supplies. LOVE it!


Here's the "final" product. For now. :)


Friday, August 16, 2013

Dresser Makeover: A Story

Everyone has one--an old piece of furniture that you've had for YEARS. You don't really love how it looks, but you can't bring yourself to do anything about it because:
  1. You're too lazy.
  2. It was your grandma's/aunt's/mom's/Mary Todd Lincoln's. And painting it would be a sin/make you an outcast at reunions/get your name and your children's names scratched off the family tree, etc.
  3. You've never found time in the last sixteen-and-a-half years to DUST it, let alone FIX it. (This is mine.)
  4. Insert excuse here_____.


You KNOW that piece. Maybe it's more than one. Maybe it's a whole dining room. The point is, everyone has one. This was MINE, and this is its story.

It was about a bazillion years ago. Hubby and I were shopping at a trendy spot called Valley Junction, where antiques abound and anything cool can be had for the right price. Including a jar of buttons, but that's a story for another time.


Another "before" shot of our little curvy dresser. Yes. That IS a lot of dust.

We were in one of those shops where stuff is piled on top of other stuff when we spotted it... a cute little curvy antique dresser. Solid wood. Dovetailed drawers. I had to have it!

"How much?" Hubby asked because I'm an introvert.

"$130," said one of the two guys who followed us around the store, spouting off the merits of each item as we passed it.

"Will you take $5?" I asked.

Okay, I didn't really, but I should have because $130 was just a wee bit out of our price range back then. In fact, it still is.

I'm going to give you the abridged version here since you can probably guess the ending. We bought it. We took it home. I put lamps on it and gushed over it and NEVER dusted it again.

Fast forward fifteen years, several dogs and about six houses later. The little wooden dresser is sitting in our upstairs hall because I don't know where else I can fit it. It doesn't actually work as a dresser for any of us because with two teenage daughters, we have enough clothes to build a suspension bridge to the moon.

I suddenly have an epiphany.

"Hey!" I say to myself, "I am pretty handy with a paintbrush these days. I should make over that old dresser that we paid too much for all those years ago!"

I started with a coat of Zinsser primer. You will hear that product name a LOT from me. If you hate sanding as much as I do, then you should get to know Zinsser. Then I followed with a coat of white paint. Any old latex will do. Satin finish. I used sandpaper to rough it up and give it that worn-in, chippy look.

For the top, I did have to crack out the old orbital sander. After it was sanded, I mixed white latex paint and water (about half and half, I'm not very mathy). And brushed it over the sanded top. When it was dry, I went over it with a coat of stain. I brushed the stain on, then wiped it off with a rag. Walmart sells these white kitchen tea towels in packs of 10 that are perfect for this and many other projects as well. This stain-over-white-wash technique gives the wood a grayish driftwood finish that I just love!

And that is pretty much all there is to know. If you are wondering about the end of this story, have a look at the photos. I think it was a happy ending. And I promise to dust it this time. Seriously.


The end.

Tuesday, February 19, 2013

A Few Winter Projects

Well, it's been a long, cold winter, and I haven't had much opportunity to work on the Porch. Still, I've managed to complete a few indoor projects. Since I don't have much time to write about them, I will skip to the good stuff and post some photos!

Faux Grain Sack Pillows: I used the CitraSolv method to make
these, and they turned out SO pretty!

Family Name Window. Hand-painted.


Yes, another makeover display hutch.
LOVED the detailed
molding on the top! Beautiful!

Friday, October 12, 2012

Rescue Hutch

Hutches are my new obsession. In the last two months, I've bought three of them and worked on a fourth one for a friend (see it here). They are oh-so-fun to makeover! They go from looking like something your grandma kept porcelain figurines on when you were eight to something BEAUTIFUL... not to mention the awesome storage they provide.

In fact, right now the hutch in my dining room (a Salvation Army find for $75, total bargain) hides a jumble of board games and seasonal decor underneath and displays books and photographs above! Maybe I'll post pics of it later, but back to the rescue hutch.

So, when I found this baby on Craigslist, I jumped at the chance to make it over. The sad thing was a victim of basement flooding and had some damage to the finish  on the bottom portion, but glass doors, an interior light and those fabulous engravings more than redeemed it!I knew I could refinish it and make it shine like new. So, I got to work.

This hutch was a mixture of solid wood, most likely pine, and composite wood. Sanding was a bit of a challenge. But I managed it. Then, I put it through the usual routine: prime, paint, distress, glaze and seal. The end result is stunning! (And sold.) :)


Saturday, September 8, 2012

Hutch Makeover

All sanded.


What I Did
Something I realized over the past two weeks is that refinishing furniture for a client is SCARY. I don't know if I want to do it ever again. See, when I buy something from Goodwill and decide to fix it up, the worst thing that can happen is it looks bad, or I dent it, or I just can't sell it and get my thirteen bucks back. Really, the consequences aren't all that dire. But when I'm working on someone else's furniture, I have to worry a little more about if I'm doing everything right and if it will stand the test of time.

Left unglazed. Right glazed.
That being said, I really did LOVE working on this hutch, despite my fears. And in my opinion, I think it turned out BEAUTIFUL. The client seemed happy, too, which was my biggest fear.


How I Did It
First, all the hardware was removed. Yes. All of it. Next, I sanded the whole thing. Yes. All of it. My fears here were if I didn't sand it, the paint would slide right off. It's a lot of work, but in the end, sanding really pays off.  Next step was priming, then painting with a creamy satin latex paint. It took a few coats to cover it all up. After that, I sanded all the
I also painted the hinges to match the
new hardware.
edges to bring out the details of the molding. Next, I glazed it with a mixture of burnt umber acrylic and water, brushing it onto the surface, then wiping it away, leaving just a hint behind for that aged/worn look. And finally, I coated it with a clear acrylic sealer. I used spray matte finish Mod Podge and then also brushed on few coats of matte finish furniture-quality Mod Podge.

Saturday, August 11, 2012

Random Porch Projects


So, I finished up the chairs to go with my French country table. They started life as purplish-red with nasty green cushions. With a little sanding, painting, distressing, aging and re-covering, they have transformed into something charming and lovely. And clean.


 A few of my other projects/finds:


Some great hardware from my a box my hubby has been hiding from
me in the basement. Steampunk-a-rific!


Excellent find at Salvation Army! I LOVE this piece!
My daughter said it looked like Sara's from Labyrinth... where she keeps
her stuffed animals, including Lancelot, the teddy bear!

This was an old project I did a while back.

Finally, a great use for an old drawer. The wood was pretty. The handle
adds a charming touch. This drawer has dividers for sorting all my art supplies!

Thursday, August 9, 2012

Lesson from a Pedestal Table

I am what the world would call a dreamer. Impossibly big ideas + impossibly big ego = dreamer. I see a project and think, "I can do that!" Sometimes it's true, and other times it isn't. Let me explain this using the project On My Porch this week: Free Pedestal Table.

If you recall, my hubby found this baby FREE on a curb! I was so excited for this project and had Really Big Ideas for it. So, I got to work.

First, I sanded the table using an orbital sander and also a sanding block. I started with the top, but since that's where my Impossibly Big Idea and Impossibly Big Ego were both shattered, let's talk about the base instead.

The Base
The lovely angles of the base would not permit orbital sanding, so it was all done by hand. I just roughed up the surface, not bothering to remove ALL the old finish. I mean, it's only the bottom, so why bother? I also covered the brass plates with card stock, cut to size, to keep the paint off. Then I painted the base with a creamy interior latex, sanded the edges by hand for a "worn" look, and finished with my own homemade version of an antique glaze, which is basically dark-brown acrylic paint and water. I brushed this mixture over the white paint, then wiped it away, leaving a slight hint of the brownness behind for an aging effect. Beautiful.

And now, we come to the table top. The sanding went... (wait for it)... SMOOTHLY! The old finish practically melted off like butter on a hot corn cob. It was perfection! Then I did something really, really stupid. I did a stain/varnish combo in walnut. This, in itself, was not stupid. It actually turned out very pretty, especially after two coats (4-6 hours of drying time each) and a final clear coat over all.

Soap-paint was the only thing
that even slightly transferred.
Here's where the stupid comes in.
You see, I was planning to put a very elaborate French graphic (from the always-amazing Graphics Fairy) onto this table. I planned and measured it PERFECTLY. It took me hours of Photoshop work and looking up the French word for shoes on Google translator (chaussures), and then using the existing words in the same font to actually write the French word for shoes into the design. I thought I was very wise in planning for the extra table leaf, too, since the leaf could be removed, and the graphic would still look AWESOME, and the seams would match up to perfection! Clever me! Except for one fatal flaw: I cannot transfer this graphic onto the shiny slick surface of the table top.

SPLAT!
I tried. A lot. I tried black crayon, black paint, black paint mixed with soap, which almost kinda, sorta worked. But didn't. And to top it off, I splattered it all over my shirt. In the end, I realized I was defeated by the amazingly shiny, slick surface that I, myself, had created. I realize now I should have put the graphic on BEFORE finishing the table. And there is no way that I can possibly freehand this design without it looking like a four year-old did it. (No offense to four year-olds.) If only I had a projector! Alas, I do not.

French graphic I
was not able to use.
(This time.)

And so, my French graphic, French country table is just a regular old French country table. Which really isn't so bad. Hubby fixed the slidy mechanism for the leaf, which works like a dream! I can put in and remove the leaf myself without any help thanks to his skills and a little WD-40.

So, sans-graphic, this baby is ready to sell except for the fact that it has no chairs. Don't get me started about my quest to find reasonably-priced chairs, though. That is a blog for another day!