Showing posts with label pumpkin. Show all posts

Tuesday, August 27, 2019

Halloween Wheel Window Card Tutorial


Halloween Wheel Window Card
This super-cute Halloween Wheel Window Card has a window and a wheel with spinning words. It's cute on its own or as a cover or insert for a junk journal!
To make it you'll need a few supplies:

Supplies:
Black Cardstock
Tim Holtz Ornate Plate
Brass Fastener
Circle Punch
Awl Or Other Sharp Tool
Craft Knife
Mounting Tape
Tape, Glue, Scissors, Etc.

Printables:
Pumpkin Image (I got mine from Jento Design on Etsy)
(Pumpkin image is also available in the cover of my Cozy Autumn Journal Kit Printable)
"Seasons" Journal Words Printable from My Porch Prints
Coffee Stained Book Pages Printable from My Porch Prints


Preparing The Black Card
To begin, cut an 8.5x11 inch sheet of black cardstock in half to create two 8.5x5.5 pieces. Then cut an extra half-inch off the side & bottom of one piece. This will be your main card.


Punch Half-Circle
Punch a half-circle in the center bottom of the smaller, main card.


Bookplate Pumpkin
Next, place your book plate in the center of your pumpkin image and trace the inside, the outside corners, and the fastening holes.


Use your awl or sharp tool to punch the fastener holes.


Using a craft knife, cut out the center tracing.


Next, attach your bookplate to your pumpkin as shown.


Creating Your Wheel
Find a circle shape that is the same size or slightly smaller than your main black card. Trace it onto the larger cardstock piece (NOT the one with the half-circle punched out). Cut it out. This will become your wheel.


Find and mark the center of your circle.
One way to do this is to place the circle on a piece of paper and use a ruler to cut the paper to the same size as the circle. Then, measure each side and mark the halfway point. For instance, my paper was 4x4 inches. So, the center of each side was the 2 inch mark. I drew a line at each 2-inch mark, and where the lines intersected was the center of my paper.

I used my awl to create a hole in the center of my paper, then placed my circle on the paper, lining my circle edges with my paper edges, and flipped it over. Using a pencil, I marked through the hole I created onto my circle. You can also look up "How to find the center of a circle" if that is more helpful.


Create a hole in the center of your circle or wheel. Then align the wheel in the bottom-center of your card (where you punched the half-circle). And mark through the center hole. Use the awl to punch it out.


Creating Your Window
This part is just a little tricky. It took me some trial and error. With the wheel aligned on the center bottom of your card, place the pumpkin over the top edge of the wheel so that your wheel shows through the window. (See photo above.) You'll want to align it carefully. The wheel should show through, but the edges of the wheel should not.


Now that you have your pumpkin and wheel aligned, carefully remove the wheel by sliding it away. Do not move your pumpkin.


Use a pencil to trace inside your pumpkin bookplate onto your card.


Now, remove your pumpkin and use your craft knife to cut out where you marked with your pencil.

Back of card.
Turn your card to the back (see above photo) and use your brass fastener to attach your wheel to the back of the card. Then flip it back to the front again.

Front of card.
 Your wheel should completely cover the window you cut out as shown above.


Adding Seasonal Words
Use glue to attach your cut-out "Seasons" Journal Words to the wheel, using the cut-out hole as a guide for placing the words. (See the above photo.)


When you've glued on a word, spin the wheel until the word disappears and attach another word. Repeat until the wheel is full of words. Try to space them evenly. Note: Be sure to leave plenty of space between the words so no more than one shows up in the window at a time.


When you've finished applying your words to the wheel through the window, use a piece of tape to secure your brass fastener.


Attach Pumpkin
You might also want to secure the fasteners on your pumpkin book plate. Then glue your pumpkin to your card, lining up the window so the words show through and covering your brass fastener.

If your pumpkin isn't large enough to cover your fastener, consider using some cheesecloth or decorative tissue paper underneath your pumpkin to hide the fastener. Just don't cover your window.


Print your Coffee Stained Book Page on cardstock and fold it in half as shown.


Use strips of mounting tape to attach your completed pumpkin card to the folded "Coffee Stained Book Page" card.


Align the pumpkin card with the bottom of the folding card as shown below.


If you want, ink the edges of your card, and you're finished! Now you can use the punched out part at the bottom to move the spinning wheel and change the words in your window. See video below.
If you liked this tutorial, please share!
Thanks!
Stephanie from My Porch Prints


Tuesday, October 2, 2018

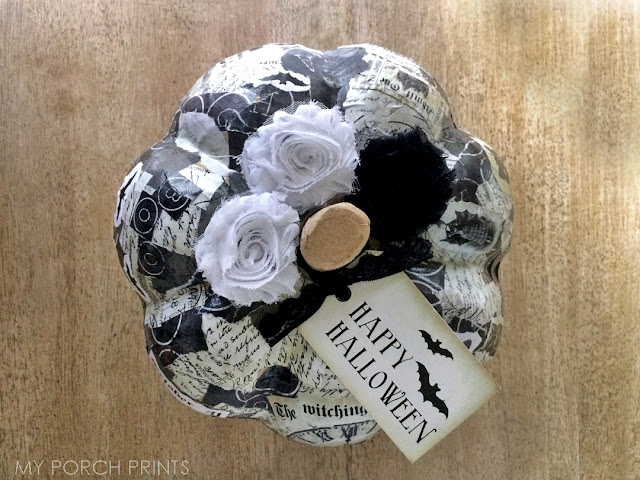
Black & White Halloween Craft Pumpkin Tutorial


When witches go riding, and black cats are seen, the moon laughs and whispers... tis time to make this awesome black & white craft pumpkin, yo.

Okay, that's not quite how it goes. But it doesn't matter. We're going to take the moon's advice and make this pretty pumpkin... yo. ;)

Make This Black & White Halloween Craft Pumpkin

You Will Need...
First, we need to gather supplies. Even Cinderella had to start with a pumpkin. If it was good enough for her, it's good enough for us! I got mine at Hobby Lobby. You can also find similar pumpkins here. You could potentially use a thrift store plastic or foam pumpkin, too... as long as you can stick images to the surface. Just keep in mind if it is a bright orange, you might want to paint it first.

You will also need:
- Romance Writer Scrap Pack from My Porch Prints (for the papers)
- Black & White Halloween Scrap Pack from My Porch Prints (for the images)
- Mod Podge (I used glossy)
- Foam Brushes
- Black Lace (optional)
- Fabric Flowers (optional)

Make This Black & White Halloween Craft Pumpkin


Decoupage
To begin, cut or tear your papers into small pieces, about 1-2 inches in size. I tore some of mine. Others I cut. I didn't want them identical, but rather of various sizes and shapes. Pour your Mod Podge into a paper bowl and use your foam sponge brush to apply the Mod Podge to a small area of your pumpkin. Then place one piece of paper over it. Using the brush, apply another layer of Mod Podge on TOP of the piece of paper.
Tip: If parts of the paper won't lay flat, I used a craft stick to smooth it down.

Make This Black & White Halloween Craft Pumpkin

Make This Black & White Halloween Craft Pumpkin


Layer Papers
Repeat the process, layering the papers over each other. You can use a few different papers, or just one, whatever you like. I layered a few different kinds of paper.
Tip: I left the bottom uncovered because no one would see it.

Add Halloween Images
To add the black & white Halloween images, carefully tear around the images you want and use the Mod Podge in the same way you applied your paper.


Make This Black & White Halloween Craft Pumpkin

Finishing Touches
When finished, allow to dry for a few hours. Then use the black lace to tie a tag to the top of the pumpkin. Embellish with black & white fabric flowers. All done!

Make This Black & White Halloween Craft Pumpkin


Make This Black & White Halloween Craft Pumpkin

Wednesday, August 12, 2015

Lamest Post Ever

Okay, I've been working kind of sporadically this summer. For a long time we thought we were moving to Michigan, so I didn't want to start a bunch of projects and make my house all cluttered and messy. However, we just decided last month that we would NOT be moving. In all the confusion and switching-gears I decided to start doing projects again. Because nothing takes my mind off life-changes like painting an armoire!

Here are a couple of projects I've done in the last week or two. I didn't bother with a lot of before/during photos, so sorry for that. But, if you're like me, you can still enjoy a good makeover.

Hoping to bring LOTS more projects as fall creeps in.


Updated an old wood computer cabinet with a little paint and distressing.


A little punkin painted on reclaimed wood.


This design was from a cute pin I saw on Pinterest! Love it!

Saturday, September 20, 2014

Autumn At My House 2014

Here's a look at how I decorate for autumn in my own house! I hope you are inspired! Enjoy!
The space above my computer printer cabinet is all prettied up for fall! I found an old drawer and painted it white, then used it like a shelf to hold pumpkins, apples and my homemade chalkboard.

This cabinet was a $5 find at our church fundraiser sale. It was brown and dirty, but a few appliques, a coat of paint and a couple of pendant pulls transformed it! I simply added a small bunch of autumn leaves to my sewing drawers to "autumn-up" this space.

Old thrift store bottles and jars make great "potions". A few dollar store cobwebs (and raven) and some mini apples make my candlesticks and vintage tea set look a whole lot spookier!

This vintage suitcase was another thrift store find. Only $3!!! It looks great all dressed up for fall atop my cabinet.

Here's a close up of this paper pumpkin made from the pages of an old song book.

This hutch was a $30 Craigslist find! I removed the doors (and by "I" I mean Hubby removed the doors). Then I painted it white and distressed it. It makes a beautiful TV hutch! A sprinkle of fall leaves and a pinecone and pumpkin add the
autumn look.


This was another thrift store find. This bookshelf was painted in green camouflage. A coat of simple white transformed it into the perfect backdrop for my lanterns and other knick knacks. A few pumpkins, gourds, pinecones and apples jazz it up for fall.

The "Love Grows" sign was hand-painted by me. The wood was from the barn on my dad's farm. On the back, I've written the names of our family members and will pass it on to my children. Some red and a white pumpkin add a touch of autumn here.

Our staircase paneling is beautiful, but so dark! I lightened it up with my handmade Fruit of the Spirit sign and a rag garland, dressed up for fall with some apples and twigs.

Our cat, Pudge, stalks birds from the window above this handmade "Nevermore" sign.


This shelf makes a great display area on my porch! Two-tone baskets, fall leaves and an apple garland add texture and color for fall!


Summer still lingers here with my pink impatiens.