Showing posts with label decorating. Show all posts

Saturday, September 15, 2018

Halloween Mini Spell Books Tutorial


Halloween Mini Spell Books
Fall is a time for pumpkin spice, crisp pretty leaves and... Halloween! This set of four mini Halloween spell books makes a fun and bewitching craft project.

Once you see how easy they are to make, you'll want to get your craft on.

1. Start with the printable download: Halloween Mini Books from My Porch Prints on Etsy.


2. Print the covers on cardstock* and the inside pages on regular paper. Cut them out as shown. You should have 3 page strips for each book.

*My printer was low on ink, which I didn't realize at the time. So, my "Book of Spells" cover is a little more "red" than the actual version. 


3. Fold the lighter, inside cover as pictured. Also fold along the "spine" to create a book shape. Secure with adhesive. I use craft glue or glue sticks.


4. You can add depth to your book (and cover up any crease lines) by using a black marker and a make-up sponge to darken the edges & spine.


5. Cut out the page strips and fold them accordion style. Apply glue to the back and glue page 1 to page 2, page 3 to page 4, and page 5 to page 6 as shown. Basically, just scrunch up your "accordion" so the page-backs stick together.


6. Now you have a book cover and a set of three signatures. (A signature is a collection of pages.)
Using a clip or clothespin, line up your three page signatures and hold them tightly together. Apply glue to the edge and push it into the inner spine of your book as shown. Hold for about 30 seconds or until adhesive begins to set.


 7. Finish by clamping the cover and pages together and allowing the adhesive to dry. Repeat process for each mini book.


And that's it! You have a collection of spooky spell books perfect for Halloween!


Saturday, February 17, 2018

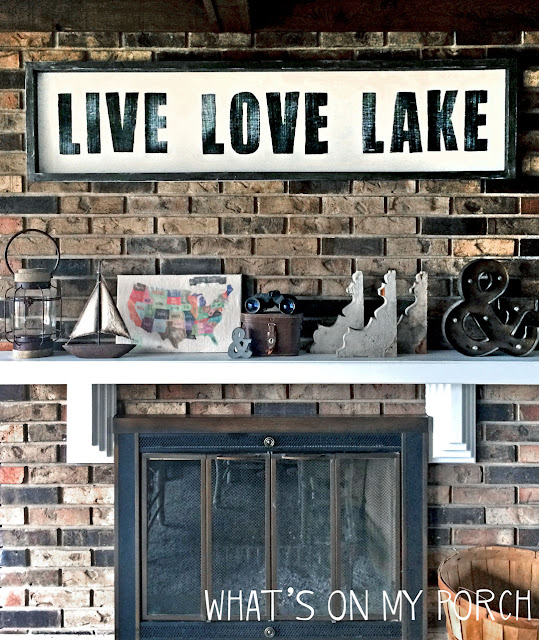
How To Make A Lake House Sign

How To Make A Lake House Sign

How To Make A Lake House Sign
Recently, Hubby and I moved to a house on a lake. It really was a dream come true. We'd always talked about what it would be like to wake up and see the sun on the water, to watch the storms roll in and whip up the waves. Of course, we never believed we could actually afford it. So, when an opportunity came up, we jumped at the chance!

Waking up to lake views is pretty amazing, but there's another element to lake life that I hadn't really thought about until we moved in... decorating! There are so many fun elements to lake house décor. It's like a blend of cabin-y woods and boats and anchors. Of course I don't want to go overboard (pardon the pun). Too much theme-y décor can start to feel cheesy. But a little sailboat here or anchor there can add just the right touch of lakehouse to my usual farmhouse style.

And that is where this sign comes in. I wanted to acknowledge our lake home without painting everything blue and putting up lake themed décor everywhere. I think it's a nice nod to lake life.


To Make This Sign You Will Need:
  • 1x1 wood boards for the frame
  • Flat wood (There are lots of options here. I used old wall paneling that we just flipped over.)
  • Screws, nails or nail gun
  • Picture hanging hardware (such as these)
  • Paint or stain for the frame (I used Rust-Oleum Carbon Gray stain)
  • Acrylic craft paint for the words
  • White latex paint or craft paint for the background
  • Paintbrushes and craft paintbrushes
  • Willow charcoal or pencil

Step 1: Assemble The Frame
Hubby assembled the wood frame. Ours is 4 ft. long to fit our fireplace, but you can make it any size you want. Cut equal top and bottom pieces. Then cut equal side pieces. Screw the side pieces onto the top and bottom pieces of the frame. Cut the flat wood panel to fit behind the frame. Make it just a bit smaller so the frame hides the edges, but so you can still attach it.
DO NOT attach the frame to the paneling yet.


Step 2: Stain the Frame
Using a workspace, stain the frame. I get the weathered wood look by lightly brushing the stain across the wood, leaving some of the wood unstained. It's extremely easy. You  might want gloves for this part. You could also use craft paint. I don't bother staining the back as no one will see it.


Step 3: Paint the Flat Wood Panel Piece
I painted the panel white with latex interior white satin paint. White craft paint would work, too. It took a few coats to completely cover the wood.

How To Make A Lake House Sign

Step 4: The Words
To add the words "Live Love Lake" to the sign, I used Photoshop. But you could probably use Microsoft Word. Just choose a font. I used "You Are Loved" font. And choose a size that makes sense for your sign and the space where it will hang. I printed off the letters a page at a time and then assembled them with tape, laying them out on my sign for a good fit.

Flip the assembled words over and use willow charcoal or a pencil to color on the back. TIP: I hold the sign up to a window so I can see the letters through the paper. Then I only color where the letter is. Once the back of each letter has been colored, flip the words back over and lay them gently on your flat white wood piece.

Tape them into place and trace each letter with a pen or pencil to transfer it to the wood sign. I re-trace the letters with pencil after they've been transferred, then use a cloth to wipe away the charcoal.

Finally, paint the letters with black acrylic paint and a small, flat artist paintbrush. When the letters are dry, I use the white background paint on a large paintbrush. Dip it lightly in the paint and then wipe it almost dry on a paper towel. Lightly pull the brush across the words. This is a "dry brush" technique that makes the words look weathered.


How To Make A Lake House Sign


Step 5: Assemble
Once it is dry, use a nail gun to attach the flat piece to the frame. Attach hanging hardware to the back of the frame, too, one on each side. And you're done!

How To Make A Ginormous Lake House Sign


Friday, December 22, 2017

Christmas at the Porch

Can you believe it's nearly Christmas? Where does the time go? I started decorating in early November. I used to wait until after Thanksgiving, but a month just isn't long enough for all the effort that goes into decorating, don't you think?

Here's a peek at Christmas at our lake house. Merry Christmas, everyone!

Christmas cubbies above my coffee bar.

Christmas coffee bar area

Christmas three-tiered tray.


Christmas three-tiered tray


Antique white and red truck with bottlebrush Christmas tree

Christmas centerpiece for the table

Our frosted Christmas tree


https://whatsonmyporch.blogspot.com/2017/12/decorate-christmas-bookshelf.html

Want MORE Christmas decorating ideas?
Check out my blog post on how to decorate Christmas bookshelves!


Sunday, May 1, 2016

Junky Toy Truck

 
So, this weekend was my birthday. Yes, thank you. :) To celebrate, Hubby took me to an event called Junk Jubilee. It's held twice each year at the Iowa State Fairgrounds in a big ole building. The place is just teeming with vendors. So much junk. So many antiques. My mind was exploding from vintage-junky-shabby overload.
 
We took daughter #2 with us and explored aisle after aisle, row upon row of everything from handmade jewelry to farmhouse finds, pristine antiques to dumpster treasure... and even some fried cheese. Which is awesome, BTW.
 
I didn't have an agenda. I wasn't looking for anything in particular, but I did manage to find a few things and get a few new ideas (stamped white feathers=LOVE).
 
My first find was a cute little metal ampersand or "and" sign. It's tiny and gray and perfect. The next find was even better... a chippy metal toy truck. I picked it up and walked around with it for a few minutes. Then set it back down. Then picked it up again to show Hubby and daughter #2.
 
Twenty-five bucks. I mean, it wasn't a bad price, but with such a cornucopia of antiques at my fingertips, surely I could find one I liked as much.... maybe for less? Right?
 
My dilemma: one year I went to Junk Jubilee and found an old rusty scale for twelve dollars. I didn't get it, and I'm still kicking myself... even though I now own two rusty antique scales. It's a hoarder thing. And a deal-finder thing.
 
So, here is this truck. All last Christmas I'm Pinning photos of little metal toy trucks with tiny Christmas trees in the back and thinking, "I'm going to DO that!" Just as soon as I get my mitts on a toy truck.
 
Now, back to Junk Jubilee. Little toy truck. Just right. But is it too much?
 
I set it down and decide to look around. If you love something let it go, right? Well, I made it two aisles before we spot a huge display of trucks. Hubby saw it first, and we both rush over for a closer look. They are all cute little metal trucks. I have my pick of any!
 
New dilemma: I don't really like the color on these. But, they're still in the running. We flip one over to check the price tag. Sixty bucks. OUCH. SIXTY. BUCKS! 
 
The rest are all similarly priced, and by that time my feet were really killing me. So, I turn a frantic face to Hubby, and he just knows. (Bless that man!)
 
"I'll get it," he says.
 
A few minutes later, he came back with a bag carrying my new (old) toy truck.
 
I regret nothing.
 
Except the cheese. :)


Friday, November 21, 2014

Christmas at What's On My Porch

Hey all! The cold. The snow. And it's only November! Still, who can resist decorating for Christmas when it's so Christmasy outside?! I think this is the earliest our family has ever had our tree up!

We splurged on a real tree this year. I thought it was a GREAT idea until I remembered it wasn't even Thanksgiving yet. And somehow we'll have to keep this thing alive for another month and half. No idea how we'll keep it watered while we're out of town for Thanksgiving. Oh, the joys of wishful thinking.

When I decorate for Christmas, I like to do it ALL in a day. I make politely implore Hubby to drag up four or five boxes of "Christmas Stuff" from the deep, dark, spidery recesses of the Underhouse. Then I sift through it all, picking out items that will go with my theme (and a few favorites that always go up, theme or not). Once everything is up (5-6 hours later). I pack up the rest and send it back to the basement. At least, that's how it's supposed to work. The boxes are still upstairs for some reason.


This year's theme was "Woodland" but my daughter said it reminded her of the North Pole. So, now it's "North Pole Woods". Browse through these pics of my house for some Christmas inspiration! Enjoy!

A basket full of lights, balls, pinecones and bows is EASY and pretty!


Hang ornaments from a chandelier with some ribbon. The matching color unifies these so they're not too gaudy.

I cup up some old faux pine garland and made it into individual wreaths for all my windows!


Mini tree=thrift store. And "JOY" letters were purchased at Walmart and painted by ME! :)

Fill a wire basket with lights, faux pine garland, and mini-books and presents wrapped in vintage sheet music! So cute!


I made these graphic stockings myself. *Except the far left stocking, my youngest daughter made hers herself! You can see more about these here.


This little bird has made his way into our Christmas tree since my teenagers were babies!


My old "junk" ladder is all done up for Christmas!

An old silver tea set, mercury glass ornaments, pine boughs from our tree, cones, and a splash of red berries make a pretty centerpiece... all fit nicely into a shabby wood tray.
 
Everything in this picture was a secondhand purchase: tree, lantern, suitcase, bunny... even the cabinet and old window in the background. I LOVE thrift stores!

This bunny piggy bank is PERFECT for our North Pole Woodland theme!