Showing posts with label free printable. Show all posts

Tuesday, August 27, 2019

Halloween Wheel Window Card Tutorial


Halloween Wheel Window Card
This super-cute Halloween Wheel Window Card has a window and a wheel with spinning words. It's cute on its own or as a cover or insert for a junk journal!
To make it you'll need a few supplies:

Supplies:
Black Cardstock
Tim Holtz Ornate Plate
Brass Fastener
Circle Punch
Awl Or Other Sharp Tool
Craft Knife
Mounting Tape
Tape, Glue, Scissors, Etc.

Printables:
Pumpkin Image (I got mine from Jento Design on Etsy)
(Pumpkin image is also available in the cover of my Cozy Autumn Journal Kit Printable)
"Seasons" Journal Words Printable from My Porch Prints
Coffee Stained Book Pages Printable from My Porch Prints


Preparing The Black Card
To begin, cut an 8.5x11 inch sheet of black cardstock in half to create two 8.5x5.5 pieces. Then cut an extra half-inch off the side & bottom of one piece. This will be your main card.


Punch Half-Circle
Punch a half-circle in the center bottom of the smaller, main card.


Bookplate Pumpkin
Next, place your book plate in the center of your pumpkin image and trace the inside, the outside corners, and the fastening holes.


Use your awl or sharp tool to punch the fastener holes.


Using a craft knife, cut out the center tracing.


Next, attach your bookplate to your pumpkin as shown.


Creating Your Wheel
Find a circle shape that is the same size or slightly smaller than your main black card. Trace it onto the larger cardstock piece (NOT the one with the half-circle punched out). Cut it out. This will become your wheel.


Find and mark the center of your circle.
One way to do this is to place the circle on a piece of paper and use a ruler to cut the paper to the same size as the circle. Then, measure each side and mark the halfway point. For instance, my paper was 4x4 inches. So, the center of each side was the 2 inch mark. I drew a line at each 2-inch mark, and where the lines intersected was the center of my paper.

I used my awl to create a hole in the center of my paper, then placed my circle on the paper, lining my circle edges with my paper edges, and flipped it over. Using a pencil, I marked through the hole I created onto my circle. You can also look up "How to find the center of a circle" if that is more helpful.


Create a hole in the center of your circle or wheel. Then align the wheel in the bottom-center of your card (where you punched the half-circle). And mark through the center hole. Use the awl to punch it out.


Creating Your Window
This part is just a little tricky. It took me some trial and error. With the wheel aligned on the center bottom of your card, place the pumpkin over the top edge of the wheel so that your wheel shows through the window. (See photo above.) You'll want to align it carefully. The wheel should show through, but the edges of the wheel should not.


Now that you have your pumpkin and wheel aligned, carefully remove the wheel by sliding it away. Do not move your pumpkin.


Use a pencil to trace inside your pumpkin bookplate onto your card.


Now, remove your pumpkin and use your craft knife to cut out where you marked with your pencil.

Back of card.
Turn your card to the back (see above photo) and use your brass fastener to attach your wheel to the back of the card. Then flip it back to the front again.

Front of card.
 Your wheel should completely cover the window you cut out as shown above.


Adding Seasonal Words
Use glue to attach your cut-out "Seasons" Journal Words to the wheel, using the cut-out hole as a guide for placing the words. (See the above photo.)


When you've glued on a word, spin the wheel until the word disappears and attach another word. Repeat until the wheel is full of words. Try to space them evenly. Note: Be sure to leave plenty of space between the words so no more than one shows up in the window at a time.


When you've finished applying your words to the wheel through the window, use a piece of tape to secure your brass fastener.


Attach Pumpkin
You might also want to secure the fasteners on your pumpkin book plate. Then glue your pumpkin to your card, lining up the window so the words show through and covering your brass fastener.

If your pumpkin isn't large enough to cover your fastener, consider using some cheesecloth or decorative tissue paper underneath your pumpkin to hide the fastener. Just don't cover your window.


Print your Coffee Stained Book Page on cardstock and fold it in half as shown.


Use strips of mounting tape to attach your completed pumpkin card to the folded "Coffee Stained Book Page" card.


Align the pumpkin card with the bottom of the folding card as shown below.


If you want, ink the edges of your card, and you're finished! Now you can use the punched out part at the bottom to move the spinning wheel and change the words in your window. See video below.
If you liked this tutorial, please share!
Thanks!
Stephanie from My Porch Prints


Monday, February 19, 2018

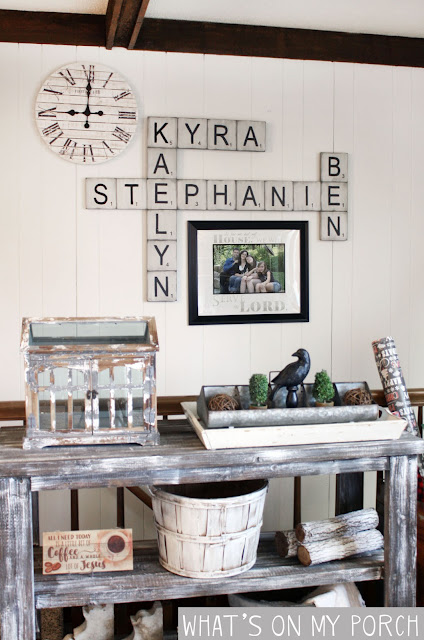
DIY Scrabble Tile Wall Decor


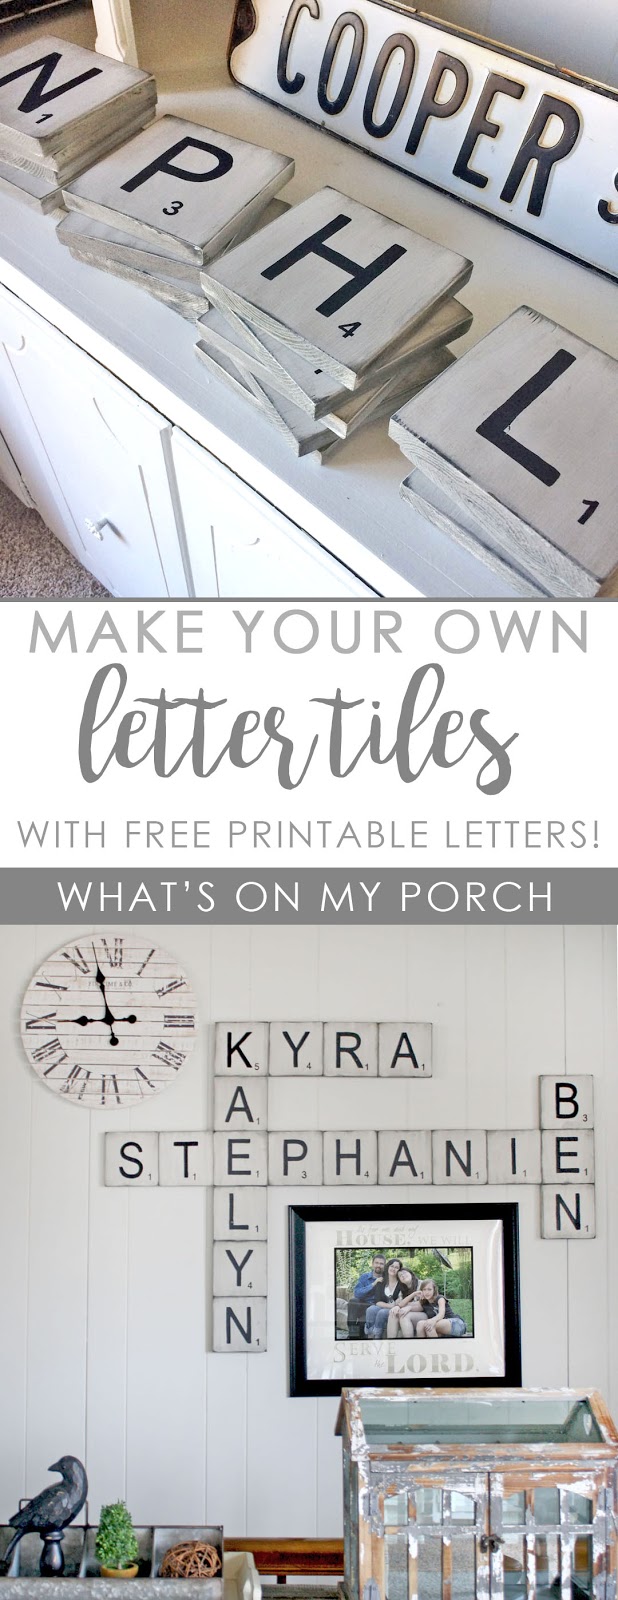
Make your own Scrabble style letter tiles for your family names

*Please note we are not professionals. Projects and products depicted in this blog are not to be taken as advice, but as inspiration only. 
ALSO NOTE: I cannot offer advice about this project. This is just to show you how I created the project for my own personal use.

How I Made My Own Over-Sized Letter Tiles Wall Decor
Hubby and I are recently empty-nesters. Well, not exactly. Our older daughter has moved into her own place in a city about 40 minutes from us. And our younger daughter is currently traveling with a missions group. She will return this summer for a month before leaving again for another year. So, basically Hubby and I are on our own.

It was really hard at first. Both our kids left within a month of each other. We went from being a family of four, to a couple again. As young parents, we'd dreamed of the day when our kids would be independent, and Hubby and I could finally have a chance to travel and "date" again. But I never realized how much a family dynamic changes when the kids grow up.


I decided I wanted to celebrate the fact that we're still a family, even if parts and pieces of us are scattered a bit. So, I'm working on a gallery wall above our basement stairs. Part of that wall is our names in over-sized Scrabble style wood letter tiles.

You've probably seen these on Pinterest. If you've thought about doing them, I say go for it! These turned out even better than I'd imagined. Here's how I did it.


Cutting My Tiles
Hubby cut the tiles from 1x6 boards. They measure 5.5 x 5.5 inches. He even sanded the edges for me. Gotta love that man! If you don't have the time or tools to do this, check out these pre-cut wood squares on Amazon.
I goofed on how many tiles we needed. I counted each letter in our names, but forgot that some of the letters would be shared (like the K in the girls' names). So I ended up with a few extra tiles.


Painting The Tiles
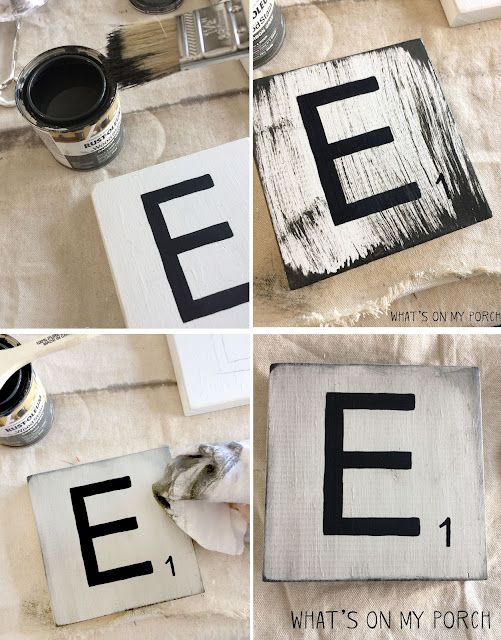
Next, I had a decision to make. I've seen these tiles in many different finishes, and I really like ALL of them. Should I leave the wood natural? Stain it dark brown? Gray? Paint it black with white letters? The possibilities! I decided to do a combination style for a distressed grayish-white look that would match my farmhouse decor. I began by painting the tiles with white SATIN latex paint--just the front and sides. The back I left plain wood.

Make your own Scrabble style letter tiles for your family names

Printing & Tracing
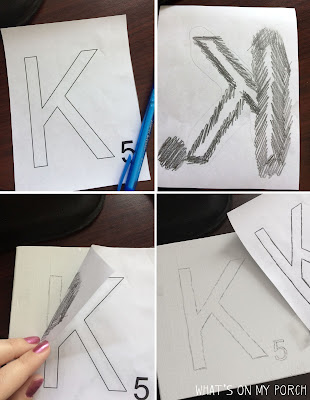
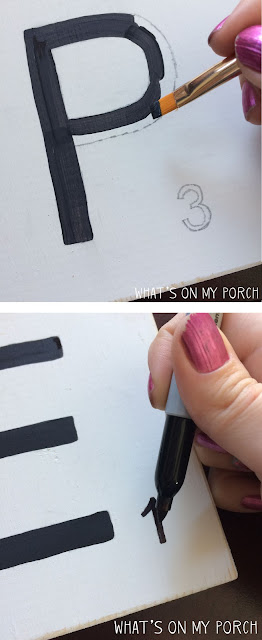
Next, I printed the letters/numbers out on paper and colored on the back with a pencil. (I'll include the printable letters at the end of this post). I then traced these onto my tiles. I filled the letters in with black craft paint. The numbers were so small, I decided to fill these in with Sharpie. The marker dries out pretty fast. Each letter/number takes two coats of paint.


Make your own Scrabble style letter tiles for your family names

Sanding The Edges
The next step was to sand the edges of each tile. I used a sanding block, but you could use an electric sander, too. I wanted just a bit of raw wood on the corners and edges for the next step, which is gray stain.

Make your own Scrabble style letter tiles for your family names

Staining Over The Paint
I used rubber gloves for this next part. I wore an apron, too. Using a brush, I applied wood stain in Carbon Gray to the sanded edges, and all around the sides of the block. With a cotton towel, I wiped the stain away and also rubbed it into the wood, spreading it lightly around for an antiqued finish.

Make your own Scrabble style letter tiles for your family names

Hanging My Tiles
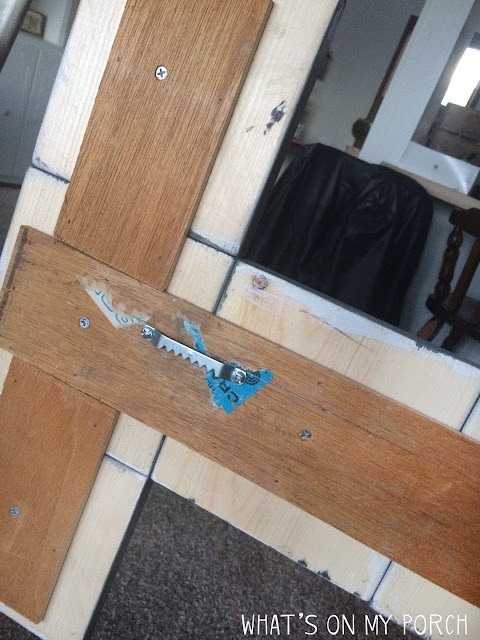
Now I had all my tiles, and they looked even better than I'd hoped! But I had a dilemma. How do people hang these on the wall? One at a time? That seems crazy! I came up with a plan to use a thin piece of wood to connect the tiles and create one giant piece of art. Hubby agreed and did all the hard work. He then attached a couple saw-tooth hangers to the back for hanging. Did I mention I love that man?

Make your own Scrabble style letter tiles for your family names

Make your own Scrabble style letter tiles for your family names

Make your own Scrabble style letter tiles for your family namesAll Done!
I did a quick layout on the floor to see where other pieces would fit with my tiles. I am planning to add a few more things, like the word "family" and maybe the letter S or number 4. But I love how it looks on the wall!

So, what about you? Think you'll give this project a try?


*Please note we are not professionals. Projects depicted in this blog are not to be taken as advice, but as inspiration only. 

Make your own Scrabble style letter tiles for your family names

Make your own Scrabble style letter tiles for your family names

Want more ideas? Check out my post on How to Transfer an Image to Wood.
To download the printable letters, click each one and right click to save the image or print it.
Please note the size. There are 4 letters on each 8.5x11 inch printable sheet. So each letter fits in a space that is approximately 5.5 x 4.25 inch.