Showing posts with label cottage. Show all posts

Sunday, March 20, 2016

Why I'll Never Make Another 3-Tiered Tray. Probably.


My Attempt at Making a Three-Tiered Tray
You've likely been to the home décor stores and seen all the cute little three-tiered trays. Some are round, some are rectangular. Some are metal, some are wood. But pretty much all of them are... expensive!

For years now, I've been under the impression that I can make/fake just about anything, and I can do it CHEAPER. So, why wouldn't this concept apply to a three-tiered tray? Right?

Wrong. So, so wrong.

When I set out to make my very own farmhouse style tray, I thought it would be very straightforward and simple. Not to mention sooooo much cheaper than the $50-$100 these things cost in stores.

The Trays
The first thing I needed was, of course, the trays. In various sizes. Three of them. First, I searched and searched the thrift stores. I knew I'd seen trays there before. Heck, I'd even bought a couple and made them over. But could I find any this time? No. Not a one. Okay, there was one, but it had ceramic tiles glued to it. Bleck.

So, on to my never-fail source for everything... the Internet! There were LOTS of trays for sale there. On Amazon, Walmart, Ebay. Of course, the new ones were EXPENSIVE. Just to buy three of them, I might as well have purchased the finished product at Hobby Lobby. I needed something CHEAPER!

So, I found a cute set of nesting trays on Ebay. They had a sunflower pattern painted inside and were green outside, but who cared! They were PERFECT. I ordered them and waited for the mail to arrive with my oh-so-awesome thrifty nesting trays.

Well, they arrived. In a very tiny box. We're talking smaller than a piece of printing paper. Hmmm. Yep, upon opening them, I realized they might work for the top and middle tiers of my stand, but definitely not the bottom one. Back to the Internet.

I found another set of nesting trays on Amazon. They were big and got good reviews. A little pricey, but hey, now I was INVESTED. I ordered the trays.


Looking for similar trays?
Take a look at these nesting trays on Amazon


The Middle Pieces
Next, I needed the middle pieces. And what could work better than wooden candlesticks? Now, I
know I'd seen these at the thrift stores at least a hundred times. But could I find any? Yes. Two, in fact.... but that was after I'd already ordered four on Amazon.


Candlesticks on Amazon

This venture was getting awfully pricey. And it was about to get worse. I talked to Hubby about my awesome plan, and told him his role... to make the whole thing stick together in a way that was sturdy and could be carried around. We bought lots of hardware stuff. Metal rods that looked like giant screws and some kind of other screw-thingy for the top and a couple nuts and bolts and what not.


Then Hubby tried to drill a hole through the first, biggest candlestick... and cracked it. We realized drilling a perfectly straight, teensy hole through the middle of three candlesticks requires special equipment that we neither had nor could afford.


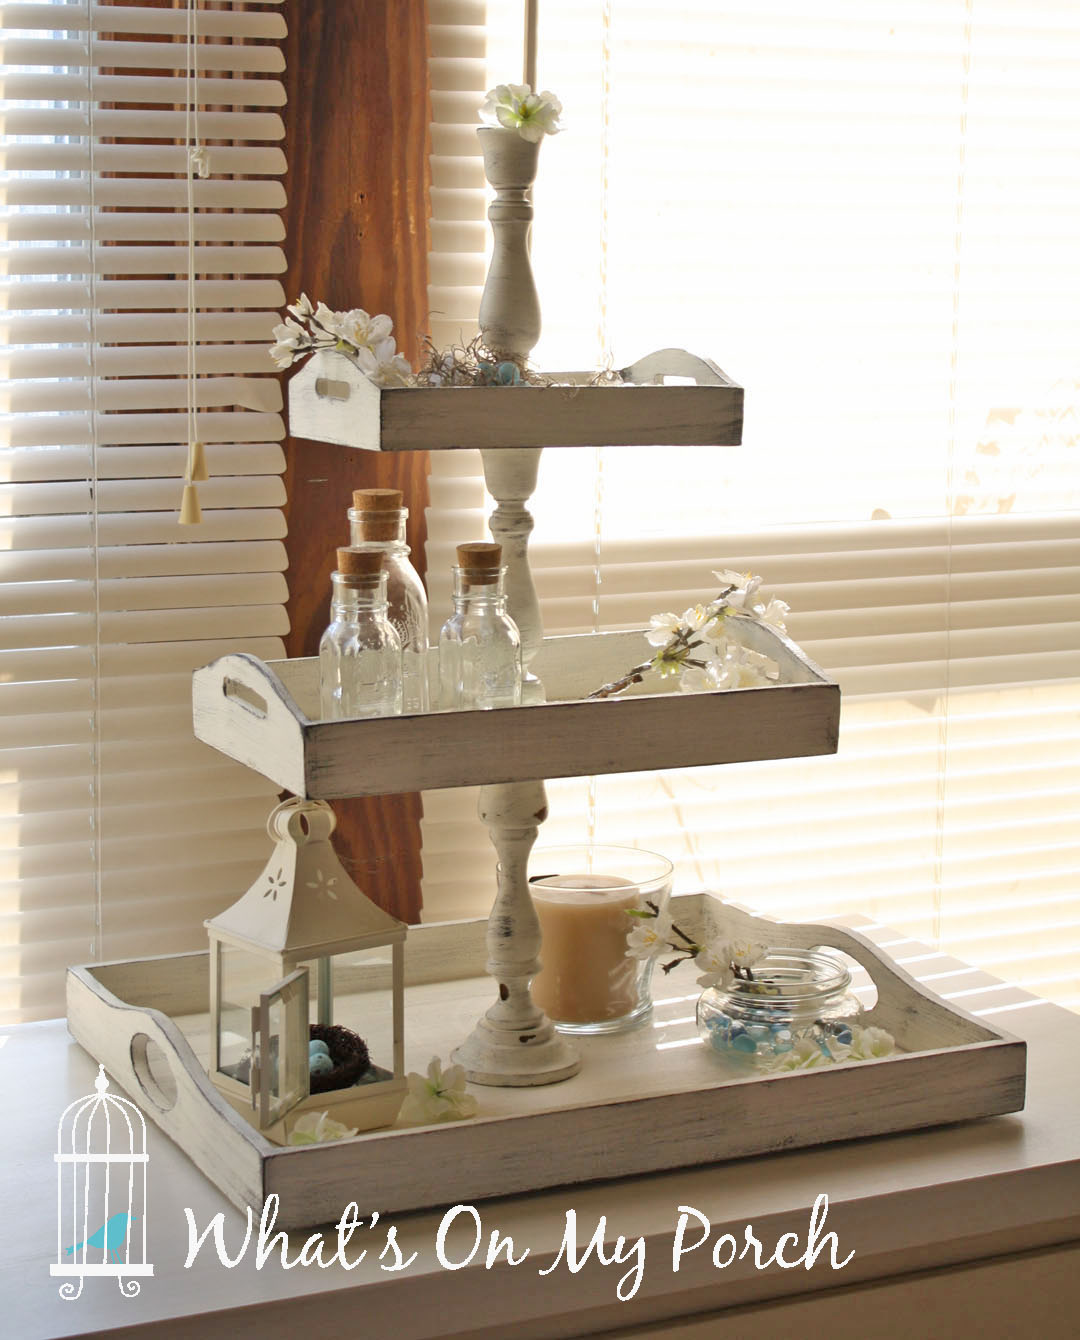
So, Hubby came up with method 2. The dowel method. He drilled out the tops and bottoms of the candlesticks and used a dowel to connect them, gluing the whole thing to the trays. See photos because I have no idea how to explain this.

As for the "pretty" bit, I just primed the trays with Zinsser primer. (Except the trays I ordered on Amazon. Those suckers were SHINY. So, I sprayed them with a thin layer of black spray paint first, hoping to add a little adhesive power, then I primed them.) And I painted them in an antique white.  I did the same to the candlesticks. I tried sanding for a distressed look, but because all the trays were different colors, textures, materials, this did not look good. So, I opted to do a dry brush technique.

 Using a dark, charcoal gray acrylic paint (just a Walmart craft paint called "Pavement") I dipped a rough paint brush, wiped it almost dry on a paper towel, then light brushed the trays, letting their texture pull small bits of paint off my brush.

Hubby assembled my trays. They are quite wobbly, but will likely hold together as long as I'm not too hard on them. I AM very happy with the result, but I would NOT do it again. Here's why.
  • This was a lot of work and did not turn out very sturdy.
  • Cost.
A breakdown of the cost:
Small sunflower trays on Ebay: $16
Amazon trays: $20
Candlesticks on Amazon: $16
Candlesticks from thrift store: $4
Dowel: $2
Pricey Hardware: Planning to return. I hope.
Paint and other stuff I had on hand already.

So, in total, this project cost almost $60. Now, granted I could make another tray. I have enough materials. But the price was enough I could have saved lots of time and headache just buying a new one that was sturdy and already assembled.

Lesson learned.

Well... maybe. :)


Read about this Farmers' Market Bench Makeover

https://whatsonmyporch.blogspot.com/2017/12/farmers-market-bench-makeover.html

Tuesday, January 14, 2014

Book Caddy Makeover

I was at a thrift store a few weeks ago when I spotted a little wooden caddy. It wasn't much to look at--dark, small, I wasn't even sure what to use it for--so I passed it up and left.

A while later, I returned to the store, and there it was again. This time, I actually picked it up, looked at it, and carried it around with me, then set it down at the last minute and left again.

Third time must be the charm. When I saw this little guy still hadn't been adopted, I took pity on him and brought him home for a makeover.

And how beautiful he turned out! I just did a quick dry-brush of some country white paint, leaving some of the dark wood to peek through. I'm still deciding if I want to add a graphic or not, but for now, I'm really glad I decided to snag this itty bitty caddy before someone else did!

Now it is a home for my books and some pretty mercury glass Christmas ornaments that I just can't bring myself to stow away yet.

Maybe next time I'm at the thrift store, I'll hesitate over a lovely wood table or pretty little chest of drawers.

Or maybe I won't. ;)


Tuesday, January 7, 2014

Basket Liner: From Grandpa's Farm

Last summer, our family went to visit my dad on his farm--something we don't get to do nearly often enough. It's always enjoyable with the views of surrounding trees and fields, walks down to the bridge over Indian Creek, Maggie--the border collie--chasing after us, looking for a good head-scratch and best of all, Grandpa Dave telling his stories.


During our visit, I decided to brave the barn with all its inhabitants. I don't mean cows or pigs, I mean wasps and spiders and heaven knows what else. With my hubby's help, I managed to unearth all manner of amazing vintage farmhouse finds, including two metal baskets. They were primitive, rusty, not much to look at but bursting with potential, so I snagged them (along with several galvanized buckets, barnboards and other amazing junk).

They've been sitting in my house just waiting for a makeover, and today they finally got it! I decided what these little charmers needed to make them perfect were fabric liners. I've never sewn fabric liners before, but I figured it couldn't be that hard. Right?


Well, it wasn't, but it did take some trial-and-error. I'm not exactly a pro with the sewing machine. I usually limit myself to straight lines, like pillows. In the end, though, I managed to sew two dainty little liners that would make any blogger proud! (*Well, any blogger that isn't too worried about straight lines or the rules of sewing.)

Here's how I did it:

 
 I began with the basket, setting it onto my fabric and eye-balling the measurements.


 Next, I drew lines from the corners of each basket to show where I would need to cut the fabric. Once all four corners are cut, it makes a kind of cross shape.


 My first oops... I realized after making a small cut that I would need about 1/2 inch extra when I sewed the corners. So, I drew double lines to give me that extra little bit.


 I cut a small slit in the corner on a diagonal (where the lines meet). Then I sewed, good side to good side.


 I decided this needed a little embellishment, so I added a bow and a button and sewed a button hole, too. It's pretty primitive as far as buttonholes go. I'm sure Hubby is thankful I don't sew button up shirts. But it got the job done.


Ta-da! That's it! Perfect! Okay, not so much. Here's a little look into what went wrong and how I could improve:

  • I should probably learn math and measure all this instead of eye-balling it. But I'm lazy and bad at math.
  • Next time, I would draw my lines from the outside of the basket. I was oh-so-clever, thinking if I measured from the inside, the liner would be the perfect size. I was wrong. The liner is too small, and I can barely stretch it over the basket. But, like Cinderella's ugly stepsisters, I MADE it fit!
  • I was going to add a lace ruffle to the top, but I got lazy. I think I should have added it. Maybe I still will. But probably not.
  • Sewing the bow behind the button seemed like a good idea until I had to fish the ribbon through the button hole. It wasn't impossible but did make me a bit grouchy.

Other than those few items, I'm pretty happy with my handiwork. If you're thinking of making a basket liner, I say give it a go! If I can do it, anybody can.


Tuesday, September 10, 2013

Etsy Update: Shabby Alabaster Autumn


Here are a few more items I added to my Etsy shop this week. They all look like they match, but it wasn't planned. Completely random. I really LOVE making old items new again! And I added a touch of autumn white to get myself into the fall decorating mood. Enjoy!


Thursday, September 5, 2013

Pretty Little End Tables

Here are a few end table makeovers from earlier this year. Of course, I'm notorious for forgetting to take "before" photos, so you'll just have to use your imagination on the French table. :) Enjoy!


This table got a fresh coat of black & white paint, then I added the graphic & sealed it for durability. Pretty!
~What's On My Porch


Two ugly little end tables "before".  ~What's On My Porch

Two pretty little end tables "after". ~What's On My Porch

Love how the layers of paint and wood come through during the distressing/sanding!
~What's On My Porch

Sunday, August 25, 2013

Antique Dresser MAKEOVER

I was surfing Craigslist when I saw an ad for an amazing wooden radio cabinet. I knew I just had to have it!
I talked hubby into driving two hours with me to go get it. When we arrived at the store where it was being sold, I LOVED it and bought it. Then I started looking around and wow! There were LOTS of items in that store that I could have come home with! But I didn't. I was very restrained. I only bought a few books, some small hardware pieces and THIS!

 
You would have done the same. Trust me. The beautiful moldings, the pretty curves and character, character, character! This antique wood dresser with its dovetailed drawers and awesome hardware was mine. It had just been waiting for me to come and buy it and make it into a shabby chic masterpiece! I got to work sanding, priming, painting, sanding some more and glazing with a dark walnut stain. Here's the result. The hardest part was selling it!

This shabby chic dresser turned out beautiful! Elegant lines, pretty moldings and graceful curves. LOVE.


Yes, I painted the hardware. I used to leave it natural or replace or spray paint it on lots of my other pieces, but
then I saw someone else paint it and realized how incredibly charming it looked!