Showing posts with label chic. Show all posts

Sunday, March 20, 2016

Why I'll Never Make Another 3-Tiered Tray. Probably.


My Attempt at Making a Three-Tiered Tray
You've likely been to the home décor stores and seen all the cute little three-tiered trays. Some are round, some are rectangular. Some are metal, some are wood. But pretty much all of them are... expensive!

For years now, I've been under the impression that I can make/fake just about anything, and I can do it CHEAPER. So, why wouldn't this concept apply to a three-tiered tray? Right?

Wrong. So, so wrong.

When I set out to make my very own farmhouse style tray, I thought it would be very straightforward and simple. Not to mention sooooo much cheaper than the $50-$100 these things cost in stores.

The Trays
The first thing I needed was, of course, the trays. In various sizes. Three of them. First, I searched and searched the thrift stores. I knew I'd seen trays there before. Heck, I'd even bought a couple and made them over. But could I find any this time? No. Not a one. Okay, there was one, but it had ceramic tiles glued to it. Bleck.

So, on to my never-fail source for everything... the Internet! There were LOTS of trays for sale there. On Amazon, Walmart, Ebay. Of course, the new ones were EXPENSIVE. Just to buy three of them, I might as well have purchased the finished product at Hobby Lobby. I needed something CHEAPER!

So, I found a cute set of nesting trays on Ebay. They had a sunflower pattern painted inside and were green outside, but who cared! They were PERFECT. I ordered them and waited for the mail to arrive with my oh-so-awesome thrifty nesting trays.

Well, they arrived. In a very tiny box. We're talking smaller than a piece of printing paper. Hmmm. Yep, upon opening them, I realized they might work for the top and middle tiers of my stand, but definitely not the bottom one. Back to the Internet.

I found another set of nesting trays on Amazon. They were big and got good reviews. A little pricey, but hey, now I was INVESTED. I ordered the trays.


Looking for similar trays?
Take a look at these nesting trays on Amazon


The Middle Pieces
Next, I needed the middle pieces. And what could work better than wooden candlesticks? Now, I
know I'd seen these at the thrift stores at least a hundred times. But could I find any? Yes. Two, in fact.... but that was after I'd already ordered four on Amazon.


Candlesticks on Amazon

This venture was getting awfully pricey. And it was about to get worse. I talked to Hubby about my awesome plan, and told him his role... to make the whole thing stick together in a way that was sturdy and could be carried around. We bought lots of hardware stuff. Metal rods that looked like giant screws and some kind of other screw-thingy for the top and a couple nuts and bolts and what not.


Then Hubby tried to drill a hole through the first, biggest candlestick... and cracked it. We realized drilling a perfectly straight, teensy hole through the middle of three candlesticks requires special equipment that we neither had nor could afford.


So, Hubby came up with method 2. The dowel method. He drilled out the tops and bottoms of the candlesticks and used a dowel to connect them, gluing the whole thing to the trays. See photos because I have no idea how to explain this.

As for the "pretty" bit, I just primed the trays with Zinsser primer. (Except the trays I ordered on Amazon. Those suckers were SHINY. So, I sprayed them with a thin layer of black spray paint first, hoping to add a little adhesive power, then I primed them.) And I painted them in an antique white.  I did the same to the candlesticks. I tried sanding for a distressed look, but because all the trays were different colors, textures, materials, this did not look good. So, I opted to do a dry brush technique.

 Using a dark, charcoal gray acrylic paint (just a Walmart craft paint called "Pavement") I dipped a rough paint brush, wiped it almost dry on a paper towel, then light brushed the trays, letting their texture pull small bits of paint off my brush.

Hubby assembled my trays. They are quite wobbly, but will likely hold together as long as I'm not too hard on them. I AM very happy with the result, but I would NOT do it again. Here's why.
  • This was a lot of work and did not turn out very sturdy.
  • Cost.
A breakdown of the cost:
Small sunflower trays on Ebay: $16
Amazon trays: $20
Candlesticks on Amazon: $16
Candlesticks from thrift store: $4
Dowel: $2
Pricey Hardware: Planning to return. I hope.
Paint and other stuff I had on hand already.

So, in total, this project cost almost $60. Now, granted I could make another tray. I have enough materials. But the price was enough I could have saved lots of time and headache just buying a new one that was sturdy and already assembled.

Lesson learned.

Well... maybe. :)


Read about this Farmers' Market Bench Makeover

https://whatsonmyporch.blogspot.com/2017/12/farmers-market-bench-makeover.html

Tuesday, September 15, 2015

How to Paint Shabby Chic Florals on Furniture


Hello Porch Fans! Today's post is about how to paint pretty little shabby chic roses onto wood furniture. First of all: Disclaimer! I really had no idea how to do this, so I turned to my trusty how-to guide (AKA Google) and tried to find a "how-to" guide to painting shabby chic flowers on furniture. There's a lot of pretty stuff out there, but not a whole lot of "how-to's". That's when I decided to wing it myself and see what happened.


So, don't consider this a one-and-only-way kind of tutorial. It's more of a guide on how you could, maybe, sort of go about painting shabby chic florals.

Step 1: You need a shabby piece of furniture. This table started life as my computer desk. (Actually, it started as a bad Craigslist purchase that fell apart before we even got it into our van. Like, literally FELL APART in the guy's driveway. Hubby was NOT happy. But he fixed it. I love that man.) It was that golden color of wood that some people like, but personally is not my favorite. I shabbied it up with paint and sanding and love.

Step 1 1/2: So, as I dragged my furniture out onto my Porch (a process I am VERY familiar with). I looked around for floral inspiration and found it in full-bloom. Punny!


Step 2: Once your furniture is prepped, you can begin to paint your flowers. Ha ha! No, not really. Not even close.

You need to gather supplies:

  • Tape Measure
  • Pencil
  • Acrylic Paints in the colors you want
  • Jar of water
  • Paper Towel
  • Brushes (small and large)
  • Sanding Block
I also chose a pic from the Internet as a kind of basic idea of what I wanted. I'm not good on the fly. I need some kind of reference, even a basic one will do.
 
Step 3: You need a shape to serve as the background for your floral. I chose a circle, because it's what I had on hand, and by on hand, I mean it was a pizza pan on top of my fridge. I measured to find the center of my table, plopped my pizza pan down and traced it out.


Step 4: Next, I lightly brushed cream-colored paint in my circle and tried to fade it toward the edge to hide the pencil mark and make a kind of blurry line between the cream and the blue of the table.


After that, I penciled what I call Smilies and Frownies all around the edge of the circle. You can see them in the pic.


Step 5: I chose an earthy brown to paint over the smilies and frownies. Then I added little "leaf" shapes on the tips of my smilies and frownies. I filled in more leaves and added some curlie Qs or whatever looked right. This was a trial and error kind of process till I got the look I wanted. After I was finished with the Smiley Frownies I realized they were awfully dark, so I went over them with some watered-down cream paint, just to mute the color a little.

Step 6: This is the step where I make a big fail. I decide to try to pencil in my flowers before painting them. Not only are my freehand drawing skills spectacularly awful, but I realized after painting a few leaves that the pencil shows right through the paint. I tried to erase the pencil marks, another massive fail. They just smeared, and I scratched up my table a little. No big, I like scratched up tables, but I had to hide those pencil marks, so I painted over them with the cream paint, which brings us to...

FAIL.


Step 7: Painting your flowers!
So, since I had no pencil marks to guide me, I really had to wing this part. I wish I could give you a Happy Trees guide to painting roses, but I can't. I just started with dark pink blobs that were the centers of my roses. Then I added some light pink blobs as petals. I used water and cream paint to blend these until they started to look rose-ish. Again, I know that's not very helpful, but it's the best I got for ya. I did the same thing with leaves, making vague "fern" shapes, starting with the tip and zig-zagging once side of the leaf, then the other, adding a "stem" with a quick swipe of the brush down the center of each leaf. I added little curlie-Qs here, too, to fill in the blank spaces and round out the design.


Step 8: When I was done, it was kind of pretty, but obviously not pro. I remedied this by using watered-down cream paint to dull the extra-bright green and pink parts of the painting. When it was dry, I used a "dry brush" technique over it, which means I dipped a large paint brush (like for painting wall trim) in cream paint and dried it off on a paper towel. Then I lightly swept it across the painting, letting the texture of the table grab it.

 For the final touch, I went back and sanded here and there when all was dry. For my first attempt at floral painting, I don't think it's too shabby. ;)


Thursday, June 19, 2014

Sofa Table Makeover

I recently got my hands on this cutie-patootie sofa table! A client told me her daughter was on the lookout for just such a table, and when I saw this pretty thing, I just had to pick it up!

Unfortunately, it didn't work for my client's daughter. However, I LOVE the way it turned out. This is another one of those pieces that I would have kept for myself if only I had the space!

Alas, it was not meant to be. I had a LOT of interest in this pretty gal, and she is going home with someone else tonight. <wistful sigh> Ah well... I guess it means I get to fall in love with something new now. :)


Saturday, June 14, 2014

Shabby Breadbox Makeover

Have you ever had an epiphany? One of those ah-ha! moments? That was me a few days ago. I have been thinking long and hard about selling our house. This has led me to evaluate every room, trying to understand my design style and weeding out anything that doesn't go with that style so if/when we move, I won't take a bunch of unwanted junk with us.

I'm transitioning from a traditional style (dark woods & fabrics) to a more vintage/shabby/French Farmhouse style (shades of white and gray, worn & weathered woods). So, in my quest to weed out the uglies, I found myself in the kitchen cleaning out a corner cabinet. When I was finished, the cabinet was organized, and the counter that had once held cleaning supplies, a toaster, a blender, a mixer, a fruit basket, a bread box, and two knife blocks now had one knife block, a bread basket, and cleaning supplies. I felt SO cool.

But then I took another look. Eeek! That breadbasket is a blonde wood. I hate blonde wood. And Eeek! again! That knife block is covered in 18 years of grossness dripping down the sides. What to do? If only they were a shabby, distressed white with some cute little gray graphics on them.

Enter EPIPHANY! I can paint ginormous hutches and dining tables. Why not paint the most basic wood items in my kitchen, too?

So, I did. 

I love, love, love how they turned out. I just did a coat of Zinsser primer (no sanding! yay!). Then a coat of satin country white Walmart brand interior paint. After they were dry, I sanded here and there for a lovely distressed look. Then I found a graphic I wanted for the breadbox. (I just free-handed the graphic on the knife block.) I sized the graphic and printed it, colored on the back with willow charcoal (Walmart art supply section) and then traced it onto the breadbox using a dull pencil. Finally, I filled it in with gray paint and when it was dry, sanded the words for a shabby look.

Now my breadbox and knife block match my style. I guess they can come along to the new house. Unless my style changes again between now and the move. :)


Thursday, May 22, 2014

Shabby Scrap Cloth Garland

You can make this shabby scrap cloth garland! It's easy and fun and gorgeous. I used mine to decorate a booth for a vintage market, but I might just have to re-use it as a window valance!


First, you find some scraps of fabric. You might already have some, but if you're like me, they are fairly useless and in a knot in the bottom of the sewing drawer. So, I went to a local thrift shop and bought some inexpensive lace curtains to mix in with my scraps. Then I just cut them into strips of varying lengths.


Here it is hanging up at my sale booth!
I used a pretty white rope to string them up. My scraps are spaced out, but you could really bunch these together for a fuller look!

Don't tie them in knots. Rather, use a kind of slip knot. (I'm sure it has a name, but I don't know what it is and even if I did you probably wouldn't know what it meant.) You fold the scrap in half to make a loop, then you place it over the rope and pull the two loose ends through the loop to hook it on. Repeat about seven gazillion times and voila! A pretty shabby garland for your home... or, in my case, to try to cover up the fact that you couldn't find your regular canopy for your booth and had to substitute with a bright red sports-themed canopy.

I love the way this garland turned out, don't you? :)


Wednesday, May 7, 2014

Desk Makeover With French Wreath Graphic


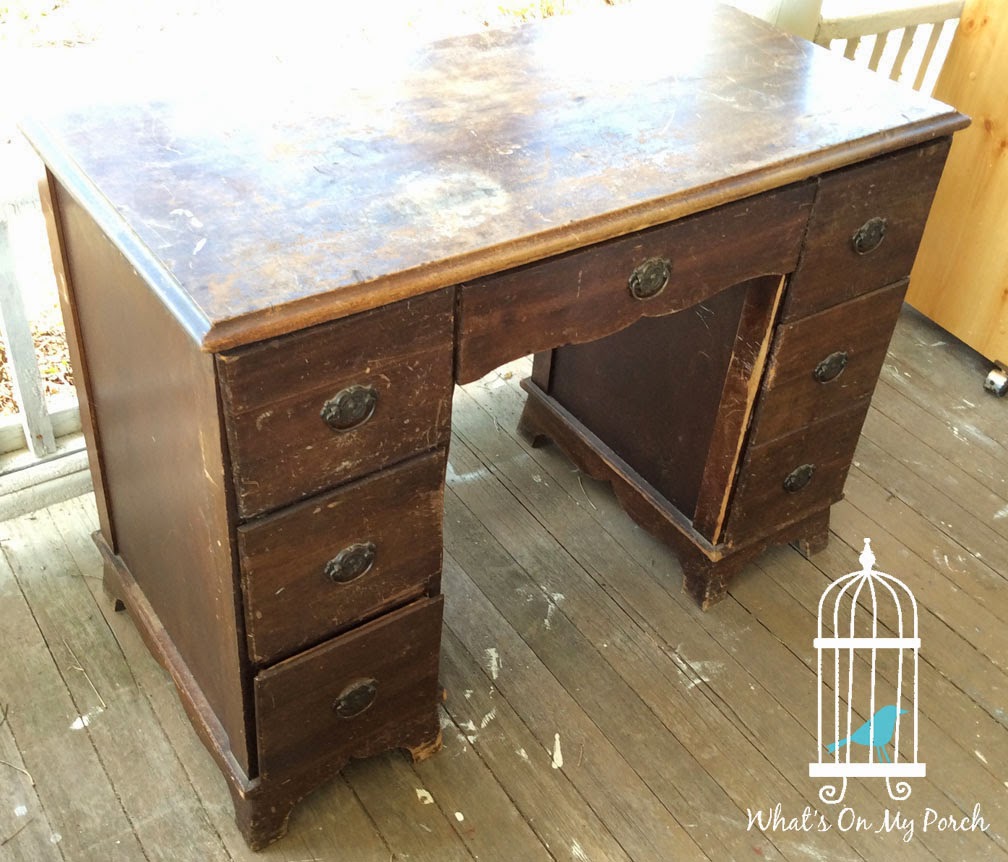
Hubby picked up this desk for me. It was a Craigslist find. I wasn't sure what exactly I was going to do with it. I only knew that it was abused and needed love. :)


I began by sanding the top down to the bare wood. It wasn't hard. The finish was practically begging to come off. I didn't sand out all the imperfections though. I like them. Next, I primed/painted the bottom portion of the desk (hardware, too!), then sanded the edges for a rough/chippy look. Finally, I stained the bottom (over the paint), wiping it away to leave behind an antique sheen.


On top, I did a white wash of watered-down latex paint. When it was dry, I also stained over that. It gives the top that driftwood look.Then I traced the graphic on and painted it. 
Thank you Graphics Fairy (see link in sidebar).

 
Here it is with the left side "distressed" so you can see the difference.

I think it turned out gorgeous. Could be used as a desk, vanity or even a TV stand! Lots of shabby-chic, cottage loveliness!