Tuesday, February 11, 2014

Transferring Images with Citra Solv


Transferring Images with Citra Solv

I know. I know. I've said it before... but I am in LOVE with transferring computer images to fabric using Citra Solv. Here is a map I transferred to a canvas drop cloth. I'll walk you through how it was done.


I used these supplies, including a canvas drop cloth that had been WASHED and dried. This ensures it will accept the ink, although as you can see, the image was still slightly blurred/faded on transfer. Since drop cloths are made to repel paint, you might have better luck using a simple cotton fabric.  
 
I also used an 11x17 cork board, removing the outer frame. You can find it here:

 
And of course, you'll need Citra Solv, available here:

 
 And now, we begin!
 
 1. First, cut your cloth and gather your supplies (pictured).
 
 
2. Next, print your picture/words or in this case map backwards. (Map available from Mr. Printables here.) Only certain types of printers work with this method. My first attempt was a fail because the printer was the wrong kind. This works best with toner or laser printers, NOT inkjet. The ink will simply not transfer.
 
 
3. Place the image upside down on your fabric and secure with tape. Make sure to do this on a work surface. Pour the Citra Solv into a glass jar or similar container and LIGHTLY dip the TIP of your paintbrush into the Citra Solv. Then lightly brush it across the back of the image. You don't want too much Citra Solv or things get messy. As you brush it, the image will appear through the paper.
 
 4. Now, working from the corner of your image, hold it in place with one hand and use the back of your spoon to transfer the image, scraping in one direction to "push" the image onto the fabric. Push relatively hard. And be meticulous, going over a spot a few times before moving on to the next. You only get one shot at this. Once you pull the paper away, it's nearly impossible to line the image up again.
 
 5. Once the image is transferred, secure the fabric to your corkboard using a staple gun. And that's it! You have a cool vintage-looking map!


You can see how to use Citra Solv and other transfer methods HERE.

Here are some other projects I've done using transfers. As you can see, the images are more crisp, depending on the type of fabric.


Tuesday, January 14, 2014

Book Caddy Makeover

I was at a thrift store a few weeks ago when I spotted a little wooden caddy. It wasn't much to look at--dark, small, I wasn't even sure what to use it for--so I passed it up and left.

A while later, I returned to the store, and there it was again. This time, I actually picked it up, looked at it, and carried it around with me, then set it down at the last minute and left again.

Third time must be the charm. When I saw this little guy still hadn't been adopted, I took pity on him and brought him home for a makeover.

And how beautiful he turned out! I just did a quick dry-brush of some country white paint, leaving some of the dark wood to peek through. I'm still deciding if I want to add a graphic or not, but for now, I'm really glad I decided to snag this itty bitty caddy before someone else did!

Now it is a home for my books and some pretty mercury glass Christmas ornaments that I just can't bring myself to stow away yet.

Maybe next time I'm at the thrift store, I'll hesitate over a lovely wood table or pretty little chest of drawers.

Or maybe I won't. ;)


Tuesday, January 7, 2014

Basket Liner: From Grandpa's Farm

Last summer, our family went to visit my dad on his farm--something we don't get to do nearly often enough. It's always enjoyable with the views of surrounding trees and fields, walks down to the bridge over Indian Creek, Maggie--the border collie--chasing after us, looking for a good head-scratch and best of all, Grandpa Dave telling his stories.


During our visit, I decided to brave the barn with all its inhabitants. I don't mean cows or pigs, I mean wasps and spiders and heaven knows what else. With my hubby's help, I managed to unearth all manner of amazing vintage farmhouse finds, including two metal baskets. They were primitive, rusty, not much to look at but bursting with potential, so I snagged them (along with several galvanized buckets, barnboards and other amazing junk).

They've been sitting in my house just waiting for a makeover, and today they finally got it! I decided what these little charmers needed to make them perfect were fabric liners. I've never sewn fabric liners before, but I figured it couldn't be that hard. Right?


Well, it wasn't, but it did take some trial-and-error. I'm not exactly a pro with the sewing machine. I usually limit myself to straight lines, like pillows. In the end, though, I managed to sew two dainty little liners that would make any blogger proud! (*Well, any blogger that isn't too worried about straight lines or the rules of sewing.)

Here's how I did it:

 
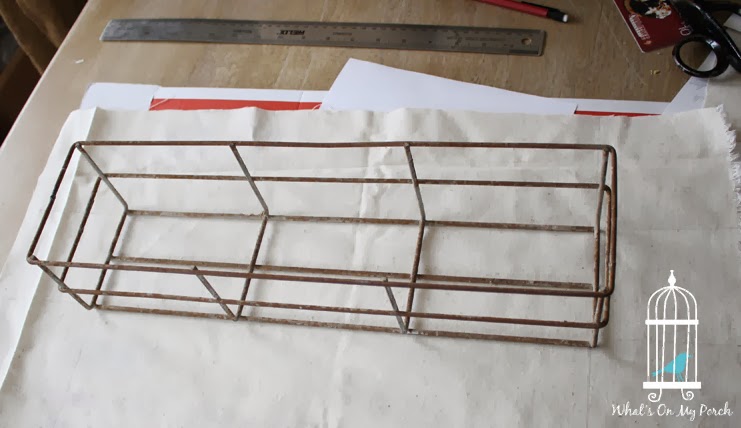
 I began with the basket, setting it onto my fabric and eye-balling the measurements.


 Next, I drew lines from the corners of each basket to show where I would need to cut the fabric. Once all four corners are cut, it makes a kind of cross shape.


 My first oops... I realized after making a small cut that I would need about 1/2 inch extra when I sewed the corners. So, I drew double lines to give me that extra little bit.


 I cut a small slit in the corner on a diagonal (where the lines meet). Then I sewed, good side to good side.


 I decided this needed a little embellishment, so I added a bow and a button and sewed a button hole, too. It's pretty primitive as far as buttonholes go. I'm sure Hubby is thankful I don't sew button up shirts. But it got the job done.


Ta-da! That's it! Perfect! Okay, not so much. Here's a little look into what went wrong and how I could improve:

  • I should probably learn math and measure all this instead of eye-balling it. But I'm lazy and bad at math.
  • Next time, I would draw my lines from the outside of the basket. I was oh-so-clever, thinking if I measured from the inside, the liner would be the perfect size. I was wrong. The liner is too small, and I can barely stretch it over the basket. But, like Cinderella's ugly stepsisters, I MADE it fit!
  • I was going to add a lace ruffle to the top, but I got lazy. I think I should have added it. Maybe I still will. But probably not.
  • Sewing the bow behind the button seemed like a good idea until I had to fish the ribbon through the button hole. It wasn't impossible but did make me a bit grouchy.

Other than those few items, I'm pretty happy with my handiwork. If you're thinking of making a basket liner, I say give it a go! If I can do it, anybody can.


Sunday, January 5, 2014

Beautiful BOOKS!

Check out these amazing vintage books for sale in my Etsy Shop! Children's, gardening and fiction... something for everyone!

Vintage Kids Books Bundle! Grimm's Fairy Tales and Let's Read Together Poems. Classic!

Great illustrations!


Ah, The Portrait of a Lady. Sadly, I've never read it, but it looks great in RED!

Rare Vick's Flower and Vegetable Garden Book is from the late 1800s
and was published by the makers of Vick's Monthly Magazine.
It has a beautiful stamped cover and is fully illustrated!
This garden book is overflowing with character and timeworn charm!

Plants are listed alphabetically.

The illustrations in Vick's Garden book are STUNNING!

Friday, January 3, 2014

Beautiful Junk

Well, the holidays are over, and it's back to work! I found a few tiny treasures over the break, not to mention a couple larger items. (Don't ask me how I will make them over with negative temperatures and a Porch full of snow. I have no idea.)

Here are some of the items I found! They are listed on my Etsy Shop. Enjoy!

I collect oversized paintbrushes, and I was VERY tempted to keep this one for myself. Unfortunately, the red/yellow color scheme clashes with my dining room, but I know SOMEONE out there is looking for this.

What little girl doesn't want a pair of soft, white gloves for her teddy bear tea?

Another find I was tempted to keep for myself: metal cups! Aren't they adorable?

I can see this trowel repurposed as a coat hanger or something even more amazing.
With this much beautiful rusty patina and charm, it can't possibly just be a trowel.


Okay, I've said it before. I want this for myself. The trouble with being a junker is learning to
LET GO. Otherwise, one's house becomes VERY crowded. Still, this adorable basket is hard to part with.

There are no words to describe the awesomeness of this spool.


Originally I was calling this a "pastry squirter." I have since learned the proper term is "pastry press."
Whatever you call it, I just call it awesome. It is functional and also artistic!
I have one of my own that I use as a steampunk accessory (think ray gun).


Tuesday, November 19, 2013

Faux Rusty Mailbox

Took an old Salvation Army store mailbox and gave it a faux rust treatment! LoVe How it turned out! I just used a sponge brush to paint on a few coats of matte brown acrylic paint, pulling at it so the paint had that raised, textured look (as in, don't brush it on). Then I sponged on some raw sienna (orangey color), and a little bit of gray. Played with it till I got the look I wanted. LOVE the vintage look!