Showing posts with label tray. Show all posts

Saturday, February 17, 2018

How to Make Your Own Coffee Bar

How To Make a Coffee Bar of Your Very Own

How to Make Your Own Coffee Bar
Coffee. We all need it. But those bulky brewers take up so much counter space! Not to mention all the accessories: cups, coffee, sugar, creamer, munchables... and don't get me started on tea, coffee's weaker-yet-just-as-necessary cousin. So, how do you get that junk off your counter and still have a cute, delicious place to store it all? A coffee bar, of course! They are all the rage these days, and why not? If you're not into coffee, try a tea station, snack station or cocoa bar! It's all good!
Here's a peek at my coffee station and some ideas for building one of your own.

My coffee station was born out of necessity. Our kitchen is teensy weensy and counter space is like prime seaside real estate. It doesn't come cheap. There was no way our coffee pot was going to fit on the counter with things like a microwave and dish drainer fighting for space. The solution was to make a coffee bar.

How To Make a Coffee Bar of Your Very Own

Start With Furniture That Fits Your Space
First, you'll need a space for your coffee bar. Some place with an outlet and a nearby water source. Mine is in an odd little nook just off our kitchen, probably meant as a small dining area. I already had the table (a Craigslist find). And I even had the bonus drop-leaf table from a thrift store. Your needs may be different. Either way, any piece of used furniture will probably do the trick. Think antique dressers, vanities, desks. Start with a substantial piece of furniture and build your bar around it!


Next? Accessorize!
What kinds of things would make your coffee bar work better? I use a wooden crate as a kind of shelf. Inside is a space for coffee storage, including a penny candy jar. Above is a three-tiered tray for holding k-kups,  jars for tea with cute little chalk labels, and Hubby's favorite sweet sesame snacks. But you could just as easily add a plate rack or cup rack depending on your needs. Beneath the coffee maker is a tray to catch spills.

How To Make a Coffee Bar of Your Very Own

Beneath, an old crate and apple basket complete the look.


How To Make a Coffee Bar of Your Very Own


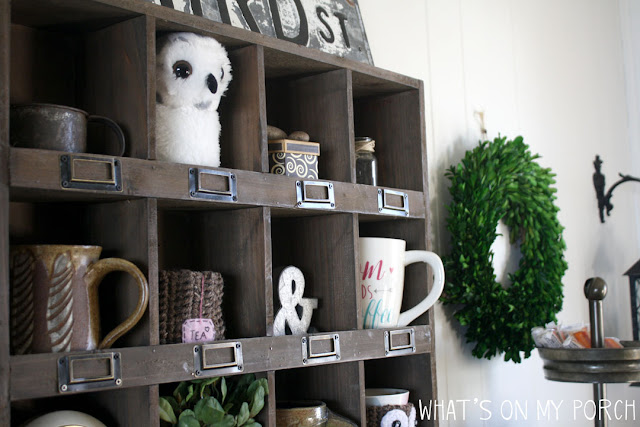
I also have a wood cubby shelf for holding coffee cups and other decorative knick-knacks. I got mine at Hobby Lobby. You can also find a similar one on Amazon here. A baby snowy owl, small ampersand and owl mug cozy peek out from their cubbies. A lantern and boxwood wreath add a decorative touch.  You could also add a chalkboard or sign. Get creative.

How To Make a Coffee Bar of Your Very Own


What are your favorite accessories for a coffee, tea or cocoa bar?

How To Make a Coffee Bar of Your Very Own

Sunday, March 20, 2016

Why I'll Never Make Another 3-Tiered Tray. Probably.


My Attempt at Making a Three-Tiered Tray
You've likely been to the home décor stores and seen all the cute little three-tiered trays. Some are round, some are rectangular. Some are metal, some are wood. But pretty much all of them are... expensive!

For years now, I've been under the impression that I can make/fake just about anything, and I can do it CHEAPER. So, why wouldn't this concept apply to a three-tiered tray? Right?

Wrong. So, so wrong.

When I set out to make my very own farmhouse style tray, I thought it would be very straightforward and simple. Not to mention sooooo much cheaper than the $50-$100 these things cost in stores.

The Trays
The first thing I needed was, of course, the trays. In various sizes. Three of them. First, I searched and searched the thrift stores. I knew I'd seen trays there before. Heck, I'd even bought a couple and made them over. But could I find any this time? No. Not a one. Okay, there was one, but it had ceramic tiles glued to it. Bleck.

So, on to my never-fail source for everything... the Internet! There were LOTS of trays for sale there. On Amazon, Walmart, Ebay. Of course, the new ones were EXPENSIVE. Just to buy three of them, I might as well have purchased the finished product at Hobby Lobby. I needed something CHEAPER!

So, I found a cute set of nesting trays on Ebay. They had a sunflower pattern painted inside and were green outside, but who cared! They were PERFECT. I ordered them and waited for the mail to arrive with my oh-so-awesome thrifty nesting trays.

Well, they arrived. In a very tiny box. We're talking smaller than a piece of printing paper. Hmmm. Yep, upon opening them, I realized they might work for the top and middle tiers of my stand, but definitely not the bottom one. Back to the Internet.

I found another set of nesting trays on Amazon. They were big and got good reviews. A little pricey, but hey, now I was INVESTED. I ordered the trays.


Looking for similar trays?
Take a look at these nesting trays on Amazon


The Middle Pieces
Next, I needed the middle pieces. And what could work better than wooden candlesticks? Now, I
know I'd seen these at the thrift stores at least a hundred times. But could I find any? Yes. Two, in fact.... but that was after I'd already ordered four on Amazon.


Candlesticks on Amazon

This venture was getting awfully pricey. And it was about to get worse. I talked to Hubby about my awesome plan, and told him his role... to make the whole thing stick together in a way that was sturdy and could be carried around. We bought lots of hardware stuff. Metal rods that looked like giant screws and some kind of other screw-thingy for the top and a couple nuts and bolts and what not.


Then Hubby tried to drill a hole through the first, biggest candlestick... and cracked it. We realized drilling a perfectly straight, teensy hole through the middle of three candlesticks requires special equipment that we neither had nor could afford.


So, Hubby came up with method 2. The dowel method. He drilled out the tops and bottoms of the candlesticks and used a dowel to connect them, gluing the whole thing to the trays. See photos because I have no idea how to explain this.

As for the "pretty" bit, I just primed the trays with Zinsser primer. (Except the trays I ordered on Amazon. Those suckers were SHINY. So, I sprayed them with a thin layer of black spray paint first, hoping to add a little adhesive power, then I primed them.) And I painted them in an antique white.  I did the same to the candlesticks. I tried sanding for a distressed look, but because all the trays were different colors, textures, materials, this did not look good. So, I opted to do a dry brush technique.

 Using a dark, charcoal gray acrylic paint (just a Walmart craft paint called "Pavement") I dipped a rough paint brush, wiped it almost dry on a paper towel, then light brushed the trays, letting their texture pull small bits of paint off my brush.

Hubby assembled my trays. They are quite wobbly, but will likely hold together as long as I'm not too hard on them. I AM very happy with the result, but I would NOT do it again. Here's why.
  • This was a lot of work and did not turn out very sturdy.
  • Cost.
A breakdown of the cost:
Small sunflower trays on Ebay: $16
Amazon trays: $20
Candlesticks on Amazon: $16
Candlesticks from thrift store: $4
Dowel: $2
Pricey Hardware: Planning to return. I hope.
Paint and other stuff I had on hand already.

So, in total, this project cost almost $60. Now, granted I could make another tray. I have enough materials. But the price was enough I could have saved lots of time and headache just buying a new one that was sturdy and already assembled.

Lesson learned.

Well... maybe. :)


Read about this Farmers' Market Bench Makeover

https://whatsonmyporch.blogspot.com/2017/12/farmers-market-bench-makeover.html

Thursday, March 13, 2014

Make This Hotel Key Sign


Make This Hotel Key Sign
I get a little stir crazy in the wintertime. I miss working on my porch: scraping, sanding, painting. But while Old Man Winter hangs on in these last few days, I can still do a few smaller, indoor projects. Here is one I've been working on.

I freely admit I totally stole this idea from one I saw on Etsy/Pinterest. I just fell in love with the vintage look and the many, many hooks for hanging necklaces, bracelets, keys, scarves.


Of course, I had to give it my own unique touch. In this case, I added a hotel sign to the top of the board and a few tags for the little metal tag-plates.

The board itself was made from reclaimed pallet wood (thanks to the amazing HUBBY!). He cut the pallet wood and assembled it. Next, I lightly painted it a creamy latex white, leaving the wood grain to show through. Then I went over it with some watered down black acrylic paint for an old, gray tint.

I added the hooks and labels, pretty much eye-balling it (I'm not great with measuring/numbers/simple math.) But I did attempt to space it out evenly using my handy-dandy fabric tape measure. Hey, if I'm a little off... it just adds to the charm, right? :) I painted lightly over the hardware, letting some of the black show through for a chippy look.

The black tag plates/label/card holders were from Amazon. The hooks were from Walmart hardware section.

The brown tags were made from gluing brown mailing paper to cardstock. Then I wrote out some French words (Google
translator) and numbers, as in room numbers.

Tim Holtz idea-ology makes these cute little ceramic style number plaquettes, which would also work great on this sign. I used one on a key.

The "Hotel Paris" at the top was inspired by a design I saw on Pinterest. I painted a very thin board black, then colored on it with a wax Easter egg crayon. Any wax will do, though, I think, even a white crayon. Next, I painted over that with white and then used a scraper to scrape the edges. The wax keeps the top coat of white from sticking, so it can be scraped away, revealing the black paint beneath, giving the sign a cool, vintage look. I printed out the words, colored the back of the paper with willow charcoal (Walmart art section) and then traced the words onto the sign and filled them in with paint. When they were dry, I hand-sanded just a bit for a worn look.

Put it all together and ta-da! I have a pretty little French-ish hotel key sign! Lovely!


Next up, see how I transformed an old wooden bench!

 
https://whatsonmyporch.blogspot.com/2017/12/farmers-market-bench-makeover.html


Wednesday, November 6, 2013

Silver Collection

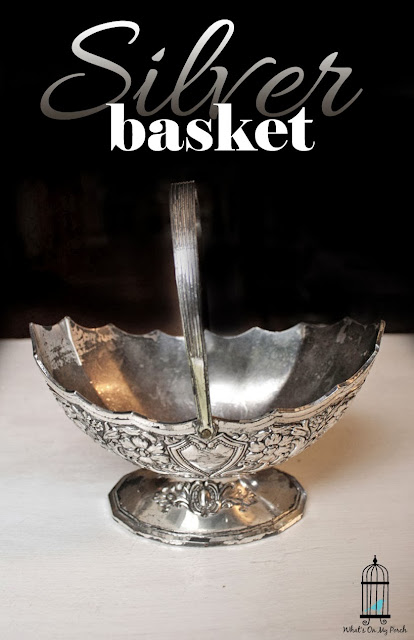
Lots of gorgeous old "silver" items up in my Etsy Shop! If you love vintage silver and timeworn patina, be sure to pop over to my Etsy shop and have a look! These would make BEAUTIFUL holiday decor for a shabby / vintage home.