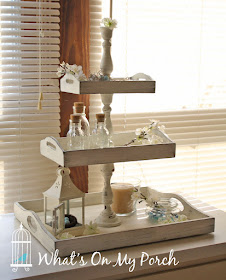
My Attempt at Making a Three-Tiered Tray
You've likely been to the home décor stores and seen all the cute little three-tiered trays. Some are round, some are rectangular. Some are metal, some are wood. But pretty much all of them are... expensive!
For years now, I've been under the impression that I can make/fake just about anything, and I can do it CHEAPER. So, why wouldn't this concept apply to a three-tiered tray? Right?
Wrong. So, so wrong.

When I set out to make my very own farmhouse style tray, I thought it would be very straightforward and simple. Not to mention sooooo much cheaper than the $50-$100 these things cost in stores.
The Trays
The first thing I needed was, of course, the trays. In various sizes. Three of them. First, I searched and searched the thrift stores. I knew I'd seen trays there before. Heck, I'd even bought a couple and made them over. But could I find any this time? No. Not a one. Okay, there was one, but it had ceramic tiles glued to it. Bleck.
 So, on to my never-fail source for everything... the Internet! There were LOTS of trays for sale there. On Amazon, Walmart, Ebay. Of course, the new ones were EXPENSIVE. Just to buy three of them, I might as well have purchased the finished product at Hobby Lobby. I needed something CHEAPER!
So, I found a cute set of nesting trays on Ebay. They had a sunflower pattern painted inside and were green outside, but who cared! They were PERFECT. I ordered them and waited for the mail to arrive with my oh-so-awesome thrifty nesting trays.
Well, they arrived. In a very tiny box. We're talking smaller than a piece of printing paper. Hmmm. Yep, upon opening them, I realized they might work for the top and middle tiers of my stand, but definitely not the bottom one. Back to the Internet.
I found another set of nesting trays on Amazon. They were big and got good reviews. A little pricey, but hey, now I was INVESTED. I ordered the trays.
Looking for similar trays?
Take a look at these nesting trays on Amazon
Take a look at these nesting trays on Amazon
The Middle Pieces
Next, I needed the middle pieces. And what could work better than wooden candlesticks? Now, I
know I'd seen these at the thrift stores at least a hundred times. But could I find any? Yes. Two, in fact.... but that was after I'd already ordered four on Amazon.
Candlesticks on Amazon
This venture was getting awfully pricey. And it was about to get worse. I talked to Hubby about my awesome plan, and told him his role... to make the whole thing stick together in a way that was sturdy and could be carried around. We bought lots of hardware stuff. Metal rods that looked like giant screws and some kind of other screw-thingy for the top and a couple nuts and bolts and what not.
So, Hubby came up with method 2. The dowel method. He drilled out the tops and bottoms of the candlesticks and used a dowel to connect them, gluing the whole thing to the trays. See photos because I have no idea how to explain this.
As for the "pretty" bit, I just primed the trays with Zinsser primer. (Except the trays I ordered on Amazon. Those suckers were SHINY. So, I sprayed them with a thin layer of black spray paint first, hoping to add a little adhesive power, then I primed them.) And I painted them in an antique white. I did the same to the candlesticks. I tried sanding for a distressed look, but because all the trays were different colors, textures, materials, this did not look good. So, I opted to do a dry brush technique.
Using a dark, charcoal gray acrylic paint (just a Walmart craft paint called "Pavement") I dipped a rough paint brush, wiped it almost dry on a paper towel, then light brushed the trays, letting their texture pull small bits of paint off my brush.
Hubby assembled my trays. They are quite wobbly, but will likely hold together as long as I'm not too hard on them. I AM very happy with the result, but I would NOT do it again. Here's why.
- This was a lot of work and did not turn out very sturdy.
- Cost.
Small sunflower trays on Ebay: $16
Amazon trays: $20
Candlesticks on Amazon: $16
Candlesticks from thrift store: $4
Dowel: $2
Pricey Hardware: Planning to return. I hope.
Paint and other stuff I had on hand already.
So, in total, this project cost almost $60. Now, granted I could make another tray. I have enough materials. But the price was enough I could have saved lots of time and headache just buying a new one that was sturdy and already assembled.
Lesson learned.
Well... maybe. :)


No comments:
Post a Comment
Note: Only a member of this blog may post a comment.