PAGES

Thursday, March 20, 2014

Clay Bird Eggs for Spring


Today is the FIRST DAY OF SPRING! Here is a quick project to celebrate.

I love the look of little bird eggs, but all the craft stores seem to have is the larger, chicken-sized eggs. I even looked online for wooden eggs. I was able to find some, but they were going to be very expensive with shipping costs. So, I decided to make my own.

Using an inexpensive sculpting clay from Walmart, I rolled it into small egg-like shapes. Of course, I'm no sculptor and most of my eggs are a little wonky. But I figure, with all the money I'm saving, close counts. I let them dry for a couple days and then painted them with acrylic in shades of pale gray-green, robins egg blue, softest yellow.

Then came the speckling. All good bird eggs are speckled. I mixed up a medium-dark gray and tried flicking it on with a brush. Then I tried painting on polka dots. Nothing looked right. Finally, I got an old toothbrush and ran my finger across it, making a huge mess, but it got the job done. They're far from perfect, but unless you get a real, up-close view, your eye will probably just skim over the imperfections.

I had a trio of birds nests from a thrift store. I stuffed these with some old moss used for making topiaries, but you could probably go outside and find a similar item from nature. Otherwise, the dollar store sells it. They also sell shredded basket filler that works well as a nest. My little ceramic birds were purchased online.

The end result is a sweet little touch of spring to display around the house and in my birdcage collection. Happy Spring!


Sunday, March 16, 2014

Altered Bottles: "And all the silly sightless people came and looked...and called it junk."

I love junk. LOVE. IT. I will gladly dumpster dive for the right treasure. No shame! Because to me, it's kind of like a rescue mission. A last chance for some poor, unloved thing. I'm a sucker for saving last-chancers. That is how I came to own several old booze bottles (quite the conversation pieces for a non-drinker).

Thankfully, I didn't have to resort to dumpster-diving for booze bottles. I found most of these pretty little things abandoned at the thrift store. It's a miracle they didn't get sent straight to the recycling station or worse, broken in the trash.

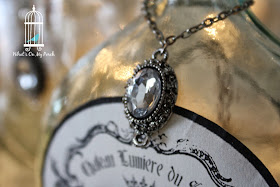
I dressed them up with some pretty baubles: lace and ribbon, gems from a craft store and faux labels! Gorgeous!

Reminds me of one of my favorite children's authors: Shel Silverstein and his poem, Hector the Collector.


HECTOR THE COLLECTOR

by Shel Silverstein
Hector the Collector
Collected bits of string,
Collected dolls with broken heads
And rusty bells that would not ring.
Pieces out of picture puzzles,
Bent-up nails and ice-cream sticks,
Twists of wires, worn-out tires,
Paper bags and broken bricks.
Old chipped vases, half shoelaces,
Gatlin' guns that wouldn't shoot,
Leaky boats that wouldn't float
And stopped-up horns that wouldn't toot.
Butter knives that had no handles,
Copper keys that fit no locks,
Rings that were too small for fingers,
Dried-up leaves and patched-up socks.
Worn-out belts that had no buckles,
'Lectric trains that had no tracks,
Airplane models, broken bottles,
Three-legged chairs and cups with cracks.
Hector the Collector
Loved these things with all his soul
Loved them more than shining diamonds,
Loved them more than glistenin' gold.
Hector called to all the people,
"Come and share my treasure trunk!"
And all the silly sightless people
Came and looked...and called it junk. 


Thursday, March 13, 2014

Make This Hotel Key Sign


Make This Hotel Key Sign
I get a little stir crazy in the wintertime. I miss working on my porch: scraping, sanding, painting. But while Old Man Winter hangs on in these last few days, I can still do a few smaller, indoor projects. Here is one I've been working on.

I freely admit I totally stole this idea from one I saw on Etsy/Pinterest. I just fell in love with the vintage look and the many, many hooks for hanging necklaces, bracelets, keys, scarves.


Of course, I had to give it my own unique touch. In this case, I added a hotel sign to the top of the board and a few tags for the little metal tag-plates.

The board itself was made from reclaimed pallet wood (thanks to the amazing HUBBY!). He cut the pallet wood and assembled it. Next, I lightly painted it a creamy latex white, leaving the wood grain to show through. Then I went over it with some watered down black acrylic paint for an old, gray tint.

I added the hooks and labels, pretty much eye-balling it (I'm not great with measuring/numbers/simple math.) But I did attempt to space it out evenly using my handy-dandy fabric tape measure. Hey, if I'm a little off... it just adds to the charm, right? :) I painted lightly over the hardware, letting some of the black show through for a chippy look.

The black tag plates/label/card holders were from Amazon. The hooks were from Walmart hardware section.

The brown tags were made from gluing brown mailing paper to cardstock. Then I wrote out some French words (Google
translator) and numbers, as in room numbers.

Tim Holtz idea-ology makes these cute little ceramic style number plaquettes, which would also work great on this sign. I used one on a key.

The "Hotel Paris" at the top was inspired by a design I saw on Pinterest. I painted a very thin board black, then colored on it with a wax Easter egg crayon. Any wax will do, though, I think, even a white crayon. Next, I painted over that with white and then used a scraper to scrape the edges. The wax keeps the top coat of white from sticking, so it can be scraped away, revealing the black paint beneath, giving the sign a cool, vintage look. I printed out the words, colored the back of the paper with willow charcoal (Walmart art section) and then traced the words onto the sign and filled them in with paint. When they were dry, I hand-sanded just a bit for a worn look.

Put it all together and ta-da! I have a pretty little French-ish hotel key sign! Lovely!


Next up, see how I transformed an old wooden bench!

 
https://whatsonmyporch.blogspot.com/2017/12/farmers-market-bench-makeover.html


Wednesday, March 12, 2014

Audrey's Garden: A Birthday Gift

There is an odd pattern to our family's busy times. It seems like late summer and post-Christmas winter are usually the quiet times, but spring and fall are both crazy-busy. This is probably because of school, activities and holidays--plus all the birthdays. 

Me, my hubby and younger daughter all have spring/early summer bdays while my older daughter, in-laws, dad and stepdad all have autumn/early winter bdays.

The spring birthdays, however, start with my mom. She's the first in early March. Every year it kind of sneaks up on me. I'm not already in birthday mode like I am once all the other birthdays roll around, plus I'm thinking about Valentine's day, then spring and hoping all the snow will melt soon and then BAM! It's my mom's birthday.

My mom is not like other moms. She's really hard to shop for. I've never seen her burn candles. She doesn't like to read. She's not a shopper, not the type who goes out to eat or watches movies. Plus she hardly ever wears jewelry or perfume. She leaves me with nothing. NOTHING.

So, like any daughter out of her reckoning, I turn to my inner creativity. The one thing my mom does seem to like is her garden. She's one of those green-thumbed people who can turn a handful of seeds into a thriving grapevine, armloads of asparagus and about three hundred tomatoes.
 
So I say to myself, "Self! Let's make mom a sign for her garden!" And I got to work. 

First, I located a lovely piece of old barnwood in my basement. Actually, Hubby dragged me down there and said, "pick one," which I did before screeching and cringing away from all the creepy crawlies that live down there and scuttling back up the stairs as fast as my feet could go.

Then I went to my trusty computer and chose a couple of fonts for the sign. I like to pair sensible, straight-lined sans-serif with the flowy curves of a script. In this case, Gill Sans and BlackJack. Then I printed it out on two sheets and cut/taped them together.

I needed to transfer it to my barnwood, so I sanded the barnwood just a little to knock off the poky, pointy edges. Next, I painted it with a country white latex house paint, filling it in towards the middle and dry-brushing the edges to let some of the wood show through. I also painted a cutie-patootie little wood applique to add to the top for a sweet, almost French, touch.

Then I colored on the back of my print-out with willow charcoal, taped the print-out to the barnwood and traced over it with a pencil. 

After transferring, I filled in the words with acrylic paint and a small brush: light gray and dark gray.

When dry, I lightly sanded the words to give them a worn, weathered look and then sealed it all with a coat of Minwax Walnut stain... simply brush the stain onto the wood (use gloves) and wipe it away with an old cloth (in my case, Hubby's old t-shirt). It will leave behind a little stain to give the sign a vintage feel and also helps to seal it.

After it was all dry, I had Hubby (what would I do without him?) add a chain for hanging. I carefully wrapped it and presented it to my mom.

"You made this?" she asked.

"Yes!" I said, brimming with pride.

"But I don't really have a garden anymore," she said.

Next year, she's getting perfume. ;)


Thursday, March 6, 2014

Birdcage Logo

So... I posted on Facebook about how I got my logo and decided to put a few more photos up here on my blog as well. 

As you may have noticed the "What's On My Porch" logo is a little blue bird in a cage. I was inspired to create this logo based on a vintage birdcage I bought a few years ago. 

To complete the look, I found a sweet little blue ceramic bird online. He's quite happy in his little cage and looks great as a logo, too, if I do say so myself. ;)